
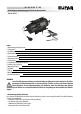
Instructions


8
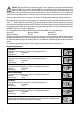
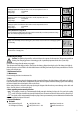
Possible charging programmes
6 Volt mode
Charging programme for 6 V batteries, 1.2 Ah to 14 Ah, temperatures above 0°C
Charge current: 2 A maximum
charge voltage: 7.2 V
6 Volt winter mode
Charging programme for 6 V batteries, 1.2 Ah to 14 Ah, temperature below 0°C
Charge current: 2 A maximum
charge voltage: 7.4 V
Motorbike mode
Charging programme for 12 V batteries from 1.2 Ah to 14 Ah, temperatures above 0°C
Charge current: 2 A maximum
charge voltage: 14.3 V
If the battery has been connected incorrectly (wrong poles) or the charger has no contact, the following error message appears
on the display „ „. If the error message „ „ is shown, a defective 6 V battery has been connected, this cannot be charged
using the battery charger. If the battery has been correctly connected, the display shows the current battery voltage and the
symbol for the set charging programme. By pressing (multiple times) the MODE button, you can select the appropriate charging
programme for your needs.
The charging programmes appear in the following order and may be selected by pressing the MODE button:
Motorbike 6 V Motorbike 6 V winter
Motorbike 12 V Motorbike 12 V winter
Car 12 V Car 12 V winter
Depending on the charging state of the battery, the device adapts the charging current in order to best charge the connected
battery. The specied maximum charging current is only used during the main charging phase. Shortly before the full charging
capacity is achieved, the device switches to a lower charging current. This ensures that the battery is gently and optimally
charged to full capacity.
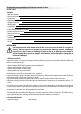
The battery symbol (7) (Figure 2: Display) shown on the display indicates the current lling level of the battery.
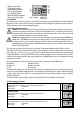
6.2 Connecting the battery charger
Caution: Make sure that the charger is not connected to the power socket. Always rst connect the red plus cable (+)
of the charger to the plus pole of the battery. Then connect the black minus cable (-) to the minus pole of the battery.
If you wish to charge the battery while it is installed, connect the black minus cable (-) to the chassis, far away from
the battery, carburettor and fuel lines. Always stick to this sequence.
Caution: After plugging the mains cable inselect the desired charging pro- gramme by operating the MODE button
multiple times. If the MODE button is not pressed, the charging process is not started. When charging has started it
is no longer possible to switch to another charging program, If you wish to work with a program other than the set
charging program, pull the plug out of the socket and wait until the display has gone dark. Then insert the plug again
and proceed as described above.
Now, connect the power plug of the charger to the mains socket. The background illumination of the display is activated.
6.1 Preparation
Clean the battery pole of dust and corrosion residue. Only for open batteries: Top up with distilled water until the minimum
lling level is reached. Leave the cells of the battery open until the end of the charging process. With maintenance-free batteries,
follow the instructions of the battery manufacturer precisely.
1. Battery voltage display
2. 6 V charging programme
3. Winter charging programme
4. 12 V charging programme
5. Car charging programme
6. Motorbike charging programme
7. Battery charge status display Figure 2: Display