cooking USAGE AND CARE GUIDE PRODUCT CODE: ECT30GX
Preface Thank you for choosing our gas cooktop. To use this appliance correctly and prevent any potential risk, read these instructions before using the appliance. Keep these instructions in a place where you can find them easily. If you are unsure of any of the information contained in these instructions, please contact our customer care centre. The manufacturer shall not be responsible for any damages to persons or property caused by incorrect installation or use of the appliance.
contents Preface Safety Warning 3 Safety Instructions 4 5 Installation 6 During Use 8 Cleaning and Service 8 Environmental Information 9 Description of the appliance Child and People Safety Instructions for use and maintenance 10 12 How to Use the appliance 13 Cleaning and Maintenance 15 16 17 18 21 22 23 Using instructions Positioning Installing the appliance Gas Connection Gas Specifition Electrical Connection Gas adjustment Trouble shooting Safety and Energy saving advice Technical
Safety Instructions Please take the time to read this Instruction Manual before installing or using the appliance. 7KLV LQVWUXFWLRQ ERRNOHW PXVW EH NHSW ZLWK WKH DSSOLDQFH IRU DQ\ IXWXUH UHIHUHQFH. If the appliance is sold or transferred to another person,ensure the booklet is passed on to the new user. 7KH PDQXIDFWXUHU GHFOLQHV DQ\ OLDELOLW\ VKRXOG WKHVH VDIHW\ PHDVXUHV QRW EH REVHUYHG TKH IROORZLQJ PDUNV DUH PDGH WR EH HDVLO\ XQGHUVWRRG VR WKDW \RX FDQ SUHYHQW DQ\ accident caused by misuse in advance, a
I Warning This appliance shall be installed in accordance with regulations in force and only used in a well ventilated space. Prior to installation,ensure that the gas and electrical supply complies with the type stated on the rating plate. 220V-240V DO NOT USE THIS APPLIANCE AS A SPACE HEATER. The gas pipe and electrical cable must be installed in such a way that they do not touch any parts or the appliance. Caution connection cord is in perfect condition.
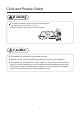
Child and People Safety Warning Do not allow children to play near or with the appliance. The appliance gets hot when it is in use. Children should be kept away until it has cooled. Caution Ŷ 7KLV DSSOLDQFH LV GHVLJQHG WR EH RSHUDWHG E\ DGXOWV Ŷ &KLOGUHQ FDQ DOVR LQMXUH WKHPVHOYHV E\ SXOOLQJ SDQV RU SRWV RII WKH DSSOLDQFH Ŷ 7KLV DSSOLDQFH LV QRW LQWHQGHG IRU XVH E\ FKLOGUHQ RU RWKHU SHUVRQV ZKRVH SK\VLFDO VHQVRU\ RU PHQWDO FDSDELOLWLHV RU ODFN RI H[SHULHQFH DQG NQRZOHGJH SUHYHQWV WKHP from using the
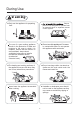
During Use Warning Burner panel is not designed to operate from an external timer or separate remote control system. Ŷ 2QO\ XVH WKH DSSOLDQFH IRU SUHSDULQJ food. The use of a gas cooking appliance results in the production of heat and moisture in the room in which it is installed. Ensure that the kitchen is well ventilated : keep natural ventilation holes open or install a mechanical ventilation device (mechanical extractor hood). Ŷ 'R QRW XVH WKLV DSSOLDQFH LI LW comes LQ contact with water.
uring se - Danger of fire: Do not store items on the cooking surface this appliance while it is in operaiton. ‘ ’ position when not in use. Caution pots or pans. the appliance surfaces of the cooking appliance. Do not use a tea towel or similar materials in place of a pot holder.Such cloths can catch fire on a hot burner. If the surface is made of glass-cracked, switch off the appliance to avoid defeat electr cution adjacent burners.
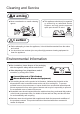
Cleaning and Service Warning Ŷ 7KLV DSSOLDQFH VKRXOG RQO\ EH repaired or serviced by an authorised Service Engineer and only genuine approved spare parts should be used. Ŷ 1HYHU XVH DEUDVLYH RU FDXVWLF cleaning agents. Caution Ŷ %HIRUH DWWHPSWLQJ WR FOHDQ WKH DSSOLDQFH LW VKRXOG EH GLVFRQQHFWHG IURP WKH PDLQV and cooled. Ŷ
D Top Plate Dimension (W*D*H) Stianless Steel 520*300*90 Ignition device Gas Connection Electric supply Continuous 220-240Vac, Ignition G1/2 thread 50Hz-60Hz, Type 2W 9 Burner Feature Rapid (1), Auxiliary (1) Nominal Gas Consumption 15.
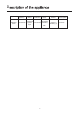
Description of the appliance Accessories Voltage regulator valve (1) Bracket (4) Sponge (4) Injector (2) Pressure joint(1) Screw (4) Auxiliary pan support (1) Instruction Manual (1) Elbow (1) How to Use the appliance 7KH IROORZLQJ V\PEROV ZLOO DSSHDU RQ WKH FRQWURO SDQHO QH[W WR HDFK FRQWURO KDQGOH Black circle: gas off Large flame: maximum setting Small flame: minimum setting The minimum setting is at the end of the anti-clockwise rotation of the control handle.
How to Use the appliance Automatic ignition with flame failure safety device The appliance is fitted with a flame failure safety device on each burner, which is designed to stop the flow of gas to the burner head in the event of the flame going out. To ignite a burner: o Press in the control knob of the burner that you wish to light and turn it anti-clockwise to the maximum position. o If you keep the control knob depressed, the automatic ignition for the burner will operate.
Safety and Energy saving advice - The diameter of the bottom of the pan should correspond to that of the burner. BURNERS Triple-Crown Rapid Semi-Rapid Auxiliary min. 200mm 200mm 160mm 120mm PANS max. 240mm 240mm 180mm 160mm Ŷ 'R QRW XVH FRRNZDUH WKDW RYHUODSV WKH HGJH of the burner. NO YES Do not use small diameter cookware on large burners. The flame should never come up the sides of the cookware.
Cleaning and Maintenance Ŷ &OHDQLQJ RSHUDWLRQV PXVW RQO\ EH FDUULHG RXW ZKHQ WKH DSSOLDQFH is completely cool. Ŷ 7KH DSSOLDQFH VKRXOG EH GLVFRQQHFWHG IURP \RXU PDLQV VXSSO\ EHIRUH FRPPHQFLQJ DQ\ FOHDQLQJ SURFHVV Ŷ &OHDQ WKH DSSOLDQFH UHJXODUO\ SUHIHUDEO\ DIWHU HDFK XVH Ŷ $EUDVLYH FOHDQHUV RU VKDUS REMHFWV ZLOO GDPDJH WKH DSSOLDQFH VXUIDFH \RX VKRXOG FOHDQ LW XVLQJ ZDWHU DQG D OLWWOH ZDVKLQJ XS OLTXLG Soft cloth Neutral Detergent Nylon Brush Metal Brush Edible Oil Acidic/Alkali Detergent Ab
Cleaning and Maintenance %851(56 Ŷ 5HPRYH WKH EXUQHU OLGV DQG )ODPH 6SUHDGHUV E\ SXOOLQJ WKHP XSZDUGV DQG DZD\ from the top plate. Ŷ 6RDN WKHP LQ KRW ZDWHU DQG D OLWWOH detergent or washing up liqui. Ŷ $IWHU FOHDQLQJ DQG ZDVKLQJ WKHP ZLSH DQG GU\ WKHP FDUHIXOO\ 0DNH VXUH WKDW WKH ÀDPH KROHV DUH FOHDQ DQG FRPSOHWHO\ GU\ Ŷ :LSH WKH ¿[HG SDUWV RI WKH EXUQHU FXS ZLWK D GDPS FORWK DQG GU\ DIWHUZDUGV Ŷ *HQWO\ ZLSH WKH LJQLWLRQ GHYLFH DQG ÀDPH VXSHUYLVLRQ GHYLFH ZLWK D ZHOO ZUXQJ RXW cloth and wipe dry
Using instructions Warnings be installed and connected in accordance with current appliance installation life hob. This appliance is not suitable for use with aftermarket lids or covers.
CLEARANCES REQUIRED WHEN FITTING WITH A COOKER HOOD 0m ook er h ood 48 0m m 400mm 60 m m 650mm 400mm mc This appliance is to be built into a kitchen unit or 600mm worktop,providing the following minium distances are allowed; o The edges of the hob must be a minimum distance of 60 mm from a side or o 650 mm between the highest point of the hob surface (including the burners) and the underside of any horizontal surface directly above it.
Installing the appliance 1. Remove the pan supports, the burner lid and flame spreader and carefully turn the appliance upside down and place it on a cushioned mat. Take care that the Ignition devices and flame supervision devices are not damaged in this operation. 2. Apply the sponge provided around the edge of the appliance. 3. Do not leave a gap in the sealing agent or overlap the thickness. Sponge The thickness of the sponge is 3 mm. The width of the sponge is 6 mm.
Gas Connection Ŷ 7KLV DSSOLDQFH PXVW EH LQVWDOOHG DQG FRQQHFWHG LQ DFFRUGDQFH ZLWK LQVWDOOD WLRQ UHJXODWLRQV LQ IRUFH LQ WKH FRXQWU\ LQ ZKLFK WKH DSSOLDQFH LV WR EH XVHG Ŷ 7KLV DSSOLDQFH LV VXSSOLHG WR UXQ RQ QDWXUDO JDV RQO\ DQG FDQQRW EH XVHG RQ DQ\ RWKHU W\SH RI JDV ZLWKRXW PRGL¿FDWLRQ &RQYHUVLRQ IRU XVH RQ /3* DQG RWKHU JDVHV PXVW RQO\ EH XQGHUWDNHQ E\ D TXDOL¿HG SHUVRQ Turn off power for safety and appliance protection. Close middle valve to prevent gas leakage.
Gas onnection Statutory requirements This installation must conform with the following: ■ Manufacturer’s Installation instructions ■ Local Gas Fitting Regulations ■ Municipal Building Codes ■ Refer to AS/NZS 5601.
Gas Connection ■ Flexible Hose: If installing with a hose assembly, it must comply with AS/NZS 1869,10mmID,class B or D,no more than 1.2 m long and installed in accordance with AS/NZS 5601.1. ■ Ensure that the hose does not contact the hot surfaces of the hotplate,oven,dishwasher or any other appliance that may be installed underneath or next to the hotplate.
Gas Specification Gas type & 11.8MJ/h Universal LP Gas 2.75kPa / Natural Gas 1.0kPa / 4.3MJ/h 0.90 21 / 0.58 / 0.
22 Hz- - Green/yellow = Earth - Blue = Neutral - Brown = Live It is necessary to allow disconnection of the appliance from the supply after installation. The disconnection can be achieved by having the plug accessible or by incorporating a switch in the fixed wiring in accordance with the wiring rules. Switch 1 Switch 2 L AC INPUT E N IGNITION If the supply cord is damaged, it must be replaced by the manufacturer, its service agent or similarly qualified persons in order to avoid a hazard.
Gas adjustment Ŷ 7DNH SUHFDXWLRQV RQ WKH RSHUDWLRQV DQG DGMXVWPHQWV WR EH FDUULHG RXW ZKHQ FRQYHUWLQJ IURP RQH JDV WR DQRWKHU Ŷ $OO ZRUN PXVW EH FDUULHG RXW E\ D TXDOL¿HG WHFKQLFLDQ Ŷ %HIRUH \RX EHJLQ WXUQ RII WKH JDV DQG HOHFWULFLW\ VXSSO\ WR WKH DSSOLDQFH 1 Change the injector of the burners. Remove the pan support, Burner lid and Flame spreader. Injector 2 Unscrew the injector using a 7mm box spanner and replace it with the stipulated injector for new gas supply.
Trouble shooting Repairs should be performed by a licensed technician only.Improper repair may result in considerable danger to you and others. Ŷ +RZHYHU VRPH PLQRU SUREOHPV FDQ EH UHVROYHG DV IROORZV Probable cause Problem Not ignited Badly ignited No Spark. Solution Check the electricity supply. The burner lid is badly assembled. Assemble the lid correctly. The gas supply is closed. Open the gas supply completely. The gas supply is not completely open. Open the gas supply completely.
WARRANTY – EURO APPLIANCES Warranty Subject to the exclusions and limitations set out below we warrant to you that if you purchase Euro Appliances from one of our authorised retailers that they will not contain defects as a result of faulty manufacturer workmanship or materials. This warranty subsists for the following periods: Euro Appliances warranty applies for a period of 36 months (3 Years) from the original date of purchase.
www.euroappliances.com.au HEAD OFFICE 65 Glynburn Road, Glyne SA 5070 Ph: 08 8165 1012 Pronto Service + Support: 1800 440 335 Email: service@eurostylegroup.com.