Instruction Book
TABLE OF CONTENTS Parts Name ......................................................................................................................................... Standard Accessories .......................................................................................................................... 1 2 Opening and Closing the Looper Cover .......... ....................................................... :........................... Opening and Closing the Sewing Table ........................
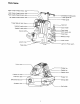
Parts Name Upper looper thread tension dial. Lower looper thread tension dial Right needle thread tension dial Left needle thread tension dial. \ Pre-tension thread guide Thread guide bar thread guide Thread take-up lever cover Needle thread guide' Spool pin Spool holder Needle thread guide Sewing Spool stand Stitch length dial Side Cover wheel ,r socket Looper cover Light and Power switch Base Lamp cover Presser foot lifter Extension Differential table feed dial Accessory box
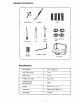
Standard Accessories Screw driver Tweezers Nets I I Lint brush Set of Needles Oil Thread stripping discs Upper knife Hexagen wrench Chip box Specifications Max. speed Up to 1300 sp.m Max. stitch length 1-4mm Stitch width 5-7ram Presser foot height Max. 6mm Differential feed (DF type only) 0.8-2.0 Needle HAxl Dimentions 292Wx295Dx290H Net weight 7.5 KGS No.
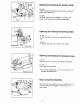
Opening and Closing the Looper Cover To open: Hold the hollow to the right as far as it will go, then pull looper cover toward you. To close: Lift looper cover and push against the machine, The looper cover snaps into the position automatically. HQIIOw Opening and Closing the Sewing Table To open: Lift the metal lever, then hold the sewing table going down. To close: Lift sewing table and push it back to the position.
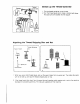
Thread Jide Stopper Stretch up the Thread Guide Bar 1. Pull the thread guide bar up to the top. 2. Turn the thread guide bar to make it comes right above the spool pins and locked into the stoppe_ Attaching the Thread Stripping Thread stripping disc SDO01holaer _S Disc and Net pool ptn ""_ When you use a small thread spool, pull out the spool holder from the spool pin. Then place the spool with its slit side up, and put the thread stripping disc on top.
Electrical outlet Connecting the Machine to the Power Supply 1. Turn off the light and power switch. 2. Connect two plugs to power socket and electrical outlet, 3. Turn on the light and power switch. -Caution- Footcontroller LightandPower Powersocket \ switch Always disconnect the plug from electrical outlet: - when machine _s not in use.
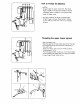
Raising or Lowering the Presser Foot 1. Apply the presser foot lifter to raise or lower the presser foot. Presser foor 2. Always keep the presser foot down when sewing. How to Change (Remove) the Presser Foot 1. Raise the presser foot lifte_ 2. Turn the balance wheel to raise the needle. Leve_FOot ]1 3. Press the lever to drop off the presser foot. 4. Raise the Presser foot lifter again to remove the presser foot. holder 5.
How to Thread the Machine @®O® -NOTED1 Always thread the upper looper first, then lower looper, needle on the right and needle on the left. Athreading chart is placed on the machine body reside the looper cove_ 2. k,,. Incorrect threading will cause of skipped stitch, broken thread or uneven thread tension. Before to sew, make sure that your machine is threaded properly. j Threading the upper looper (green) - Open the looper cover.
Threading the lower looper (red) - Open the looper cover and sewing table - Place the spool on right spool holder. - Draw the thread through the pre-tension thread guide (1) from right to left. - Thread from left to right around the thread guide (2). - Thread guides (3, 4, 5) * If machine attached with the Lower looper automatic threader, then please refer to page 12 continuously and disregard the following instruction.
Threading the needle on the right (blue) ® - Place the spool on the spool holder second from the left. - Draw the thread through the pre-tension thread guide (1) from left to right. - Thread guide (1) from left to right. - Thread from left to right around the thread guide (2).
@ Threading the needle on the left (orange) - Place the spool on left spool holder. - Drawthe thread through the pre-tension from left to right. • - Thread Thread Thread Thread thread guide (1) from left to right around the thread guide (2). guide (3) behind of the thread take-up lever cover, guide (4) - Turn the balance wheel toward you to bring needle bar at its highest position, then pass the thread through needle bar thread guide from left to right.
Securing Ends To avoid unravelling, it is necessary to leave a thread chain about 5 cm (2") long at the beginning and end of seam. To secure the beginning and end of a seam choose one of the following methods. At the beginning cD ® Separate the end of threads and knot. @ Thread the chain through a large eyed needle, and weave that chain through the overlock stitches on the fabric. © Backstitching O Before putting your fabric in the machines, sew a thread chain about 5 cm (2") long behi0d the needle.
Adjustment of Differential Feed (DF type only) How to adjust If the sewn fabric is stretched, turn the dial between the "[_" section. If the sewn fabric is gathered, turn the dial between the "L::_" section. When sewing without differential feed, the adjustment dial should be set on the "N" How to use the Lower Looper Automatic Lower looper hole Threader position. (For certain type only) Lower looper threader thread guide (5) 1. After passing the hole on lower looper thread guide (5). 2.
Thread Tension Correct Tension Thread Tension Dial wrong_ Setting mark Tighten of fabri_ "_ Upper tjiE Lower looper thread .4 I1= rJ_---_ Right side _=_. of fabric Needle thiead _'_:1'_" Loosen on the left t Thread Tension Adjusting the thread tension may be required depending on the type of fabric and thread being used.
•Fabric, needle and threadshe setting of tension dials may vary depending on the type and thickness of fabric and thread being ewn. Fabric Lightweight fabric such as organdy, crepe de chine, lawn and georgette Needle HA-1 SP No. 11 Needle thread Long fiber polyester thread No.
Th['ead Tension Adjustment (2-Needle 4-Thread) Set all four thread tension dials at "4". Then sew, and check the thread tensions, f Needle thread on the left is loose. Needle thread on the right is loose. \ Wrong side _ Needle thread ._ "ontheleft_ _ "I Upper "-'---Upper looper thread l:l_-__ NeedLe thread _1_ on the right Right side _.__ i=1_ Loower looper thread Needle thread on the right thread Right side Lower looper thread on the left Tighten needle thread tension on the left.
Overlock Sewing 1-Needle 3-Thread This machine can also sew 1-needle 3-thread overlock stitches by removing the left needle, Correct Tension ®©@ I Wrong of fabricside Upper looper thread Needle thread Lower looper thread Right side of fabric Thread tension adjustment (1-Needle 3-Thread) Set all thread thread tension dials at "4". Then sew, and check the thread tnesions. I Lower looper thread is tight and/or upper looper thread is loose. right on Needle loose.
Adjustment of Stitch Length 1. Larger the number, longer the stitch. Smaller the number, shorter the stitch. 2. The stitch length can be adjusted from 1 to 4mm (approx. 0.04" to 0.15") 3. The position "N" Counterclockwise is for rolled and narrow hemmings. Adjustment of Cutting Width The proper cutting width differs with the type of fabric. Check the seam each time, and adjust the cutting width as follows: 1. Open the sewing table. 2.
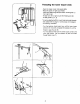
How to Change the Needle (1 "__NI ieedwll, clam p ! ® Presser foot 1. Disconnect the machine from the power supply. 2. Turn the balance wheel to raise the needle above the presser foot. Then apply the hexagon wrench (attached in the accessory box) to loose the needle clamp screw for the needle you are gotng to remove. (Figure(_)) 3. Insert new needle into the needle clamp with its flat side to the back until the top of needle touches the stopper pin, then tighten the needle clamp screw. (Figure @) 4.
Cleaning and Oiling -Cleaning the feed dog- 1. Open the sewing table and looper cover. 21 Turn the balance wheel toward you until the needle goes up to the highest position. 3. Remove the needle plate and presser foot. 4. Using a lint brush (attahed in the accessory box) to brush around the feed dog. 5. Re-set needle plate and presser foot, -Cleaning upper knife area- 1. Open the looper cover.
Trouble Shooting B_fore calling for service, check the information Problem below. Cause Correction 1. Needle inserted incorrectly 2. Used wrong needle Thread Breaks Needle Breaks Machines Stitches Skips 3. Needle is bent or blunt 4. Thread tensions are too tight 5: Wrong threading Machine will Not Sew Loose Stitches or Loops Formed -18 -18 -15 -7-10 -Reset needle -18 1. Needle inserted incorrectly 2. Needle is bent or blunt -Reset needle -18 1.
Optional accessories Blind hem stitch foot Elasticator foot Optional accessories are available from your dealer.