Another quality product from Instruction Manual Instruccion Manual Model / Modelo EURO-PRO Operating LLC: Boston, MA, 02465 4400 Bois Franc, St. Laurent, Quebec H4S 1A7 Tel.: 1 (800) 361-4639, www.euro-pro.
IMPORTANT SAFETY INSTRUCTIONS When using an electrical appliance, safety precautions should always be followed, including the following: 5. Keep fingers away from all moving parts. Special care is required around the sewing machine needle. Read all instructions before using this sewing machine. 6. Always use the proper needle plate. The wrong plate can cause the needle to break. Danger - To reduce the risk of electric shock: 7. Do not use bent needles. 1.
INSTRUCCION DE SEGURIDAD IMPORTANTE “Cuando usar una máquina eléctrica, la precaucion basica hay que slempre se seguido, incluiendo el sequito.” “Leer todas instrucción antes de usar esa máquina de coser.” “Esta máquina de coser esta diseñada por el uso casero.” 8. “Para desconectar, carrar todos dominados a la posición “0”, entonces quitar el enchufe desde la salida.” “PELIGRO” “CONSERVAR LOS INSTRUCCIONES DE LA ADVERTENCIA” “Reducir riesgo del choque eléctrico.” 1.
Congratulations: Estimado Cliente: As the owner of a new sewing machine, you will enjoy precision quality stitching on all types of fabrics, from multiple layers of denim to delicate silks. Le felicitamos muy cordialmente por su nueva máquina de coser. Your sewing machine offers the ultimate in simplicity and ease of operation.
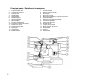
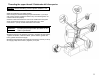
Principal parts / Detalles de la màquina 1. 2. 3. 4. 5. 6. 7. 8. 9. 10. 11. 12. 13. 14. 16. 5 Thread tension dial Thread take-up lever Presser Foot Needle plate Sewing table Bobbin stopper Stitch length dial Stitch display Reverse sewing lever Presser foot pressure (inside) Shuttle race cover Pattern selector dial Spool pins Hand wheel Bobbin winder 1. 2. 3. 4. 5. 6. 7. 8. 9. 10. 11. 12. 13. 14. 16.
Principal parts / Detalles de la màquina 15. 16. 17. 18. 19. 20. 21. 22. 23. Handle Bobbin winder Spool pin Hand wheel Power switch Main plug socket Bobbin thread guide Presser food lever Sewing foot 15. 16. 17. 18. 19. 20. 21. 22. 23.
Accessories / Accesorios Standard Accessories Bonus Feet 1. Bobbins (3) 2. Felt (2) 3. Machine oil 4. Seam ripper 5. Screw driver 6. Set of needles 7. Zigzag foot (on machine) A. buttonhole foot B. Button sewing foot C. Zipper foot D. Blind stitch foot 1 2 3 Standard Accesorios Bonus Feet 4 5 6 1. Canillas (3) 2. Fieltro (2) 3. Aceitera 4. Corta-ojales 5. Destornillador 6. Agujas 7. Pie universal A. Pie para ojales B. Pie para coser botones C. Pie para cremallera D.
Threading the upper thread / Enhebrado del hilo superior Caution: Before threading, turn the power switch to “Off”. • Raise the needle bar to its highest position. • Follow exactly the lettered threading sequence illustrated. If you skip a step or fail to properly engage the thread in any of the thread guides, the machine will not sew properly. • Continue to draw the thread down and into the needle bar thread guide. • Insert the thread though the eye of the needle from front to back.
Twin needle (not included) / Agujas gemelas (no incluso) • Turn stitch length dial to the desired stitch length. •Turn stitch selector to straight stitch. • Make sure that the two threads used to thread the twin needle are of the same weight. You can use one or two colors. • Insert the twin needle in the same way as a single needle. Flat side should face away from you. • Follow instructions for single needle threading. Thread each needle separately.
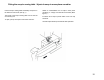
Fitting the snap-in sewing table / Ajusta la snap-in mesa plana corrediza Hold the snap-in sewing table horizontally and push it in the direction of the arrow. (See fig. 1) The inside of the snap-in sewing table can be used as an accessory box. Giarda la horizontalidad de la snap-in mesa plana corrediza y lo empuje a la dirección de la saeta. (Mirar figura 1) El interior de la snap-in puede utilizar como una caja accesoria. To open, pull up at the point of the arrow as shown.
Connecting machine to power source / Conecta la máquina al fuente eléctrico CAUTION: Always make sure that the machine is unplugged from power source and the main switch is on “Off” when the machine is not in use and before inserting or removing parts. This machine is equipped with a polarized plug which must be used with an appropriate electrical outlet. Connect the machine to a power source as illustrated below. The power switch is located above the terminal box.
Changing the bulb / Cambio de la bombilla CAUTION: Make sure to disconnect the electrical supply from the wall outlet before changing the bulb. • Open face cover in direction of arrow. (See fig. 1) • Remove bulb by unscrewing it anticlockwise. • Install a new bulb by screwing it in clockwise. • Use a screw type bulb with 15W (Max). ATENCIÓN: Desenchufar la máquina de la red eléctrical. • El interruptor de la luz se encuentra en dentro de la tapa frontal.
Two-step presser foot lever / Palanca alza-prensatelas con dos escalones When sewing several layers of thick fabric, the presser foot can be raised to a second higher level to facilitate the placement of the fabric “A”. (See fig. 1) Para coser ropas extremamente gruesas se puede ensanchar el pasaje de la ropa del pie subiendo la palanca del alza-prensatelas de un escalón “A”. (Mirar figura 1.) Fig.
Drop Feed Control / Control De Gota A. Push feed dog lever down to drop feed dog below needle plate for darning, embroidery and button sewing. B. Push feed dog lever up to raise feed dog above needle plate for normal sewing. (See fig. 1) A. Gira el control de alimento de gota a la derecha (bajar el gancho). (Mirar figura 1) Fig.
Attaching the presser foot holder / Montaje del porta-pie Attention: Turn the power switch to “off” before carrying out any of the operations below. Raise the needle to its highest position and raise the presser foot lever. Attach the presser foot holder "b" to the presser foot bar ”a”. (See fig. 1) Attaching the presser foot: Lower the presser foot bar "a" until the groove "c" is directly above the pin "d". (See fig. 2) Lower the presser foot bar "a" and the presser foot ’f' will engage automatically.
Winding the bobbin / Embobinado del hilo inferior 1. Release clutch by turning clutch knob toward you. 2. Draw thread from spool through bobbin winder tension disc from front to back as shown. 3. Pull end of thread through hole in bobbin as shown. 4. Place bobbin onto bobbin winder shaft with end of thread coming from the top of the bobbin. Push bobbin winder shaft to the right until it clicks. 5. Wind thread until winder stops. Remove bobbin and clip thread. 6. Tighten clutch knob. 1.
Inserting the bobbin / Colocación de la canilla Attention: Turn the power switch to “off” before inserting or removing the bobbin. When inserting or removing the bobbin, the needle must be raised to its highest position. (Fig. 1) • Open the hinged cover (1). • Hold the bobbin case with one hand. Insert the bobbin so that the thread runs in a clockwise direction (arrow) (2).
Changing the needle (System 130/750H) / Colocación de la aguja (sistems 130/750H) Caution: Turn power switch to “Off” before inserting or removing the needle. Replace the needle at the first sign of thread breakage or skipped stitches. Select the correct type and size of needle for the fabric to be sewn. Turn the balance wheel towards you until the needle is at its highest position. Loosen the needle clamp screw “A” and tighten again after inserting the new needle. (Fig.
Thread tension / Tensión del hilo Note: The bobbin thread tension has been adjusted at the factory and readjustment is usually not required. Lower thread tension To test the bobbin thread tension, remove the bobbin case and bobbin from the machine and hold the bobbin case suspended by the thread. Shake it once or twice. If the tension is correct, the thread will unwind by about an inch or two. If the tension is too tight, it will not unwind.
Bringing up the lower thread / Subir el hilo inferior Hold the upper thread with your left hand. Turn the handwheel towards you with your right hand until the needle goes down and comes up again to its highest position (Fig. 1). • Lightly draw up the needle thread forming a loop with the bobbin thread. The upper thread should have caught the lower thread in a loop. • Pull the needle thread toward you and the lower thread will come up from the bobbin in a large loop (Fig. 2). • Pull about 6” (15 cm.
Reverse sewing / Coser hacia atrás Reverse sewing is used for locking the end of seams and where reinforcement is needed. At the end of a seam, press down the reverse sewing lever (Fig 1) and touch the foot control lightly. Sew a few reverse stitches. (Fig. 2) Release lever and the machine will sew forward again. Al final de la costura apretar el botón de retroceso. (Fig. 1) Coser algunos puntos hacia atrás. (Fig. 2) Apenas se suelta el botón, la máquina cose de nuevo hacia adelante. Fig. 2 Fig.
Machine needle / fabric / thread Needle, Fabric, Thread Selection Guide NEEDLE SIZE FABRICS 9-11 (65-75) Lightweight fabrics - thin cottons, voile, serge, silk, muslin, Qiana, interlocks, cotton knits, tricots, jerseys, crepes, woven polyester, shirt & blouse fabrics. 12 (80) Medium weight fabrics - cotton, satin, kettlecloth, sailcloth, double knits, lightweight woolens. 14 (90) Medium weight fabrics - cotton duck, woolen, heavier knits, terrycloth, denims.
Guía de seleción de aguja / tejdo / hilo TAMAÑO DE AGUJA 9-11 (65-75) TEJIDO Tejido de peso lígero-Algodón delgado, voile, Sarga, Seda Muselina, Quiana, Traba, Tejedura de algodón, Tricot, Jersey, Crepes, Tejido poliestérico, Camisa & Tejido de blusa. 12 (80) Tejido de peso medio-Algodón, Raso, Lona, Tejedura doble, Tejido de lana de peso lígero. 14 (90) Tejido de peso medio-Algodón de dril, Tejido de lana, Tejedura más pesada, Dril de algodón.
Fabric - Thread - Needle Table / Tabla de Telas - Hilos - Agujas TELAS FABRIC HILOS THREAD AGUJAS NEEDLES La presión del pie prensatela Pressure of Presser Foot Pressure regulation La presión regulación FINAS LIGHT MEDIANAS MEDIUM NILON NYLON 80 ALGODÓN 80 COTTON TRICOT TRICOT SEDA SILK 60 ELASTICA FIBRA 60 S. FIBRE Longitud del Puntadas Length of Stiches Recto / ST.
Sewing (Pattern Selector) & Operation / Coser (Selector de Modelo) Y Tabla de Función PONTADA STITCH NO.
Sewing on buttons / Coser botones Put the Foot Pressure Regulator to position 2. (see fig. 1) Position the work under the foot. Place the button on the marked position and lower the foot. Set the pattern selector knob on and sew a few securing stitches. Select the zigzag stitch width according to the distance between the two holes of the button.
How to sew buttonholes / Coser ojales Preparation: Remove the zigzag foot and attach the buttonhole foot. Adjust the stitch length dial between 0.5-1. The density of the stitch depends on the thickness of the fabric. Note: Always test sew a buttonhole. To prepare the fabric: Measure the diameter of the button and add 0.3 cm (1/8”) for the bartacks. If you have a very thick button add more to the diameter measurement. Mark the position and length of the buttonhole on the fabric.
Zippers and piping / Colocación de cremalleras Set the pattern selector dial to straight stitch as shown in Fig. 1. Set the stitch length control between 1-4 (according to thickness of fabric). The zipper foot can be inserted to the right or left, depending on which side of the zipper you want to sew. (Fig. 2) To sew past the zipper pul, lower the needle into the fabric, raise the presser foot and push the zipper pull behind the presser foot. Lower the foot and continue to sew.
Darning / Remiendos • Turn stitch length dial to the desired length. • Turn stitch selector to straight stitch. • Position the fabric to be darned under the presser foot together with the underlaying fabric to be used. • Lower the presser foot and alternately sew forward or reverse using the lever. • Repeat this motion until the area to be darned is filled with rows of stitching. For reverse sewing instructions, see page 18. • Regular la máquina según la ilustración.
Attaching lace / Como pegar encajes • Turn stitch length dial to the desired length. • Turn stitch selector to straight stitch. • Fold in the edge of the fabric (approximately 1/4” or 6mm.) • Place the lace under the folded edge of the fabric allowing it to underlap the fabric slightly as required by the pattern of the lace. • Sew on the edge of the fabric fold. • You can add a decorative touch by using the satin stitch to sew the lace. • Regular la máquina según la ilustración.
Appliqué / Aplicación • Turn stitch length dial to the desired length. • Turn pattern selector dial to small zigzag width. • Cut out the appliqué design and baste is to the fabric. • Sew slowly around the edge of the design. • Trim excess material outside the stitching. Make sure not to cut any stitches. • Remove basting thread. • Tie top and bottom thread under the appliqué to avoid unravelling.
Monogramming and embroidering with embroidery hoop* / Monogramas borados usando el aro de bordas* Pattern Selector Selector el Modelos Fig. 1 Presser foot regulator Presion de Pie • Set the machine as illustrated in fig. 1. • Remove the presser foot and the presser foot holder. • Attache the darning plate. • Lower the presser foot lever before starting to sew. • Adjust the stitch width according to the size of lettering or design. • Regular la máquina según la ilustración. (Fig.
Monogramming and embroidering (continued) / Monogramas y bordados (continue) Monogramming • Sew, moving the hoop* slowly along the lettering. Make sure that you maintain a constant speed. • When the letter is finished, secure the threads with a few straight stitches. *Note: Embroidery hoop is not included with the machine. Embroidering • Stitch along the outline of the design by moving the embroidery hoop*. Make sure to maintain a constant speed.
3-Step zigzag / Zigzag cosido Sewing on lace and elastic, darning, mending, reinforcing edges. • Set the machine as illustrated. Pattern selector on• Place patch in position. The stitch length can be shortened to produce very close stitches. (Fig. 1) • When mending tears, it is advisable to use a piece of backing fabric to reinforce. The stitch density can be varied by adjusting the stitch length. First sew over the center and then overlap on both sides.
Overlock stitches / Puntos overlock Seams, neatening, visible hems. Turn stitch length dial to position 4. Stretch overlock position on selction dial. For fine knits, jerseys, neck, edges, ribbing. All overlock stitches are suitable for sewing and neatening edges and visible seams in one operation. When neatening, the needle should just go over the edge of the fabric. Attention: Use new needles or ball point needles or stretch needle.
Blind hem - lingerie stitch / Costura invisible - punto de lenceria For hems, curtains, trousers, skirts, etc. Blind hem/lingerie for fine fabrics. Set the machine as illustrated. (1) Stitch length dial Disco de longitud de puntada Note: It takes practice to sew blind hems. Always make a sewing test first. • Fold the fabric as illustrated with the wrong side uppermost.. (2) • Place the fabric under the foot. Turn the handwheel forwards by hand until the needle swings fully to the left.
Stitch selection / Elección del punto Stitch length dial Disco de longitud de puntada Triple straight stitch. Pattern selector see Fig. 1. For hard wearing seams. • Turn the stitch length dial to 4. See Fig. 1. • The machine sews two stitches forwards and one stitch backwards. This gives triple reinforcement. For hardwearing seams, hems and decorative seams. Punto recto triple Fig. 1. Para costuras muy resistentes. Fig. 1 • Ajustar el botón selector del largo de la puntada en la posición. See Fig. 1.
Cutting the thread / Cortar el hilo Cutting the thread: • Turn the handwheel till the needle is in its upper most highest position. • Lift the foot up. • Pull the fabric out and attach the thread around the cutter (see fig. at right). • Pull down on the thread to cut it. Sujetar los hilos las dos manos detrás de la prensatela. Hacerlos entrar en la ranura “A” de la barra prensatelas y tirar los hilos hacia abajo hasta que se corten.
Maintenance / Manutención de la máquina Caution: Always make sure that the machine is unplugged from the power source and the main switch us on “Off” (0) before inserting or removing any parts and before cleaning. Remove the stitch plate: Turn the handwheel until the needle is fully raised. Open the hinged front cover and unscrew the needle plate screw with the screw driver. (Fig. 1) Cleaning the feed dog: Remove the bobbin case and use a brush to clean the whole area. (Fig.
Trouble shooting guide PROBLEM PROBABLE CAUSE CORRECTION 1. 2. 3. 4. 5. 6. Rethread the machine. Reduce the thread tension (lower number). Select a larger needle. Remove and reinsert the needle (flat side towards the back). Remove the spool and wind thread onto spool. Replace the needle. 1. 2. 3. Remove and reinsert the bobbin case and pull on the thread. The thread should pull easily. Check both bobbin and bobbin case. Loosen lower thread tension as described. The needle is not inserted correctly.
Eliminación de averias PROBLEMA CAUSA CORRECCIÓN 1. 2. 3. 4. 5. 6. Enhebrar la máquina correctamente. Disminuir la tension del hilo superior (número menor). Usar una aguja más gruesa. Colocar lamaguja correctamente (el lado plano hacia atrás). Sacar la bobina y devanar el hilo. Cambiar la aguja. 1. Montar nuevamente el porta-canillas y tirar del hilo. Este tiene que desenrollarse fácilmente. Controlar la canilla y el porta-canillas. Corregir la tensión del hilo inferior conforme las instrucciones.
25 YEAR LIMITED WARRANTY EURO-PRO Operating LLC warrants the sewing machine head and any of its parts other than those covered by the 2-year warranty below or those subject to normal wear and tear for a period of 25 years from date of the original purchase, to be free of defective parts due to imperfections in the workmanship and materials, subject to the following conditions, exclusions and exceptions. The electrical equipment (motor, foot control, light, etc.
GARANTÍA LIMITADA DE 25 AÑOS EURO-PRO Operating LLC garantiza el cabezal de la máquina de coser y cualquiera de sus partes que no estén cubiertas por la siguiente garantía de 2 años, o aquellas sujetas al desgaste normal, por un período de 25 años desde la fecha de compra original, contra cualquier falla de materiales o fabricación, sujeto a las siguientes condiciones, exclusiones y excepciones. El equipamiento eléctrico (motor, pedal de control y luz, etc.