
Specifications

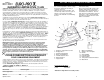

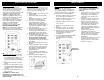
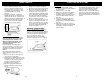


Fig. 3
5
4. Place the iron on its heel on a stable,
protected surface and allow the iron
to heat for approximately two (2)
minutes or until the temperature
settings on the right side of the LED
display panel have stopped flashing.
5. Turn the variable steam control dial
to the right to increase the amount of
steam. When using extra steam, the
iron uses more water and it may be
necessary to fill the water tank more
often. (Fig. 2)
BURST OF STEAM BUTTON
CAUTION: DO NOT aim iron at face,
towards yourself, or anyone else
while using or adjusting steam.
Burns or serious injury may occur.
The burst of steam position is useful
when ironing denim, cotton and linens.
It provides quick bursts of steam which
aid in removing stubborn wrinkles.
The burst of steam feature can be used
with Dry or Steam ironing as desired.
1. Make sure the water tank is at least
1/2 filled with water.
2. Select the desired fabric and
temperature setting. Place the iron
on its heel (on a stable, protected
surface) and allow it to heat for
approximately 2 minutes.
3. Position variable steam control to the
burst of steam position. (Fig. 3)
4. With the iron in a horizontal position,
press the steam button several times
to prime the pump.
5. Slide the variable steam control to
the right to increase the amount of
steam. (Fig. 3) When using extra
steam, the iron uses more water and
it may be necessary to fill the tank
more often. See page 4 for refilling
the iron with water.
6. Steam is produced as soon as the
iron is held in the horizontal position.
Steam will stop coming out when the
iron is put on its heel in a vertical
position or by setting the variable
steam control to “0”.
ATOMIZER SPRAY NOZZLE
The atomizer spray nozzle is useful on
fabrics with stubborn wrinkles. Press
the spray button and a jet of water will
spray onto the fabric being ironed.
(Fig. 4) The water spray can be used
with dry or steam ironing as desired.
Fig. 4
OPERATING INSTRUCTIONS
30
MODE D'EMPLOI
RANGEMENT
1. Réglez toujours la commande variable
de vapeur à « 0 » après avoir vidé le
réservoir d'eau.
2. Laissez le fer refroidir.
3. Rangez toujours le fer en position
debout afin de protéger la semelle.
4. De temps à autre, nettoyez l'extérieur
du fer à l'aide d'un chiffon humide, puis
essuyez pour sécher.
5. Si vous utilisez un empois en
vaporisateur, essuyez la semelle de
temps à autre à l'aide d'un chiffon
humide pour prévenir l'accumulation
de dépôts.
6. Si le fer n'a pas été utilisé pendant
plusieurs semaines, tenez le fer à
l'horizontale et laissez sortir la vapeur
pendant environ 2 minutes avant de
repasser.
REMARQUE: La fonction antigoutte
réduit l'écoulement de l'eau et les
taches d'eau. Elle ne prévient pas
l'écoulement de l'eau et les taches
d'eau si vous appuyez trop souvent sur
le bouton jet de vapeur ou si la
température est trop basse. La quantité
de gouttes d'eau sera réduite après
avoir rempli et vidé le réservoir du fer 2
à 3 fois en repassant à la vapeur.
Fig. 2