NL - Instructieboekje DE - Gebrauchsanweisung EN - Instruction Manual FR - Manuel d’utilisation Independ-2500 Benzineaggregaat Benzinaggregat Petrol Generator Groupe électrogène à essence
INHOUD I - Veiligheidsinformatie . . . . . . . . . . . . . . . . . . . . . . . . . 3 II - Beschrijving . . . . . . . . . . . . . . . . .. . . . . . . . . . . . . 4 III - Controle voor gebruik. . . . . . . . . . . . . . . . . . . . . . . . . 6 IV - Werking . . . . . . . . . . . . . . . . . . . . . . . . . . . . . . . 7 V - Periodiek onderhoud . . . . . . . . . . . . . . . . . . . . . . . . .9 VI - Probleemoplossing . . . . . . . . . . . . . . . . . . . . . . . . . 12 VII - Opslag . . . . . . . .
Waarschuwing! Lees voor gebruik dit instructieboekje zorgvuldig en geheel door en bewaar het boekje om later nog eens te raadplegen. I - VEILIGHEIDSINFORMATIE 1 – Uitlaatgassen zijn giftig Laat de motor nooit draaien in een afgesloten ruimte; dat kan in korte tijd bewusteloosheid en dood veroorzaken. Gebruik de motor uitsluitend buiten of in een goed geventileerde ruimte. 2 – Brandstof is uiterst brandbaar en giftig Schakel de motor altijd uit als u brandstof bijvult.
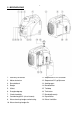
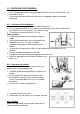
II - BESCHRIJVING 1. Economy-schakelaar 11. Stopcontact AC wisselstroom 2. Motorschakelaar 12. Stopcontact DC gelijkstroom 3. Brandstoftank 13. Aardingspunt 4. Bougie 14. Brandstoffilter 5. Uitlaat 15. Tankdop 6. Draaghandgreep 16. Trekstarter 7. Choke-hendeltje 17. Brandstofkraantje 8. Controlelampje AC (wisselstroom) 18. Dop oliefilter 9. Waarschuwingslampje overbelasting 19. Deksel luchtfilter 10.
II-1 – Olie waarschuwingssysteem Als het oliepeil tot onder het laagste niveau daalt, stopt de motor automatisch. U dient de olie bij te vullen en de motor opnieuw te starten. II-2 – Motorschakelaar De motorschakelaar regelt het ontstekingssysteem “ ON” (AAN) – het ontstekingssysteem is ingeschakeld, de motor kan worden gestart. “ STOP” (UIT) – het ontstekingssysteem is uitgeschakeld, de motor zal niet draaien.
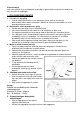
III – CONTROLE VOOR GEBRUIK Let op: - Als u het aggregaat voor de eerste keer gebruikt dient u de tank met minimaal 2 liter brandstof te vullen. - De controle voor gebruik dient elke keer dat u het aggregaat gebruikt te worden uitgevoerd III-1 – Controleer het brandstofpeil Overtuig u ervan dat er voldoende brandstof in de tank zit Als er te weinig brandstof in zit, vul dan bij met loodvrije benzine; zorg ervoor dat het filter altijd in de nek van de tank zit als u bijvult, zie afb.
IV – WERKING Let op: - het aggregaat is zonder olie vervoerd. Als u het oliereservoir niet vult zal het aggregaat niet starten. - Zorg dat het aggregaat volkomen vlak staat als u olie bijvult. Kantelen kan tot overvullen leiden en de motor beschadigen.
B – Waarschuwingslampje overbelasting Het waarschuwingslampje overbelasting gaat branden wanneer er een overbelasting van aangesloten apparatuur wordt geconstateerd, de inverter-regeling oververhit raakt of wanneer het AC-voltage stijgt. De circuit-breker treedt in werking en stopt het proces van stroomvoorziening, om het aggregaat en de aangesloten apparatuur te beschermen. Het groene AC wisselstroom controlelampje dooft en het rode waarschuwingslampje overbelasting gaat branden.
V – PERIODIEK ONDERHOUD V-1 – Onderhoudskaart Regelmatig onderhoud is de belangrijkste voorwaarde voor een goede en veilige werking. Onderdeel Bougie Motorolie Oliefilter Luchtfilter Brandstoffilter Choke Klep speling Brandstofleiding Uitlaatsysteem Carburateur Koelsysteem Startsysteem Stationair toerental Koppelingen en aansluitingen Carter ontluchting Generator Handeling Conditie controleren, opening evt.
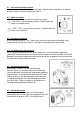
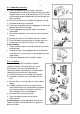
V-2 – Motorolie verversen a) Plaats het apparaat op een vlakke, horizontale ondergrond en laat de motor enkele minuten warm lopen. Stop de motor en sluit de brandstofkraan (OFF). Sluit de ventilatieknop op de tankdop door hem met de klok mee dicht te draaien. b) Draai de schroef los en verwijder het zijpaneel, zie afb.
V-4 – Reiniging en bijstelling bougie a) Draai de schroef los en verwijder het bovenpaneeltje. b) Verwijder de bougiedop en neem de bougie eruit c) Verwijder de aanslag, controleer op verkleuring (standaardkleur is bruin) en de afstand tussen de polen. Die moet tussen de 0,6 en 0,7 mm. zijn. Stel zonodig iets bij. Oogt de bougie versleten, vervang hem dan door hetzelfde type: CR4HSB (NGK). d) Breng de bougie terug op zijn plaats e) Bevestig het bovenpaneeltje weer op z’n plaats.
VI – PROBLEMEN OPLOSSEN VI-1 – De motor wil niet starten Er wordt geen brandstof naar de carburateur getransporteerd - Er zit geen brandstof in de tank – brandstof bijvullen - Wel brandstof in de tank – zet het brandstofkraantje en de ventilatieknop op “ON” - De brandstofleiding zit verstopt – maak hem schoon - De carburateur zit verstopt – maak hem schoon De motor heeft onvoldoende olie - Vul olie bij Problemen met het ontstekingssysteem, vonk niet stevig genoeg - De bougie is vuil of vochtig – m
VIII – TECHNISCHE GEGEVENS MODEL Generator Type Voltage AC Inverter 230V – 50Hz Capaciteit max. 2,5 kVA Capaciteit continu 2,2 kVA Power factor 1.0 Capaciteit DC 12V / 8,3A Model XY152F-3 Type Luchtgekoeld, 4-takt, OHV, benzinemotor Boring x slag 52,4 x 57,8 Cilinderinhoud 124,6 cc Max. vermogen 3,5kW – 5500 t.p.m.
DE INHALT: I - Sicherheitsinformationen . . . . . . . . . . . . . . . . . . . . . . 15 II - Beschreibung . . . . . . . . . . . . . . . . .. . . . . . . . . . . . 16 III - Kontrolle vor der Anwendung. . . . . . . . . . . . . . . . . . . . . 18 IV - Funktionsweise . . . . . . . . . . . . . . . . . . . . . . . . . . . . 19 V - Periodische Wartung . . . . . . . . . . . . . VI - Problemlösung . . . . . . . . . . . . . . . . . . . . . . . . . 22 . . . . . . . . …. . . . VII - Lagerung . . . . . . . .
Warnhinweis! Lesen Sie dieses Handbuch vor der Anwendung sorgfältig und vollständig durch und bewahren Sie es zum späteren Nachschlagen auf. I - SICHERHEITSINFORMATIONEN 1 – Auslassgase sind giftig Den Motor niemals in einem geschlossenen Raum betreiben; dies kann innerhalb kurzer Zeit Bewusstlosigkeit und Tod verursachen. Den Motor ausschließlich im Freien oder in gut gelüfteten Räumen betreiben.
5 – Warnungen bezüglich der Anschlüsse Das Aggregat niemals an das reguläre Stromnetz anschließen. Das Aggregat nicht parallel mit einem anderen Aggregat schalten. II - BESCHREIBUNG 1. 2. 3. 4. 5. 6. 7. 8. 9. 10. Economy-Schalter Motorschalter Kraftstofftank Zündkerze Auspuff Tragehandgriff Choke-Hebel Kontrollleuchte AC (Wechselstrom) Warnleuchte Überbelastung Warnleuchte Öl 11. 12. 13. 14. 15. 16. 17. 18. 19.
II-1 – Ölstandwarnsystem Wenn der Ölstand unter das niedrigste Niveau sinkt, schaltet der Motor automatisch aus. Sie müssen Öl nachfüllen und den Motor erneut anlassen. II-2 – Motorschalter Der Motorschalter regelt das Zündsystem. “ ON” (AN) – das Zündsystem ist eingeschaltet, der Motor kann angelassen werden. “ STOP” (AUS) – das Zündsystem ist ausgeschaltet, der Motor dreht nicht.
III - KONTROLLE VOR DER ANWENDUNG Achtung: - Wenn Sie das Aggregat zum ersten Mal benutzen, ist der Tank mit mindestens 2 Liter Kraftstoff zu füllen. - Die Kontrolle muss vor jedem Gebrauch des Aggregats durchgeführt werden. III-1 – Den Kraftstoffstand kontrollieren Vergewissern Sie sich davon, dass ausreichend Kraftstoff im Tank ist.
IV- FUNKTIONSWEISE Achtung: - Das Aggregat wurde ohne Öl transportiert. Wenn Sie das Ölreservoir nicht füllen, startet das Aggregat nicht. - Sorgen Sie dafür, dass das Aggregat beim Nachfüllen des Öls absolut flach steht. Eine leichte Neigung kann zur Überfüllung führen und den Motor beschädigen.
Warnhinweis: Vergewissern Sie sich, dass die Geräte, die angeschlossen werden sollen, ausgeschaltet sind Vergewissern Sie sich, dass die angeschlossenen Geräte das Maximum nicht überschreiten. Vergewissern Sie sich, dass die geforderte und abgegebene Spannung übereinstimmen. Der Economy-Schalter muss ausgeschaltet werden, wenn Sie elektrische Gerate verwenden, die eine hohe Spitzenlast erfordern, wie z.B. ein Kompressor oder eine Tauchpumpe.
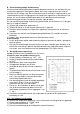
Mit einem Aräometer die Dichte der Akkuflüssigkeit messen und die Ladezeit anhand der Tabelle rechts bestimmen. Die Dichte des vollständig geladenen Akkus muss 1,26 bis 1,28 betragen. Es wird empfohlen, dies stündlich zu kontrollieren. l) Mit den Akkukabeln die Pole des Akkus an die entsprechenden Pole der DCGleichstromsteckdose des Aggregats anschließen: + an +, - an -!. m) Kontrollieren, ob alle Kabel korrekt angeschlossen sind und anschließend den Gleichstromschutz in die “ON”-Position schalten.
V – PERIODISCHE WARTUNG V-1 – Wartungskarte Regelmäßige Wartung ist die wichtigste Voraussetzung für eine richtige und sichere Funktion.
V-2 – Motoröl wechseln a) Das Gerät auf einen flachen, horizontalen Untergrund stellen und den Motor einige Minuten warm drehen lassen. Den Motor ausschalten und den Kraftstoffhahn schließen (OFF). Schließen Sie den Lüftungsknopf am Tankdeckel, indem Sie diesen im Uhrzeigersinn drehen. b) Die Schraube lösen und die Seitenplatte entfernen, siehe Abb. c) Die Kappe des Ölfilters entfernen. d) Einen Sammelbehälter unter das Aggregat stellen und dieses so kippen, dass alles Öl herausläuft.
V-4 – Reinigung und Nachstellen der Zündkerzen a) Die Schraube lösen und die obere Platte entfernen. b) Die Zündkerzenkappe entfernen und die Zündkerze herausnehmen. c) Den Belag entfernen, auf Verfärbung (Standardfarbe grün) und den Elektrodenabstand prüfen. Dieser Abstand muss zwischen 0,6 und 0,7 mm betragen. Gegebenenfalls etwas nachstellen. Mit demselben Typen auswechseln, wenn die Zündkerze verschlissen aussieht: CR4HSB (NGK). d) Die Zündkerze wieder einsetzen.
VI – PROBLEME LÖSEN VI-1 – Der Motor will nicht starten Es wird kein Kraftstoff in den Vergaser transportiert. - Es ist kein Kraftstoff im Tank - Kraftstoff nachfüllen. - Es ist Kraftstoff im Tank - den Kraftstoffhahn und den Lüftungsknopf in die „ON“Position schalten. - Die Kraftstoffleitung ist verstopft - reinigen Sie sie. - Der Vergaser ist verstopft - reinigen Sie ihn.
VIII- TECHNISCHE DATEN MODELL Generator Typ AC-Spannung Inverter 230 V – 50 Hz Leistung 2,5 kVA Dauerleistung 2,2 kVA Leistungsfaktor 1.0 DC-Leistung 12V / 8,3A Modell XY152F-3 Typ Bohrung x Hub Luftgekühlt, 4-Takt, OHV, Benzinmotor 52,4 x 57,8 Zylinderinhalt 124,6 cc Max. Leistung 3,5 kW – 5500 t.p.m.
EN CONTENTS I - Safety Information. . . . . . . . . . . . . . . . . . . . . . . . . . . . 28 II - Description. . . . . . . . . . . . . . . . . . . . . . . . . . . . . . . 29 III - Check before using. . . . . . . . . . . . . . . . . . . . . . . . . . . 31 IV - Operation . . . . . . . . . . . . . . . . . . . . . . . . . . . . . . . 32 V - Periodic maintenance . . . . . . . . . . . . VI - Problem Solving. . . . . . . . . . . . . . . . . . . . . . . . . . . 34 . . . . . . . . . . . .
Warning! Read this entire instruction booklet carefully in its entirety before using the device, and keep it to refer to when necessary. I - SAFETY INFORMATION 1 – Exhaust fumes are poisonous Never run the engine in a closed space; it could result in unconsciousness and death in a very short time. Only use the engine outside or in a well-ventilated space. 2 – Fuel is highly flammable and poisonous Always switch the engine off when filling the tank.
II - DESCRIPTION 1. Economy switch 11. AC alternating current socket 2. Engine switch 12. DC direct current socket 3. Fuel tank 13. Earth point 4. Spark plug 14. Fuel filter 5. Exhaust 15. Tank cap 6. Carry handle 16. Pull cord starter 7. Choke lever 17. Fuel cock 8. Indicator light AC (alternating current) 18. Oil filter cap 9. Overload warning light 19. Air filter cover 10.
II-1 – Oil warning system If the oil level drops below the lowest level then the engine will automatically stop. You must top up the oil and restart the engine. II-2 – Engine switch The engine switch controls the ignition system ON – the ignition system is switched on, the engine can be started. STOP – the ignition system is switched off, the engine will not run. II-3 – Economy switch If the Economy switch is switched ON then the motor speed is adjusted to the connected load.
III - INSPECTION BEFORE USE N.B.! - If using the generator for the first time the tank must have at least 2 litres of fuel. - The generator must always be inspected prior to being used III-1 – Check the fuel level Ensure that there is enough fuel in the tank If there is too little fuel then fill it with lead free petrol; ensure that the filter is always in the tank opening when filling, see fig. The content of the fuel tank is 5.1 litres.
IV - OPERATION N.B.! - the generator is transported without oil. If you fail to fill the oil reservoir the generator will not start. - Ensure that the generator is completely level when filling up with oil. Tilting could result in overfilling and damage the engine. IV-1 – Starting the engine N.B.
B - Overload warning light The overload warning light will light up if, an overload caused by the attached equipment is detected, the inverter control overheats, or the AC voltage rises. The circuit breaker will then kick in and stop the process of electricity generation in order to protect the generator and connected equipment. The green AC alternating current warning light will go off and the red overload warning light will light up. After a few seconds the engine will stop.
V PERIODIC MAINTENANCE V-1 – Maintenance card Regular maintenance is the most important condition for correct and safe operation.
a) Place the device on a flat, level surface and start and warm up the engine for a few minutes. Stop the engine and turn off the fuel cock (OFF). Close the ventilator knob on the tank cap (clockwise). b) Loosen the screw and remove the side panel, see fig. c) Remove the cap from the oil filter.
V-4 – Cleaning and adjusting the spark plug a) Loosen the screw and remove the top panel. b) Remove the spark plug cap and remove the spark plug. c) Clean off any deposits, check for discolouration (standard colour is brown) and check the distance between the poles. This should be between 0.6 en 0.7 mm. Adjust if necessary. If the spark plug appears worn then replace it with the same type of spark plug: CR4HSB (NGK). d) Reinstall the spark plug. e) Replace the top panel.
VI – SOLVING PROBLEMS VI-1 – The engine will not start Fuel is not being transported to the carburettor - The fuel tank is empty - put in fuel - There is fuel in the tank – turn the fuel cock and the ventilation knob to ON - The fuel line is blocked – clean it - The carburettor is blocked – clean it The engine has insufficient oil - Add oil Problems with the ignition system, insufficient spark - The spark plug is dirty or damp – clean and/or dry it - Problems with the ignition system – consult you
VIII – TECHNICAL SPECIFICATIONS MODEL Generator Type Voltage AC Inverter 230V / 50Hz Capacity max. 2.5 kVA Capacity continuous 2.2 kVA Power factor 1.0 Capacity DC 12V / 8.3A Model XY152F-3 Type Air cooled, 4 stroke, OHV, petrol engine Bore x stroke Cubic capacity Max. power Fuel Motor Independ 2500 Contents fuel tank Continuous operation 52.4 x 57.8 124.6 cc 3.5kW – 5500 r.p.m. Lead free petrol 5.7 litres 4 hours 10 min (100% load) 5 hours 30 min (50% load) Engine oil 0.
FR CONTENU I - Informations de sécurité . . . . . . . . . . . . . . . . . . . . . . . 40 II - Description . . . . . . . . . . . . . . . . .. . . . . . . . . . . . . 41 III - Contrôle avant utilisation. . . . . . . . . . . . . . . . . . . . . . . . 43 IV - Fonctionnement . . . . . . . . . . . . . . . . . . . . . . . . . . V - Entretien périodique . . . . . . . . . . . . . . 44 . . . . . . . . . . . . 46 VI - Résolution de problèmes . . . . . . . . . . . . . . . . . . . . . .
Avertissement ! Lisez attentivement et entièrement ce manuel d'utilisation avant toute utilisation et rangez-le en lieu sûr pour pouvoir le consulter ultérieurement. I - INFORMATIONS DE SÉCURITÉ 1 – Les gaz d'échappement sont toxiques Ne laissez jamais le moteur tourner dans une pièce fermée ; ceci peut rapidement faire perdre connaissance et causer la mort. Utilisez le moteur uniquement à l'extérieur ou dans une pièce bien ventilée.
5 – Avertissements relatifs aux branchements Ne branchez pas le groupe électrogène sur le secteur. Ne branchez pas le groupe électrogène en parallèle sur un autre groupe électrogène. II - DESCRIPTION 1. 2. 3. 4. 5. 6. 7. 8. Touche Economy Touche moteur Réservoir Bougie Échappement Poignée de transport Commande starter Témoin lumineux CA (courant alternatif) 9. Témoin d'alerte surcharge 10. 11. 12. 13. 14. 15. 16. 17. 18. 19.
II-1 – Témoin d'alerte huile Quand le niveau d'huile est inférieur au niveau minimal, le moteur s'arrête automatiquement. Vous devez ajouter de l'huile et redémarrez le moteur. II-2 – Touche moteur La touche moteur commande le système d'allumage. « ON » (MARCHE) – le système d'allumage est activé, le moteur peut être démarré. « STOP » (ARRÊT) – le système d'allumage est coupé, le moteur ne peut être démarré.
III – CONTRÔLE AVANT UTILISATION Attention : - Si vous utilisez le groupe électrogène pour la première fois, vous devez mettre au moins 2 litres de carburant dans le réservoir. - Le contrôle avant utilisation doit être effectué chaque fois que vous utilisez le groupe électrogène. III-1 – Contrôler le niveau de carburant Vérifiez qu'il y a bien du carburant dans le réservoir. S'il n'y a pas assez de carburant, ajoutez de l'essence sans plomb.
IV – FONCTIONNEMENT Attention : - le groupe électrogène a été transporté sans huile. Si vous ne remplissez pas le réservoir d'huile, le groupe électrogène ne démarrera pas. - Veillez à ce que le groupe électrogène soit absolument horizontal lorsque vous ajoutez de l'huile. Une position inclinée du groupe électrogène peut entraîner un volume d'huile trop important et endommager le moteur. IV-1 – Démarrer le moteur Attention : - Ne branchez pas d'équipement électrique avant le démarrage.
B – Témoin d'alerte surcharge Le témoin d'alerte de surcharge s'allume en cas de surcharge de l'équipement raccordé, de surchauffe du système inverter ou d'augmentation de la tension CA. Le coupe-circuit est activé et coupe l'alimentation de courant pour protéger le groupe électrogène et l'équipement branché. Le témoin vert de courant alternatif CA s'éteint et le témoin d'alerte rouge de surcharge s'allume. Le moteur s'arrête après quelques secondes.
V – ENTRETIEN PÉRIODIQUE V-1 – Carte d'entretien Un entretien régulier est la principale condition permettant un fonctionnement efficace et sûr.
V-2 – Vidange de l'huile moteur a) Placez l'appareil sur un sol plat et horizontal et laissez le moteur chauffer pendant quelques minutes. Coupez le moteur et fermez le robinet de carburant (OFF). Fermez le bouton de mise à l'air libre du bouchon du réservoir en le tournant dans le sens des aiguilles d'une montre. b) Desserrez la vis et retirez le panneau latéral, voir ill. c) Retirez le bouchon du filtre à huile.
V-4 – Nettoyage et réglage de la bougie a) Desserrez la vis et retirez le panneau supérieur. b) Enlevez la cosse de la bougie et retirez la bougie. c) Enlevez les dépôts, contrôlez la présence de décoloration (la couleur normale est brune) et l'écartement entre les électrodes. L'écartement doit se situer en 0,6 et 0,7 mm. Réglez au besoin. Si la bougie paraît usée, remplacez-la par une bougie du même type : CR4HSB (NGK). d) Remettez la bougie en place. e) Remettez le panneau supérieur à sa place.
VI – RÉSOLUTION DE PROBLÈMES VI-1 – Le moteur ne démarre pas Le carburant n'arrive pas au carburateur. - Il n'y a pas de carburant dans le réservoir - faire l'appoint de carburant. - Il y a du carburant dans le réservoir – mettez le robinet de carburant et le bouton de ventilation en position « ON ». - Le tuyau de carburant est obstrué – nettoyez-le. - Le carburant est obstrué – nettoyez-le. Le moteur n'a pas assez d'huile. - Ajoutez de l'huile.
VIII – CARACTÉRISTIQUES TECHNIQUES MODÈLE Générateur Type Tension AC Independ 2500 Inverter 230 V – 50 Hz Capacité maxi 2,5 kVA Capacité continue 2,2 kVA Facteur de puissance Capacité CC Modèle Type 1.
IX – BEDRADINGSDIAGRAM IX- VERDRAHTUNGSSCHEMA IX – WIRING DIAGRAM IX – SCHÉMA ÉLECTRIQUE
CE-verklaring / Erklärung / declaration / declaration Hierbij verklaart ondergetekende / Hiermit erklärt der Unterzeichnende / Herewith declaers the signer / Le soussigné Euromac bv.