ENGLISH ce T an l l N m a A r RT erfo ead re O P , r efo t p IM es ance s b b n .
CONTENTS Important Safety Instructions Child Safety Tips Dishwasher Features Dishwasher Dimensions Installation Instructions Loading the Dishwasher Detergent Dispenser Rinse Aid Dispenser Model EDW132C Operating Instructions Model EDW154E Operating Instructions Model EDW174E Operating Instructions Model EDW194E Operating Instructions Care and Maintenance Overfill Protection Solutions to Common Dishwashing Problems Troubleshooting Washing Special Items Product Warranty Index 2 3 3 4 4 5 16 18 20 21 22 23 2
This manual does not cover all possible conditions and situations that may occur. Some situations may arise where use of common sense and caution should always be used when installing, operating, and maintaining any appliance. WARNING! Before using your dishwasher, follow basic precautions, including the following: ♦ Read all instructions before using the dishwasher. ♦ Dishwashers must be electrically grounded. Read the Installation Instructions for details.
DISHWASHER FEATURES Your new dishwasher features our EuroStyle™ wash system. This means that after the prewash, the water is drained out and the main wash starts with clean water. If you plan to start your dishwasher right away, it’s not necessary to rinse the dishes. You do, however, need to scrape off the large particles of food before loading. NOTE: Deviations in features may occur, depending on the model.
Read these instructions carefully and completely before you install the machine. The installation should be carried out by a qualified person who is familiar with all local codes and ordinances for electrical and plumbing connections. If a dishwasher is being installed in this area for the first time, most of the cabinet work, plumbing, and electrical has to be done before you move the machine into place.
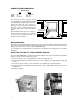
CABINET OPENING DIMENSIONS After determining where the water supply line will enter under the sink, drill a 1-1/2" (38 mm) access hole. The water line inlet valve is on the right rear of the machine. 32" to 35" 813 to 890 mm The electrical and water supplies should enter through the area indicated by the shading on the illustration at right.
ENGLISH ADJUSTING THE LEVELING LEGS Before you slide the unit under the cabinet, you should adjust the levelling legs to within 1/8” of the opening height. The four leveling legs should be adjusted by unscrewing the leg out to the length required. When the feet are properly adjusted, tighten the locking nuts to the base pan. (The machine may have an inclination of 2° maximum without affecting its performance.) WARNING! Never lay the dishwasher on its front or side.
FASTENING THE DISHWASHER TO THE CABINET It’s necessary to fasten the dishwasher to the cabinet so it won’t tilt when the door is opened or if something heavy is placed on the door. Use only the screws provided with the machine. The dishwasher can be fastened to the cabinet on the top, at the sides, or both, depending on the type of installation. STANDARD CABINET INSTALLATIONS For a standard cabinet and ADA installations, you should mount the dishwasher at the top.
ENGLISH TECHNICAL DATA Water pressure Power Heating element Max loading 18-176 psi 110–120 v, 60 Hz 1200 w 1450 w EASY CONNECTION Your Eurotech comes with everything you need for an easy, problem-free installation: n PEX tubing with 3/8” compression fitting—This tubing has a 50-year spec life. It fits American dishwasher water supply valves. n Drain hose—Corrugated drain hose and holder to form a high loop. n Electrical cord and plug—110-120 volts, 15 amp cord supplied with unit.
DRAIN CONNECTIONS Eurotech provides a 5/8” (17 mm) corrugated drain hose with a drain line holder to form a high loop. If additional drain hose is needed, please purchase an additional Eurotech drain hose and join it to the provided hose with a 5/8” (17 mm) copper tube. NOTE: Do not use any fittings anywhere in the drain line that are less than 5/8" (17 mm) ID. The access hole for the drain line should be 1-1/2" (38 mm).
ENGLISH ELECTRICAL CONNECTIONS The dishwasher comes with an electrical cord for 110– 120 volts, 15 amp supplied. This cord should be plugged into the 110-120 volt outlet under the sink. If the cord is not long enough, or if a hard-wire installation is needed, see “Connecting An Electrical Cable” below. WARNING! Do not use an extension cord for this appliance.
CONNECTING AN ELECTRIC CABLE If the cord is not long enough, or if a hard-wire installation is needed, follow the steps below to complete the electrical connection. WARNING! Before working on wiring for any electrical appliance, be sure the electrical power has been turned off at the breaker/fuse box. 1. Remove the access panel by removing the two screws on each side of the access panel that hold the fill strips in place. Next, remove the two screws underneath the panel that hold it against the guard plate.
ENGLISH FITTING THE EDW194E ONE-PIECE CUSTOM DOOR PANEL Model EDW194E can only be installed with a one-piece custom door panel that extends from the toe kick to the counter top. The unit comes with everything needed to make installing the door panel easy. The door is predrilled for the panel’s mounting screws. To order a one-piece door, contact your dealer.
BUILDING A CUSTOM WOOD DOOR PANEL FOR MODEL EDW194E If you prefer, you can build a custom wood door panel for this model to match the cabinets. CUSTOM WOOD PANEL DIMENSIONS Width: Height: 23-3/8” (595 mm) 28-1/4 min. to 30-1/16” max. (718 mm–764 mm) (Measured from the top of the panel to the lower edge of the kitchen cabinet.) Thickness: 1/4” (6 mm) minimum to 3/4” (19 mm) maximum Weight: Up to 22 lb. NOTE: Screws for mounting custom wood panels less than 3/4” are not supplied with the unit.
ENGLISH WOOD PANELS THE SAME HEIGHT AS THE DISHWASHER DOOR (23-1/4”) Custom-built 2-inch decorative fill strip or cutting board (not available to order) 28-1/4" 718 mm If the custom panel is the same height as the dishwasher door, a 2” decorative fill strip or pull-out cutting board must be used to fill the area between the panel and the counter top (as illustrated at right). 23-3/8" 595 mm toe kick INSTALLING A CUSTOM WOOD PANEL To install the custom wood panel, follow the steps below. 1.
LOADING THE DISHWASHER LOADING THE UPPER BASKET The upper basket holds small and medium-sized items, such as glasses, cups, saucers, bowls and small plates, as illustrated below. To make loading and unloading easier, the upper basket can be pulled out all the way. Careful arrangement of the dishes will ensure optimal cleaning. It is best not to load items atop one another because it could prevent water from spraying over the whole surface of the items.
Load larger items in the lower basket, such as, dinner plates, pots and pans, serving dishes, and casseroles. Be sure to load dishware facing downward or toward the center of the dishwasher. When loading tall items in the lower basket, make sure the upper spray arm turns freely. NOTE: Be careful not to position items so close to the door that they could prevent the detergent dispenser from opening.
DETERGENT DISPENSER The detergent and rinse aid dispensers are on the inside of the dishwasher door. If the detergent dispenser is not open, push the small lever at the top, as illustrated. There are two compartments. The one marked “15” holds about one tablespoon of detergent. This compartment should generally be filled for lightly soiled wash loads. The compartment marked “25” holds about one and one-half tablespoon of detergent. This compartment should be used for normally and heavily soiled loads.
ENGLISH RECOMMENDED DETERGENT AMOUNTS BASED ON WATER HARDNESS WATER HARDNESS DETERGENT AMOUNTS Soft (0-3 grains per gallon) Prewash Main wash 1 teaspoon 1 to 1-1/2 tablespoons Medium (4-8 grains per gallon) Prewash Main wash 1 teaspoon 1 to 2 tablespoons Hard (9+ grains*) Prewash Main wash 1 teaspoon 2 to 3 tablespoons NOTE: We recommend that you do not add prewash detergent for the Quick or Light wash programs.
RINSE AID DISPENSER Eurotech dishwashers are designed to use liquid rinse aids in hard water areas. The rinse aid dispenser is located inside the door next to the detergent dispenser. The rinse aid is released during the final rinse to prevent water from forming droplets on your dishes that can leave spots and streaks. It also improves drying by allowing water to “sheet” off the dishes. To fill the rinse aid dispenser, follow the steps below. 1.
ENGLISH MODEL EDW132C OPERATING INSTRUCTIONS CONTROL PANEL Program Knob On/Off Button LOW TEMP. ON OFF HEAT PREWASH LOW TEMP. SO AK N PA ON S OM PO ON TS EC & HEAT PREWASH N O R M AL Y Q U IC K R IN SE S Option Buttons Indicator Lights PROGRAM KNOB ON/OFF BUTTON Turn the program knob to the right until the program you wish to select aligns with the small vertical line above the knob. Press this button to turn the power to the machine on and off.
MODEL EDW154E OPERATING INSTRUCTIONS CONTROL PANEL LCD Window Program Knob Indicator Lights Prewash Rinse aid Stop Wash Soak & Hold Rinse Rinses Energy saver ar ay el t st D ad t ar p To St lo Drying Quick Pots pans End On Normal f Of Light Delicate Delay Start Start Top Load ON/OFF BUTTON Press this button to turn the power to the machine on and off. The LCD will light up when the power is on. You must turn the power on before you select a program or option.
ENGLISH EDW154E PROGRAMS Wash Program Soak & Hold Wash Temp (° F) House Rinse Temp (° F) House Quick Light Delicate Normal Pots & Pans Rinse 130 130 130 150 150 House 130 130 130 150 150 130 Recommended Loads For extra-heavily soiled loads that require a presoak, such as pans or baked-on casseroles Lightly soiled loads Lightly soiled loads Delicate items, e.g.
for this option are as follows: A0 = no dry A1 = 20 minutes CANCELLING A PROGRAM A2 = 35 minutes A3 = 45 minutes START BUTTON After you have selected the wash program and option(s) you prefer, press this button to start a program. A signal will sound to indicate the program has begun and the LCD will display the program run time. INDICATOR LIGHTS The On light indicates that the power to the unit is on. The Rinse Aid light glows when you need to add rinse aid.
ENGLISH MODEL EDW194E OPERATING INSTRUCTIONS CONTROL PANEL Programs 1 2 3 4 5 Indicator Lights LCD Window 6 7 On/Off Button ON/OFF BUTTON Press this button to turn on the power to the machine. The power must be on before you can select the program and options. LCD WINDOW The LCD displays programs, delay start hours, and program run times. It also displays error codes (see page 31). PROGRAM BUTTON Press the program button until the number for the program you wish to select displays (e.g.
CANCELLING A PROGRAM END-OF-PROGRAM BUZZER To cancel a program after it has started, press and hold the Start button until “00” displays in the LCD window. You will have to reselect the program and options and press Start again to restart the unit. Before you restart the unit, make sure the detergent dispenser is still closed; otherwise, you will have to add detergent. At the end of the program, a prolonged buzzer will sound to indicate the program is complete.
The interior of your Eurotech dishwasher is made of surgical quality stainless steel that has been electropolished to make it the smoothest surface available. The smooth surface prohibits the accumulation of dirt and bacteria inside the unit. If the water in your area is especially hard, however, lime deposits could form inside the machine. If this happens, you can remove them by putting two tablespoons of citric acid in the detergent compartment and running a Normal program.
CLEANING THE WATER INLET FILTER In hard water areas, a chemical buildup may form on the water inlet filter. To clean this filter, remove it from the inlet hose and clean it with warm water and a soft brush. OVERFILL PROTECTION Your Eurotech dishwasher has an overfill protection device that automatically shuts off the inlet valve and starts the drain pump if the water level in the unit should rise above the normal level. If this happens, turn the water off at the main supply and call for service.
As with any new appliance, it sometimes takes using it a few times to learn to operate it properly. If you are having minor performance problems with your dishwasher, read this section before calling for service. It may save you time and unnecessary expense. Poor washing performance ♦ The dishes may not be loaded properly. Make sure that soiled surfaces are facing downward or toward ♦ ♦ ♦ ♦ ♦ ♦ ♦ the center of the dishwasher. Also, make sure that the bowls, pots, etc.
Etching If you have a cloudy film on your dishes that can’t be removed, it could be etching. To prevent etching, try the following: ♦ ♦ ♦ ♦ ♦ ♦ ♦ Use less detergent. You may be using too much for the water hardness in your area. (See page 19.) Use a good quality dishwasher detergent. Do not overload the machine. Water should circulate freely to ensure adequate rinsing and draining. Fill the rinse aid dispenser (unless you have soft water in your area; in which case you may not need a rinse aid.
♦ If the temperature of the water entering your dishwasher is below 120°, the dishwasher runs longer because it heats the water to the proper temperature for the program selected. Raising your water heater setting may help to shorten the cycle times. Dishwasher does not drain properly ♦ Make sure that the cycle was complete before you opened the dishwasher. If not, allow it to complete and check again. ♦ Some water left in the sump area near the drain is normal.
WASHING SPECIAL ITEMS Most common dishware items can be safely washed in an automatic dishwasher. If you have any doubts about a particular item, check with the manufacturer to see if it is dishwasher safe. If that isn’t possible, you might wash one item of a set a few times and compare it to the rest of the set to determine if washing it in the dishwasher had any affect on it. NOTE: Eurotech has no control over what is put in our dishwashers once installed in a customer’s home.
Be sure to complete the Warranty Registration Card you received with your appliance and mail it to AM Appliance Group to validate your appliance warranty. Cosmetic damage must be reported to your dealer within five days from the date of purchase. After unpacking the washer, thoroughly check the unit for cosmetic damage. FOR RESIDENTIAL INSTALLATIONS ONLY LENGTH OF WARRANTY AM APPLIANCE GROUP WILL PAY FOR: One-Year Full From date of purchase.
INDEX A Adjusting leveling legs 7 B Buzzer, end-of-program 22, 24, 26 C Cabinet, fastening unit to Cabinet opening dimensions Cancelling a program EDW132C EDW154E EDW174E EDW194E Care and maintenance Child safety tips Cleaning door filters spray arms water inlet filter Common dishwashing problems Connecting an electrical cable Control panel EDW132C EDW154E EDW174E EDW194E Cosmetic damage Custom door panel, EDW194E Customer service center info Cutlery basket 8 6 21 21 22 24, 26 26 27 3 27 27 27 28 29 12
Type plate (also Data tag) N No Prewash button EDW174E EDW194E Noises, unusual 23 25 30 O On/Off button EDW132C EDW154E EDW174E EDW194E One-piece door panels (EDW194E) Operating instructions EDW132C EDW154E EDW174E EDW194E Overfill protection 4 U Unit dimensions Unusual noises Upper basket 4 30 16 W 21 22 23 25 13 21 22, 23 23, 24 26 28 Warranty information Wash programs (see Programs) Washing special items Water flow volume Water hardness Water inlet filter, cleaning Water pressure Water supply Woo
Eurotech Dishwasher Owner’s Manual_Version 4 36