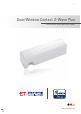
DE Door/Window Contact Z-Wave Plus Installation and Operation Guide Made in Germany www.eurotronic.
Content 1 Delivery Scope 3 8 Z-Wave 10 2 Safety and Warning Instructions 4 9 Association 11 3 Intended Use 5 10 Configuration 11 4 Product Description 5 11 Notification 11 5 5.1 5.2 Operating the Device Button LEDs 6 6 6 12 Help 12 13 Cleaning 13 6 6.1 6.2 6.3 6.4 6.5 6.
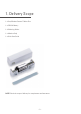
1. Delivery Scope 1 x Door/Window Contact Z-Wave Plus 1 x CR123 A Battery 1 x Reflecting Sticker 1 x Adhesive Strip 1 x Quick Start Guide NOTE! Check the scope of delivery for completeness and intactness.
2. Safety and Warning Instructions NOTE! This signal word warns of possible material damage. WARNING! This signal word indicates a hazard with a medium degree of risk which, if not avoided, may result in death or serious injury. SAFETY INSTRUCTIONS - The Door/Window Contact Z-Wave Plus is designed for use in buildings. - Operate the Door/Window Contact Z-Wave Plus only as described in the Installation and Operation Guide. - Do not keep using the device when there is obvious damage.
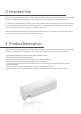
3. Intended Use The Eurotronic Door/Window Contact Z-Wave Plus is a battery powered wireless binary sensor for detecting the door or window open/closed position. The device uses an optical sensor for the status detection. For reasons of safety and approval (CE), you must not modify and/or alter the product. If you use the product for purposes other than those described, the product may be damaged. In addition, improper use may result in hazards such as short circuits, fire, electric shock, etc.
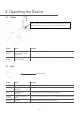
5. Operating the Device 5.1 Button Note: To use the low push button in the housing of the Door/ Window Contact, use a paper clip or a similar thin item. Button State Meaning NetworkButton Press the button three times in quick succession. Joing or leave a Z-Wave network. NetworkButton Keep button pressed for 10 seconds. Reset door/window contact to factory settings. 5.2 LEDs LED-Anzeige Colour State Meaning Green blinking Network operation (join or leave) is executed.
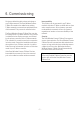
6. Commissioning Interoperability This product can be operated in any Z-Wave network with other Z-Wave certified devices from other manufacturers. All non-battery operated nodes within the network will act as repeaters regardless of vendor to increase reliability of the network. On factory default the device does not belong to any Z-Wave network. The Door/Window Contact Z-Wave Plus needs to be added to an existing Z-Wave network to communicate with the devices of this network.
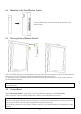
6.1 Inserting Batteries Fig. 1 1. Open the housing of the Door/Window Contact. . 2. Insert the battery into the housing. When inserting the battery, make sure that you insert the battery sideways (Fig. 1). 6.2 Add to a Z-Wave Network (Inclusion) Start the inclusion mode of your primary Z-Wave controller . Press the button within the housing of your Door/Window Contact three times in quick succession in order to activate the inclusion mode. While the inclusion mode is active, the green LED is blinking.
6.4 Mounting of the Door/Window Contact Use the adhesive strip to mount the devie on the wall or the window frame. 6.5 Placing the Door/Window Contact Sensor Select a suitable place for the Door/Window Contact on the side of the windor or the door. The ideal distance to the sensor is 3 mm. The sensor must be aligned with the window or the door. For dark surfaces (e.g. brown window/door) you should place the reflecting sticker at the surface opposite the Door/Window Contact.
7.
Supervision Transmits Z-Wave Commands with an execution confirmation. 1 S U Transport Service Handles the transmission of large telegrams. 2 S U Version Returns information about the firmware. 2 S U, S0, S2 Wake Up Handles and wake-up notification. 2 S U, S0, S2 Z-Wave Plus Info Identifies the device as a Z-Wave Plus device. 2 S U * Availability of the Command Class after adding the Door/Window Contact Z-Wave Plus to your Z-Wave network.
. Help Problem Solution The Door/Window Contact was already Restart your primary Z-Wave controller. If the door/ working and all of a sudden it doesn‘t window contact still does not respond afterwards, work anymore. follow the steps below: - Remove your Door/Window Contact from your Z-Wave network (see 6.3 on page 8). - Reset your Door/Window Contact to factory settings (see 6.4 on page 8) - Add your Door/Window Contact to your Z-Wave network again The Door/Window Contact was integra- 1.
. Cleaning NOTE: RISK OF DAMAGE! Improper handling of the Door/Window Contact Z-Wave Plus can lead to damage. - Do not immerse the Door/Window Contact Z-Wave Plus in water or other liquids. - Do not use aggressive cleaning agents, brushes with metal or nylon bristles or sharp or metallic cleaning objects such as knives, hard spatulas and the like. These can damage the surfaces. - Clean the Door/Window Contact Z-Wave Plus with a soft, dry cloth.
16. Warranty The 24-months warranty period begins at the day of purchase. Please keep the receipt as evidence of purchase. During the warranty period, defective radiator thermostats may be sent to your dealer or the address below. Please ensure sufficient postage is paid. A new or repaired device will then be sent to you free of charge. No new warranty period begins with the repair or replacement of the device.