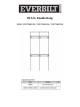
49.5 in.
INSTRUCTION TABLE OF CONTENTS: • Quick Start Guide • 49.5 in. Double Hang – Base Kit • 48 in.
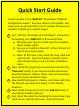
Quick Start Guide Look for packet in this ‘BASE KIT’ box labeled “Modular Configuration Guide”, find your layout in the packet, and make sure you received the correct number of boxes and contents to build your specific layout. 1. First, find the “Assembly and Installation” instructions for building your ‘BASE KIT’ in this base kit box. a) Measure your space to make sure the complete closet design will fit. b) Be sure to install the ‘Base Kit’ at the furthest left side of your closet space.
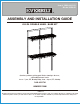
Item # 1006-844-162 Model # 90440 ASSEMBLY AND INSTALLATION GUIDE 49.5 IN. DOUBLE HANG - BASE KIT Questions, problems, missing parts? Before returning to the store, call Everbilt Customer Service 8 a.m. – 7 p.m., EST, Monday-Friday, 9 a.m. – 6 p.m., EST, Saturday 1-800-305-1726 HOMEDEPOT.COM THANK YOU We appreciate the trust and confidence you have placed in Everbilt through the purchase of this closet organizer. We strive to continually create quality products designed to enhance your home.
Table of Contents Table of Contents..........................................................2 Installation ......................................................................6 Install Hang Tracks...................................................................6 Install Upper Vertical Rails.......................................................6 Install Vertical Rail Joiners and Lower Vertical Rails................7 Install Brackets......................................................................
Pre-installation PLANNING INSTALLATION 1. 2. 3. 4. Measure the closet width and plan the layout. See the “Plan Your Closet Layout” section for illustration examples. Select the correct hardware for assembly. See "choose your hardware" section below. Use stud finder to locate the studs and mark. It is recommended to mount hang tracks onto studs.
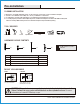
Pre-installation (continued) CHOOSE YOUR HARDWARE DRYWALL DD Drill a 1/2 in. hole in the drywall. If you hit a stud during drilling, use above stud hardware/instructions for each stud location. CC Insert bolt through hang track (or vertical rail/vertical rail joiner) then screw on toggle (DD). Install toggles (DD) in each hole of the component you are attaching before attaching to the wall. Compress and pass the toggle (DD) through the hole you drilled.
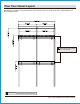
Plan Your Closet Layout When planning your installation, measure the dimensions of your installation location. For specific designs refer to separate Modular Closet System Configuration Guide. TIP: Shelf height can be adjusted per your personal needs. NOTE: All vertical measurements are taken from the floor. 5 HOMEDEPOT.COM Please contact 1-800-305-1726 for further assistance.
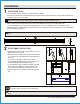
Installation 1 Install Hang Track □ Use a stud finder to locate and mark your studs if installing on drywall. □ Place the longest hang track (C) flush against the wall, the bottom of the track should be 84 in. off the ground. The thicker side should be on top, closest to the ceiling. TIP: When creating larger closet layouts that include multiple hang tracks, install this kit hang track to the far-left of your planned closet design.
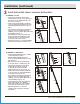
Installation (continued) 3 Install Vertical Rail Joiners and Lower Vertical Rails SCENARIO 1: STUD □ Push vertical rail joiner (I) up into upper vertical rail (A) as shown, secure the vertical rail joiner (I) on hole B with panhead screw (#12 x 2 in.) (see Fig. 5). □ Put the lower vertical rail (B) as shown and secure the lower vertical rail (B) on the hole C and D with panhead screw (#12 x 2 in.) (see Fig. 6).
Installation (continued) SCENARIO 3: DRYWALL □ Tear the drilling template box (Q) according to the dashed line (see Fig. 14). □ Align the drilling template box (Q) as a locator as shown and mark the holes on the wall (see Fig. 15). □ Drill 1/4 in. holes for hole B and C, drill 1/2 in. hole for hole D. Insert wall anchors (1/4 in.) into hole B and C (see Fig. 16).
Installation (continued) 5 Install Shelves 2 □ Make sure your shelves (G) fit your closet layout design. □ Hold the shelf’s (G) front rod, let it fit into the bracket’s (H) front notches as the diagram shows, then push down the shelf’s rear part allowing the shelf’s rear horizontal rod to lock into the back clip of bracket. 1 H Two shelves share one bracket NOTE: The bracket is supposed to be shared by two shelves in system as shown on the right. Each end of shelf will take up half of bracket.
Installation (continued) 7 Install Closet Rod Joiner and End Caps □ Measure length of closet rod assembly needed based on your closet layout. If your layout requires multiple closet rods to be joined, install closet rod joiner (N) to make a longer assembly (see Fig. 23). □ If joiner is needed for your layout, insert closet rod joiner (N) into one end of one closet rod (L) and then insert the exposed end of the joiner into the end of second closet rod (L).
Questions, problems, missing parts? Before returning to the store, call Everbilt Customer Service 8 a.m. – 7 p.m., EST, Monday-Friday, 9 a.m. – 6 p.m., EST, Saturday 1-800-305-1726 HOMEDEPOT.COM Retain this manual for future use.
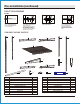
Item #1006-844-812 / 1006-844-804 / 1006-844-632 Model #90443 / 90445 / 90447 Assembly and Installation Guide 48 in. White / Gray / Birch / Décor Shelf Cover (2-Pack) B (Left) B (Right) PARTS LIST A Part A Description 48 in. Décor Shelf Cover Quantity 2 B Décor Shelf Cover Endcap Set (both ends) 2 Installation 1 REMOVE PROTECTIVE FILM (TWO SIDES) BEFORE INSTALLATION. 2 PUT ON ENDCAPS (B) AS SHOWN BELOW (SINGLE OR CONNECTED).