
Installation Guide


HOMEDEPOT.COM
Please contact 1-800-305-1726 for further assistance.
10
Install Vertical Rail Covers
9
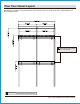
□ Measure open areas of the vertical rail, this includes: bottom of hang track
cover to top of shelves, bottom of shelf brackets to top of shelves, bottom of
brackets to end of vertical rails, etc.
□ Cut the vertical rail cover (E-F) to your desired length with hacksaw.
□ Push and press one end of the vertical rail cover (E-F) to the rail to lock onto
the rail. Press and move the other end to make sure the whole vertical rail
cover is securely in place.
NOTE: For safety, please remember to wear safety gloves, goggles and
strictly follow the instructions of your hacksaw during the cutting.
8
Installation (continued)
Care and Cleaning
□ To remove dust, stains, and other deposits: Use a soft cloth (or soft brush) with a diluted solution mix of warm water and a mild
detergent (such as liquid dishwashing detergent). DO NOT use solvents.
□ Make sure you thoroughly rinse the surface(s) with clean fresh water after cleaning to remove all residue.
□ Thoroughly dry the surface(s) before reuse.
EverbiIt closet organizer is powder coated. Clean following these steps:
NOTE: Make sure to complete joiner assembly (if needed based on layout) before
adding end caps to the nished ends of closet rod.
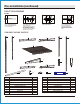
Install Closet Rod Joiner and End Caps
7
□ Measure length of closet rod assembly needed based on your closet layout.
If your layout requires multiple closet rods to be joined, install closet rod
joiner (N) to make a longer assembly (see Fig. 23).
□ If joiner is needed for your layout, insert closet rod joiner (N) into one end of
one closet rod (L) and then insert the exposed end of the joiner into the end
of second closet rod (L). Repeat this step for longer assemblies where
needed (see Fig. 23).
□ Push end caps (O) into finished ends of closet rod (L) (see Fig. 23).
□ Position closet rod assembly at desired location and snap into closet rod
brackets (M) (see Fig. 24 and Fig. 25).
□ You may have unused closet rod joiner(s) and/or endcap(s) depending on your
design.
If creating a larger kit (which ships in several boxes) install all brackets,
shelves, and closet rods from each box BEFORE installing decorative
hang track covers and vertical rail covers in the following steps.
Fig. 23
Fig. 24
Fig. 25
Max 18 in.
L
N
O
M
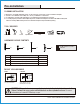
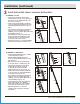
Install Hang Track Covers
□ Place the hang track cover (D/K) with the direction as shown then push to
snap and lock. Slide from left to right to make sure the whole cover is
secured.
□ Make sure to put longer hang track cover (D) on the longer hang track (C).
A
D/K
C/J
Line up and press
onto rail
Cut to your t
E-F
Measure
and cut
Measure
and cut
Measure
and cut
Fig. 8
Fig. 9
Fig. 10
Max 18 in.
J
L
M
K