
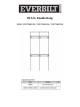
Installation Guide

6
Installation
HOMEDEPOT.COM
Please contact 1-800-305-1726 for further assistance.
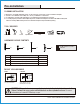
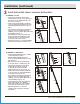
Install Upper Vertical Rails
□ Attach the upper vertical rail (A) to the hang track (C) slots as
the diagram shows (see Fig. 1).
□ Slide the rst vertical rail (A) to the left edge of the hang track
(C) , so make sure it is ush with the end of the hang track (C)
(see Fig. 2).
□ Use a level to ensure upper vertical rail (A) assembly is
vertically straight (plumb) and secure it using screw holes in
vertical rail with appropriate hardware (see Fig. 3).
□ Use provided spacer (P) to line up the next upper vertical rail
(A) (see Fig. 4). It is CRITICAL to install vertical rails at the
correct spacing using spacer (P) for the system to work.
□ Repeat the above process to install remaining upper vertical
rails.
2
TIP: When creating larger closet layouts that include multiple hang tracks, install this kit hang track to the far-left of your planned closet design.
Additional shorter length hang tracks will be installed in continuous sequence to the right of this kit hang track.
If creating a larger kit (which ships in several boxes) install all hang tracks and vertical rails from boxes labeled 'EXTENSION' BEFORE installing
any brackets, shelves or decorative covers in following steps.
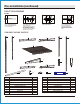
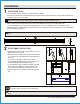
Install Hang Track
1
□ Use a stud finder to locate and mark your studs if installing on drywall.
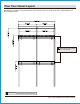
□ Place the longest hang track (C) flush against the wall, the bottom of the track should be 84 in. off the ground. The thicker side
should be on top, closest to the ceiling.
□ Make sure the track is level and mark each screw hole on the wall. Ensure at least one hole aligns with a stud.
□ Use correct hardware to secure the hang track and tighten (see "Choose Your Hardware" in the Pre-installation section).
□ Repeat steps above for adding remaining hang tracks (J). Be sure to install the next shorter hang tracks (J) level and ush with
previous installed hang track (C).
WARNING: Before cutting, drilling, or hammering into any wall, verify the location of electrical, plumbing, and gas lines. Cutting may cause serious
injury.
Thicker side up
WALL
Fig. 1
Fig. 4
Fig. 2
25.5 in. (64.8 cm) 24 in. (60.9 cm)
Keep level and ushC J
WARNING: Before cutting, drilling, or hammering into any wall, verify the location of electrical, plumbing, and gas lines. Cutting may cause serious
injury.
A
C
Fig. 3
A
VERTICAL RAIL SPACER
*DO NOT DISCARD*
*DO NOT DISCARD*
*DO NOT DISCARD*
*DO NOT DISCARD*
WALL
WALL
WALL