
Instructions / Assembly


9
Evo, Inc., 20560 SW 115th Ave., Tualatin, OR 97062 USA
Phone 503.626.1802 | Fax 503.213.5869 | www.evoamerica.com | support@evoamerica.com
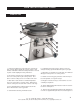
Know Your Grill From Front To Back
18 - Rear handle for lifting and pushing your grill into position.
19 - Stainless steel waste tray mounted to slide rails under
drip pan provides overfl ow waste removal from drip pan and
convenient clean out.
20 - Grill shown with hood resting from drip pan. When hood
is not in use, it is recommended to support it from drip pan
at the rear location. For complete access to cook surface,
remove hood from grill and store separately.
21 - Rear leg rubber foot provides support for positioning grill
on deck or patio surfaces.
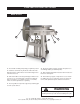
22 - Electronic ignition is battery operated. The ignitor uses
one AAA-type battery (installed in ignitor).
23 - Burner lighting and ignition instruction sticker located on
left side of control panel.
24 - Removable leg support on right side to access LP tank
for refi lling. No tools are required to remove leg support. To
remove, slide upward and push outward over fasteners.
WARNING
Replacement of right leg support is necessary after
installing LP tank to provide structural stability to the grill.
22
20
18
19
21
24
23
Back of Grill