
installation and_manual


INSTALLATION INSTRUCTIONS
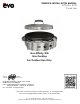
A f f i n i t y 3 0 G
Evo, Inc., 20560 SW 115th Ave., Tualatin, OR 97062 USA
Phone 503.626.1802 | Fax 503.213.5869 | www.evoamerica.com | support@evoamerica.com
9
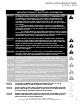
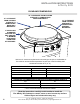
Cook Surface: Lift and separate cook surface from unit and place next to installation area.
Drip Pan Gasket:
Gasket is secured
to top of drip tray.
Remove gasket
from drip tray
and set aside
for reinstallation.
Drip Pan
Unlatch pan
from circular
skirt, then
carefully lift and
separate drip
pan from unit
and place next
to installation
area. Take care
not to scratch
drip pan during
installation.
Chassis:
Lift chassis
from crating box
and place on
its side next to
installation area.
Use caution
since ignition
components
are exposed.
Metal Right Angle Brackets: Unscrew from unit
and keep screws and brackets handy for fi rst
installation step.
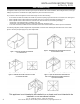
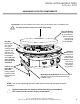
UNPACKING COOKTOP COMPONENTS
STEP 1: As you are unpacking the crate, make sure you locate all components before
installation.
Ignition components are exposed during uncrating and installation.
Use caution and do not alter factory set positions.
The cook surface is heavy. Use caution when lifting.
Remove Tie
Down Bolts
and Tabs
holding chassis
to packing crate
base using 7/16”
wrench.