TWO C PANTO PANTO SINGL BLACK - TRUE Bicycle Owner’s Manual evobicycle.
10th Edition, 2014 This manual meets 16 CFR 1512 and EN 14764, 14766 and 14781 Standards IMPORTANT: This manual contains important safety, performance and service information. Read it before you take the first ride on your new bicycle, and keep it for reference. Additional safety, performance and service information for specific components such as suspension or pedals on your bicycle, or for accessories such as helmets or lights that you purchase, may also be available.
1. First NOTE: We strongly urge you to read this Manual in its entirety before your first ride. At the very least, read and make sure that you understand each point in this section, and refer to the cited sections on any issue which you don’t completely understand. Please note that not all bicycles have all of the features described in this Manual. Ask your dealer to point out the features of your bicycle. A. Bike fit 1. Is your bike the right size? To check, see Section 3.A.
tightened, refer to the torque specifications in the instructions provided by the manufacturer of the component in question. Correctly tightening a fastener requires a calibrated torque wrench. A professional bicycle mechanic with a torque wrench should torque the fasteners on you bicycle. If you choose to work on your own bicycle, you must use a torque wrench and the correct tightening torque specifications from the bicycle or component manufacturer or from your dealer.
• Brakes: Check the brakes for proper operation (see Sections 4.C). Squeeze the brake levers. Are the brake quick-releases closed? All control cables seated and securely engaged? If you have rim brakes, do the brake pads contact the wheel rim squarely and make full contact with the rim? Do the brakes begin to engage within an inch of brake lever movement? Can you apply full braking force at the levers without having them touch the handlebar? If not, your brakes need adjustment.
2. Safety A. The Basics WARNING: The area in which you ride may require specific safety devices. It is your responsibility to familiarize yourself with the laws of the area where you ride and to comply with all applicable laws, including properly equipping yourself and your bike as the law requires. Observe all local bicycle laws and regulations.
B. Riding Safety 1. Obey all Rules of the Road and all local traffic laws. 2. You are sharing the road or the path with others — motorists, pedestrians and other cyclists. Respect their rights. 3. Ride defensively. Always assume that others do not see you. 4. Look ahead, and be ready to avoid: • Vehicles slowing or turning, entering the road or your lane ahead of you, or coming up behind you. • Parked car doors opening. • Pedestrians stepping out. • Children or pets playing near the road.
C. Night Riding Riding a bicycle at night is much more dangerous than riding during the day. A bicyclist is very difficult for motorists and pedestrians to see. Therefore, children should never ride at dawn, at dusk or at night. Adults who chose to accept the greatly increased risk of riding at dawn, at dusk or at night need to take extra care both riding and choosing specialized equipment which helps reduce that risk. Consult your dealer about night riding safety equipment.
While riding at dawn, at dusk or at night: • Ride slowly. • Avoid dark areas and areas of heavy or fast-moving traffic. • Avoid road hazards. • If possible, ride on familiar routes. If riding in traffic: • Be predictable. Ride so that drivers can see you and predict your movements. • Be alert. Ride defensively and expect the unexpected. • If you plan to ride in traffic often, ask your dealer about traffic safety classes or a good book on bicycle traffic safety. 3.
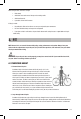
B. Saddle position Correct saddle adjustment is an important factor in getting the most performance and comfort from your bicycle. If the saddle position is not comfortable for you, see your dealer. The saddle can be adjusted in three directions: 1. Up and down adjustment. To check for correct saddle height (fig. 3): • sit on the saddle; • place one heel on a pedal; • rotate the crank until the pedal with your heel on it is in the down position and the crank arm is parallel to the seat tube.
WARNING: When making saddle angle adjustments with a single bolt saddle clamp, always check to make sure that the serrations on the mating surfaces of the clamp are not worn. Worn serrations on the clamp can allow the saddle to move, causing you to lose control and fall. Note: If your bicycle is equipped with a suspension seat post, the suspension mechanism may require periodic service or maintenance. Ask your dealer for recommended service intervals for your suspension seat post.
WARNING: Always tighten fasteners to the correct torque. Bolts that are too tight can stretch and deform. Bolts that are too loose can move and fatigue. Either mistake can lead to a sudden failure of the bolt, causing you to lose control and fall. Your dealer can also change the angle of the handlebar or bar end extensions.
àààà Hex nuts or hex key bolts which are threaded on to or into the hub axle (Your bicycle may be equipped with a different securing method for the front wheel than for the rear wheel. Discuss the wheel securing method for your bicycle with your dealer. It is very important that you understand the type of wheel securing method on your bicycle, that you know how to secure the wheels correctly, and that you know how to apply the correct clamping force that safely secures the wheel.
WARNING: Do not remove or disable the secondary retention device. As its name implies, it serves as a back-up for a critical adjustment. If the wheel is not secured correctly, the secondary retention device can reduce the risk of the wheel disengaging from the fork. Removing or disabling the secondary retention device may also void the warranty. Secondary retention devices are not a substitute for correctly securing your wheel.
CAUTION: If your bike has a disc brake, exercise care in touching the rotor or caliper. Disc rotors have sharp edges, and both rotor and caliper can get very hot during use. a. Removing a disk brake or rim brake Front Wheel (1) If your bike has rim brakes, disengage the brake’s quick-release mechanism to increase the clearance between the tire and the brake pads (See Section 4.C fig. 11 through 15).
NOTE: If, on a traditional cam action system, the lever cannot be pushed all the way to a position parallel to the fork blade, return the lever to the OPEN position. Then turn the tension adjusting nut counterclockwise one-quarter turn and try tightening the lever again. WARNING: Securely clamping the wheel with a cam action retention device takes considerable force.
(3) On single-speed, remove the chain from the front sprocket, so that you have plenty of slack in the chain. Put the chain on the rear wheel sprocket. (4) Then, insert the wheel into the frame dropouts and pull it all the way in to the dropouts. (5) On a single speed or an internal gear hub, replace the chain on the chainring; pull the wheel back in the dropouts so that it is straight in the frame and the chain has about 1/4 inches of up-and-down play.
Adjusting the seat post cam action mechanism The action of the cam squeezes the seat collar around the seat post to hold the seat post securely in place. The amount of clamping force is controlled by the tension adjusting nut. Turning the tension adjusting nut clockwise while keeping the cam lever from rotating increases clamping force; turning it counterclockwise while keeping the cam lever from rotating reduces clamping force.
6. See the brake manufacturer’s instructions for operation and care of your brakes, and for when brake pads must be replaced. If you do not have the manufacturer’s instructions, see your dealer or contact the brake manufacturer. 7. If replacing worn or damaged parts, use only manufacturer-approved genuine replacement parts. 8. Brake controls and features It’s very important to your safety that you learn and remember which brake lever controls which brake on your bike.
D. Shifting gears Your multi-speed bicycle will have a derailleur drivetrain (see 1. below), an internal gear hub drivetrain (see 2. below) or, in some special cases, a combination of the two. 1.
d. Which gear should I be in? The combination of largest rear and smallest front gears (fig. 16) is for the steepest hills. The smallest rear and largest front combination is for the greatest speed. It is not necessary to shift gears in sequence.
E. Pedals 1. Some bicycles come equipped with pedals that have sharp and potentially dangerous surfaces. These surfaces are designed to add safety by increasing grip between the rider’s shoe and the pedal. If your bicycle has this type of high- performance pedal, you must take extra care to avoid serious injury from the pedals’ sharp surfaces. Your dealer can show you a number of options and make suitable recommendations. 2.
WARNING: Failure to maintain, check and properly adjust the suspension system may result in suspension malfunction, which may cause you to lose control and fall. If your bike has suspension, the increased speed you may develop also increases your risk of injury. For example, when braking, the front of a suspended bike dips. You could lose control and fall if you do not have experience with this system. Learn to handle your suspension system safely. See also Section 4.C.
Tire pressure is given either as maximum pressure or as a pressure range. How a tire performs under different terrain or weather conditions depends largely on tire pressure. Inflating the tire to near its maximum recommended pressure gives the lowest rolling resistance; but also produces the harshest ride. High pressures work best on smooth, dry pavement.
5. Service WARNING: Technological advances have made bicycles and bicycle components more complex, and the pace of innovation is increasing. It is impossible for this manual to provide all the information required to properly repair and/or maintain your bicycle. In order to help minimize the chances of an accident and possible injury, it is critical that you have any repair or maintenance which is not specifically described in this manual performed by your dealer.
• Carefully check the control cables and cable housings. Any rust? Kinks? Fraying? If so, have your dealer replace them. • Check the tires for excess wear, cuts or bruises. Have your dealer replace them if necessary. • Check the wheel rims for excess wear, dings, dents and scratches. Consult your dealer if you see any rim damage. • Check to make sure that all parts and accessories are still secure, and tighten any which are not.
Appendix B The lifespan of your bike and its components 1. Nothing Lasts Forever, Including Your Bike. WARNING: Frequent inspection of your bike is important to your safety. Follow the Mechanical Safety Check in Section 1.C of this Manual before every ride. Periodic, more detailed inspection of your bicycle is important. How often this more detailed inspection is needed depends upon you. Ignoring this WARNING can lead to frame, fork or other component failure, which can result in serious injury or death.
TWO COLOR PANTONE 2287 C PANTONE 432 C SINGLE COLOR ON BLACK - TRUE WHITE C EVO SINGLE COLOR PANTONE 432 C www.evobicycle.com MATTE WHITE CARD STOCK SINGLE COLOR PANTONE 432 C Distributed in the United States exclusively by: 1181 South Lake Drive, Lexington, SC 29073-7744 www.hawleyusa.com | 803.359.3492 Distributed in Canada exclusively by: 1000 rue des Riveurs, Lévis, QC G6V 9G3 www.cycleslambert.com | 855.526.