
Warranty


6
www.evolutionpowertools.com
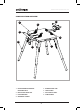
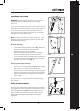
Do the same operation with the second nut and bolt;
when both xed clamps are in position, then tighten
securely so there is no movement. (Fig.5)
Repeat the same operation for the second xed clamp.
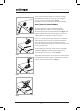
ADJUSTABLE CLAMP ASSEMBLY
Align the adjustable clamp component onto the
corresponding plastic shape in the long slot that is
attached to the leadscrew. Drop bolt through (Fig.6) and
tighten up rmly. The bolt should engage a square nut
captive within the adjustable clamp’s baseplate.
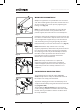
There is a secondary aluminium clamp with a removable
rubber tip that may suit the size and shape of dierent
saws and allow a range of saws to t the stand. This is
designed to hook over the top face of some saw bases and
hold a variety of saws.
Locate aluminum secondary clamp onto the adjustable
clamp body (Fig.7) and bolt through, taking care to
ensure washers are placed as shown. (Fig.8)
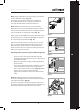
Adjustable clamp position can be opened and closed to t
saws of dierent widths using the removable T-Handle to
tighten and loosen the leadscrew. (Fig.9)
Fig. 5
Fig. 6
Fig. 7
Fig. 8