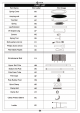
€ EX ACME PART LIST Part Name Part Letter Part Image Spring Cover #A Jumping mat #B Top Rail #C Spring #D Leg Extension HE W-gaped Leg #F Screws #G Spring Tool #H Bolt washer and nut #1 Phillips Screw Driver #J Pad Elastic Ropes #K Enclosure Net #L Upper Net Pole #M Bottom Net: Pale #N Pole Foam Tube HO Pols Caps #P Pole Rubber Foot #Q Quick Clamp #R Clamp Bolt #5 Clamp: Nut #1 Clamp Protect Sleeve #U
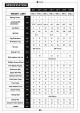
€ Ex Acme SPECIFICATION WEIGHT LIMIT Spring Cover BFT | 10FT 12FT 13FT 14FT 15FT 16FT Jumping: Mat {Diameter} Top Rails Springs Ley Extension Wish aped Leg Screws Spring Tool Bolt washer and out Phillips Screw Diver Pad Elastic: Ropes Enclosure Net Upper Net Pole Bottom Net Pole Pole: Foam Tube Pole Caps: Pale Rubber Foot Quick Clamp Clamp Bolt Clamp Nut Clamp Protect Sleeve Ladder
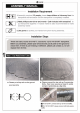
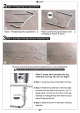
€ acme Step 2: W-shaped leg and Leg Extension: Notice: 1 We-shaped leg with 2 Leg Extension & Please connect the Leg Extension to the a Reshaped as Picture (shows: Step 3: Key Step for the big circle and Trampoline Leg: 2) The top rail must be firmly put inside the trampoline leg iris @ very important step.
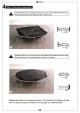
€ Ex Acme Step 4: Spring and Jumping Mat: Important Notice: Do not install the spring one by one. If you install them one by one; tha trampoline frame will ba defective due to Uneven force. important Notice: 06 not use ans leg to push against the trampoline leg frames when fitting the spring. IE will cause trampoline to Become misshapen. Please firstly install 4 or 6 spins as Picture (and Picture @ by Spring tool After that, it is:better 2 people to install the rest springs differentiation sides.
The trampoline frame shows as Picture & Whitman you move the trampoline, do not pull the ram poling from one side: iris better 2.83 people list the trampoline on opposite sides of frame and make sure frame legs are in vertical position.
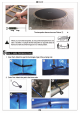
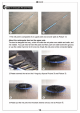
€ Ex acme Oe &: Enclosure Net and Poles: 1 The net pole is composed of an upper pole and a lower pole as Picture 13; About the rectangular dent on the upper pole. The:dent is designed that way, which wilt make the net poles more stable and safer, and not wobble. Yau just need to hand the pole and then push one side toward the ground, or use the rubber hammer fo hit one end, finally the net pole will be connected tightly: 2:Please connect the net ori: the Parings by clips as Picture 3) and Picture 5 (5) 3.
€ pace 4:8 total have 2 quick champs Whisk Will connect the inst poles to the Leg extension and W-shaped leg. Important step: Firstly firmly clamp the lower net pole to the leg extension, than clamp the lower net pole 10 the W-shaped leg (double stable) Congratulations! You have completed your assembly of your Ex Acme brand trampoline. DISASSEMBLY To disassemble, please follow the trampoline and enclosure net combination assembly steps in reverse order.