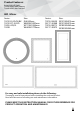
Product Features: Extra thick LED light Touch switch with memory Touch switch dim function LED Mirror Series: 19010-R-GD/SL/BK 19010-RT-SL/GD 19055-GD/SL 19038 Size: DIA 800mm W800XH1000mm W711XH1524mm W660XH1778mm Series: TJ218-36X48 DJ217-36X48 TJ218-38X72 DJ217-38X72 Size: W1219XH912mm W1219XH912mm W1829XH965mm W1829XH965mm For easy and safe installation,please do the following: Thoroughly read all instructions before installing the enclosed product.
WARNING AND SAFETY INSTRUCTIONS Before assembling your LED Lighted Mirror fixture, please make sure that you carefully read through this instruction sheet, refer back to them during installation to ensure your product is fitted safely and correctly. Keep these instructions for future use. WARNING Risk of Fire and Electric Shock ●All fittings must be installed in accordance with current IEE wiring regulations. If in doubt, consult a qualified electrician.
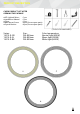
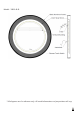
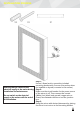
PRODUCT DESCRIPTION CHECK PRODUCT LIST AFTER OPENING THE PACKAGE ●LED Lighted Mirror ●Installation Manual ●Z-bar ●Wall Mount Screw ●Drywall Anchor --1pcs --1pcs --1pcs --4pcs(One as spare parts) --4pcs(One as spare parts) (TOOLS YOU MAY NEED) Series: 19010-R-GD 19010-R-SL 19010-R-BK Size: DIA 800mm DIA 800mm DIA 800mm Color temperature: Neutral light(4200K) Warm light(3000K) White light(6400K) E486300
PRODUCT DESCRIPTION & INFORMATION Model:19010-R-GD Model:19010-R-SL E486300
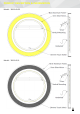
Model:19010-R-SL * All diagrams are for reference only. All model dimensions and proportions will vary.
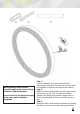
INSTALLATION PROCESS X3 X3 Warning:Always switch off the electrical supply at the mains during installation and maintenance. Do not switch on the electrical supply at the mains until installation completed. X1 Step 1: Use an I-Beam level to mount the included mounting bracket with 3 screws (Use anchor when it's installed on drywall, concrete or tile surface). Step 2: Make sure the circuit breaker for the power source of the mirror is off.
PRODUCT DESCRIPTION CHECK PRODUCT LIST AFTER OPENING THE PACKAGE ●LED Lighted Mirror ●Installation Manual ●Z-bar ●Wall Mount Screw ●Drywall Anchor --1pcs --1pcs --1pcs --4pcs(One as spare parts) --4pcs(One as spare parts) (TOOLS YOU MAY NEED) Series: 19010-RT-SL 19010-RT-GD Size: W800XH1000mm W800XH1000mm Color temperature: Neutral light(4200K) Warm light(3000K) White light(6400K) * All diagrams are for reference only. All model dimensions and proportions will vary.
PRODUCT DESCRIPTION & INFORMATION Model:19010-RT-SL Model:19010-RT-GD E486300
INSTALLATION PROCESS: X3 X3 Warning:Always switch off the electrical supply at the mains during installation and maintenance. Do not switch on the electrical supply at the mains until the end of the installation. X1 Step 1: Use an I-Beam level to mount the included mounting bracket with 3 screws (Use anchor when it's installed on drywall, concrete or tile surface). Step 2: Make sure the circuit breaker for the power source of the mirror is off.
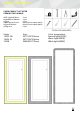
PRODUCT DESCRIPTION CHECK PRODUCT LIST AFTER OPENING THE PACKAGE ●LED Lighted Mirror ●Installation Manual ●Z-bar ●Wall Mount Screw ●Drywall Anchor ●Plug wire --1pcs --1pcs --1pcs --4pcs(One as spare parts) --4pcs(One as spare parts) --1pcs (TOOLS YOU MAY NEED) Series: 19055-GD 19055-SL 19038 Size: W711XH1524mm W711XH1524mm W660XH1778mm Color temperature: Neutral light(4200K) Warm light(3000K) White light(6400K) E486300
PRODUCT DESCRIPTION & INFORMATION Model:19055-GD Black Aluminum Frame 5mm Silver Mirror Dimmer Touch Switch Plug wire 1.5M Hardwire 1.5M Model:19055-SL White Aluminum Frame 5mm Silver Mirror Dimmer Touch Switch Plug wire 1.5M Hardwire 1.
Model:19038 * All diagrams are for reference only. All model dimensions and proportions will vary.
INSTALLATION PROCESS X3 X3 Warning:Always switch off the electrical supply at the mains during installation and maintenance. Do not switch on the electrical supply at the mains until the end of the installation. X1 Wall-mounted installation Step 1: Mark the position of the hanging screw. Step 2: fix the screw. Step 3: hang up the LED mirror on the wall Floor type installation Step 1: Open the floor stand. Step 2: Connect the plug wire to the hard wire.
OPERATION PROCESS Series: 19010-R-GD 19010-R-SL 19010-R-BK Series: 19055-GD 19055-SL 19038 Press to turn on/off the light as well as change color temperature. Long press the sensor to achieve dimming.
PRODUCT DESCRIPTION CHECK PRODUCT LIST AFTER OPENING THE PACKAGE ●LED Lighted Mirror ●Installation Manual ●Z-bar ●W36''XH48''-Wall Mount Screw ●W36''XH48''-Drywall Anchor ●W38''XH72''-Wall Mount Screw ●W38''XH72''-Drywall Anchor --1pcs --1pcs --1pcs --7pcs(One as spare parts) --7pcs(One as spare parts) --8pcs(One as spare parts) --8pcs(One as spare parts) (TOOLS YOU MAY NEED) Series: DJ217-36X48 Size: W1219XH912mm Series: TJ218-36X48 TJ218-38X72 DJ217-38X72 Size: W1219XH912mm W1829XH965mm W1829XH965m
Model:TJ218-38x72 Model:TJ218-38x72 E486300
PRODUCT DESCRIPTION & INFORMATION Model:TJ218-36X48 Model:TJ218-36X48 E486300
Model:DJ217-36X48 Model:DJ217-36X48 E486300
Model:DJ217-38x72 Model:DJ217-38x72 * All diagrams are for reference only. All model dimensions and proportions will vary.
INSTALLATION PROCESS X6 or X7 X6 or X7 (According to actual needs) (According to actual needs) Warning:Always switch off the electrical supply at the mains during installation and maintenance. Do not switch on the electrical supply at the mains until the end of the installation. X1 Step 1: Use an I-Beam level to mount the included mounting bracket with 3 screws (Use anchor when it's installed on drywall, concrete or tile surface).
OPERATION PROCESS Series: DJ217-36X48 Button 1: Short press,two color light off. Short press, two color light on , The two operations loop in turn . In the two color light mode, long press causes the brightness changing to dark . Second short press, the brightness gose up ,the two operations loop in turn. Button 2: When two-color light on ,this key is valued to below function: First short press ,Neutral light. Second short press, Warm light. Third short press,White light . The 3 operations loop in turn .
OPERATION PROCESS Series: TJ218-36X48 TJ218-38X72 DJ217-38X72 Button 1: Short press, monochrome off. Short press, monochrome light, These two operations loop in turn. In monochromatic mode, long pressing causes the brightness to dim. The second short pressure, the brightness increase, the two operations in turn cycle. Button 2: When the monochrome light is on, this key value is: The first long press, light from light to dark; Second long press, light from press to light.
LED Mirror Power Source FAQ Internal Power Flow Diagram Scenario 1 (Direct Wired) This is the most common way to connect the mirror. The LED light & anti fog pad are both controlled by the built-in touch switch on the mirror. *The LED light is dimmable. Input 110VAC 110VAC -12VDC Output Anti-fog LED driver Power Source: Constant 110AC power pad Output Dimmer Switch 12V LED Light Scenario 2 (Wall Switch) By doing so, the mirror is now bridged to the wall switch.