
Full Product Manual


ITEM
#EX-21BS
A
B C
D
E
F
J
G
H
I
X 24
X 32
X 28
X 4
6
B
D
5
www.general.ca
EX-21BS_V4_R2 - 07-01-2015 © COPYRIGHT GENERAL INTERNATIONAL
4. Attach a long tie bar D with it’s edge sitting over
the short tie bar edge as shown in 5, then attach
the second long tie bar.
5. Attach the two top long shelves B, with their
edges sitting over the top short shelf as shown
in 6.
1
C
E
4
2
CLOSE UP VIEW
CLOSE UP VIEW CLOSE UP VIEW
3
1. Attach an adjustable leg extension F to each leg
A using two carriage bolts with washers and nuts
1, as shown.
Note: Select the hole 3 that comes closest to the desired
height for your saw.
2. Attach one top short shelf C and short tie bar E to
one leg as shown, then attach a second leg, 4.
3. Repeat with the second pair of legs.
Note: Position the legs
with the holes for the
lower tie bars closer to
the bottom 2.
FOR EXCALIBUR EX-16 & EX-21 SCROLL SAWS
Adjustable height stand
24 1/2” to 31 1/2”
F
A
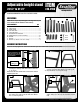
UNPACKING
NOTE: Please report any damaged or missing items to your
General International distributor immediately.
LIST OF CONTENTS QTY
A- LEGS ................................................................................................. 4
B- LONG TIE BAR .................................................................................. 2
C- SHORT TIE BAR ................................................................................. 2
D- TOP LONG SHELF ............................................................................. 2
E- TOP SHORT SHELF ............................................................................ 2
F- ADJUSTABLE LEG EXTENSION ......................................................... 2
G- CARRIAGE BOLT (for stand assembly) ...................................... 24
H- WASHER ......................................................................................... 32
I- HEX NUT ......................................................................................... 28
J- HEX BOLT (to attach scroll saw to stand) .................................... 4
ASSEMBLY INSTRUCTIONS
Note: Do not fully tighten the stand bolts until after you have fastened the scroll saw to the stand.