+DQGOHLGLQJ 9DDWZDVPDFKLQH ([TXLVLW (*63 ( 'HHO 6QHOVWDUWJLGV Lees deze handleiding goed door voordat u de afwasmachine gebruikt. Bewaar deze gebruiksaanwijzing voor toekomstig gebruik.
INHOUD 4 UW VAATWASMACHINE GEBRUIKEN 4 12 Bedieningspaneel Wateronthardingsniveau instellen Vaatwerk voorbereiden en inladen Functie glansspoelmiddel en vaatwasmiddel Glansspoelmiddelreservoir vullen Vaatwasmiddelreservoir vullen 13 VAATWASMACHINEPROGRAMMA INSTELLEN 13 15 Overzicht vaatwasprogramma’s Een programma starten Ingestelde programma tussentijds wijzigen Tussentijds extra vaatwerk inladen? 16 FOUTMELDINGEN 17 TECHNISCHE GEGEVENS 6 7 10 11 14 14 OPMERKING: Door het hoofdstuk van de t
VERKORTE HANDLEIDING Lees a.u.b. de gedetailleerde informatie in deze handleiding voor een correct en effectief gebruik van uw vaatwasmachine.
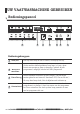
UW VAATWASMACHINE GEBRUIKEN Bedieningspaneel 5 6 7 4 3 2 1 Bedieningsknoppen 1 Aan/Uit Druk op deze knop om aan te zetten, het display licht op 2 Halfvolle machine Als de machine halfvol geladen of nog leger is, kiest u deze functie om energie en water te besparen. (gebruik bij alle programma’s mogelijk, behalve het SNEL programma. 3 Extra Droog Om het vaatwerk intensiever te laten drogen. (Het kan alleen worden gebruikt met lntensief, Standaard, ECO, Glas en 90 min.
Intensief Sterk vervuild vaatwerk o.a. potten en pannen met aangekoekte voedselresten. Standaard Voor normaal bevuild vaatwerk zoals pannen, borden, glazen en licht bevuilde pannen. 5 Programma symbolen ECO Dit is een standaard programma geschikt voor normaal bevuild vaatwerk bijv. pannen, borden glazen en licht bevuilde pannen. Glas Voor licht bevuild serviesgoed en glas. 90min Voor normaal bevuild vaatwerk die snel moeten worden gereinigd.
Vaatwasmachinezout als waterontharder Het wateronthardingsniveau moet handmatig worden ingesteld m.b.v. de waterhardheidsknop. De wateronthardingszout verwijdert mineralen en zouten, die een schadelijk of nadelig effect zou hebben op de werking van het toestel, uit het water. Hoe meer mineralen in het water, des te harder het water is. Het wateronthardingsniveau moet worden aangepast aan de hardheid van het water in uw omgeving.
Lees a.u.b. Handleiding Deel 1, Hoofdstuk 3 "Zout bijvullen als waterontharder" OPMERKING: Wanneer uw model deze optie niet heeft, sla dan deze paragraaf over. Vaatwasmachinezout voor waterontharding De hardheid van het water varieert van regio tot regio. Wanneer er hard water wordt gebruikt in de vaatwasmachine, wordt er aanslag op het vaatwerk, bestek en keukengerei gevormd.
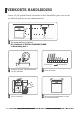
Tips om de vaatwasmachine effectief te laden Schraap alle grote voedselresten ervan af. Week restanten verbrand voedsel in pannen totdat deze zacht zijn. Het is niet nodig om schotels af te spoelen onder stromend water. Voor optimale reinigingsresultaten, volg onderstaande inlaadrichtlijnen op. (Kenmerken en vormgeving van (bestek)korven en -rekjes kan afwijken. Dit is afhankelijk van het door u aangeschafte model).
Bovenkorf laden De bovenkorf is ontworpen voor het plaatsen van delicater en lichter vaatwerk zoals glazen, koffie- en theekopjes en schotels, maar ook borden, kleine kommen en ondiepe pannen (zolang deze niet te vuil zijn). Plaats de schalen en het kookgerei zo zodat ze niet worden verplaatst door de waterstraal.
Functie glansspoelmiddel en vaatwasmiddel Het spoelmiddel komt tijdens de laatste spoeling vrij om te voorkomen dat er druppels op uw serviesgoed ontstaan, die vlekken en strepen kunnen achterlaten. Het verbetert ook het drogen door het water van het serviesgoed af te laten rollen. Uw vaatwasser is alleen geschikt voor vloeibaar glansspoelmiddel. LET OP! Gebruik alleen een goed merk glansspoelmiddel voor vaatwasmachines. Vul het spoelglansmiddelreservoir nooit met andere reinigingsmiddelen (bijv.
Glansspoelmiddelreservoir vullen 1 Haal het afdekkapje los door deze op te lichten 2 Schenk voorzichtig en langzaam glansspoelmiddel in het reservoir; pas op: doe niet te vol 3 Sluit het afdekkapje Doseerafgifte glansspoelmiddel instellen Voor een zo optimaal droogresultaat met een minimale hoeveelheid glansspoelmiddel is de machine zo uitgerust dat u de dosering van de afgifte zelf kunt instellen. Volg hiervoor onderstaande stappen. 1. Steek de stekker in het stopcontact; 2. Binnen 60 sec.
Vaatwasmiddelreservoir vullen 1 A Schuif naar links 2 B Druk hierop 1 Kies de manier die overeenkomt met uw machine. 1. Ontgrendel de afdekkap door de sluiting te schuiven. 2. Ontgrendel de afdekkap door op de sluiting te drukken. OPMERKING: 2 Doe het vaatwasmiddel in het grote bakje A) voor de hoofdwas fase . Voor een beter reinigingsresultaat, vooral als er zeer vuile items in staan, giet u een kleine hoeveelheid extra vaatwasmiddel op de deur.
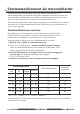
Vaatwasmachineprogramma instellen Overzicht vaatwasprogramma’s In onderstaande tabel ziet u welke programma’s geschikt zijn voor welke vervuilingsgraad met voedselresten en hoeveel vaatwasmiddel er nodig is. U ziet ook extra informatie over de programma's.
Overzicht vaatwasprogramma’s In onderstaande tabel ziet u welke programma’s geschikt zijn voor welke vervuilingsgraad met voedselresten en hoeveel vaatwasmiddel er nodig is. U ziet ook extra informatie over de programma's.
Een programma starten 1. Trek de onder- en bovenkorf uit de machine, laad het vaatwerk en duw korven weer naar binnen. Tip: laad eerst de onderkorf en daarna de bovenkorf. 2. Doe het vaatwasmiddel erin. 3. Steek de stekker in het stopcontact. Voor correcte stroomvoorziening gegevens, zie vanaf pagina 17 "Technische Gegevens". 4. Zorg ervoor dat de watertoevoer op volle druk en geheel open staat. 5. Open de deur, druk op de Aan/Uit-knop. 6. Kies een programma, het bijbehorende symbool licht op.
Tussentijds extra vaatwerk inladen? Een schaaltje vergeten? U kunt dit op elk moment voor het openen van het wasmiddelreservoir in de machine zetten. Volg hiervoor deze stappen: 1. 2. 3. 4. 5. Open de deur op een kleine spleet om de machine te onderbreken, Wacht totdat de sproeiarm geheel stilstaat, u kunt daarna de deur geheel open doen. Zet het vergeten item in de vaatwasmachine . Sluit de deur. De vaatwasmachine hervat zijn programma.
Foutmeldingen Wanneer er een storing is, zal de machine een foutcode weergeven om aan te geven wat er aan de hand is: Probleem Mogelijke oorzaak E1 Waterinname duurt langer. Kraan niet open of geblokkeerd, te lage waterdruk. E3 Kan niet op juiste temperatuur komen. Storing verwarmingselement. E4 Overstroming Een element van de machine lekt. Ed Geen communicatie tussen hoofdprintplaat en display printplaat.
TECHNISCHE INFORMATIE W H Height (H) 815mm Width (W) 598mm Depth (D1) 550mm (with the door closed) Depth (D2) 1150mm (with the door opened 90°) (*63 ( 9HU VLH 3DJLQD YDQ
Product fiche (EN50242) Sheet of household dishwasher according to EU Directive 1016/2010 & 1059/2010: Manufacturer ([TXLVLW (*63 ( Type / Description ([TXLVLW (*63 ( Standard place settings 12 Energy efficiency class 1 A++ Annual energy consumption 2 258 kWh Energy consumption of the standard cleaning cycle 0,908 kWh Power consumption of off-mode 0,45 W Power consumption of left-on mode 0,49W Annual water consumption 3 3080 liter Drying efficiency class 4 A Standard cl
Product information sheet (EN60436) Supplier's name or trade mark: ([ TXLVLW (*63 ( Supplier's address VHH SDJH General product parameters: Parameter Rated capacity Value (a ) (ps) 12 EEI ( a ) Cleaning performance 55,9 index ( a ) Parameter Value Dimensions in cm Energy efficiency class ( a ) Height 81,5 Width 59,8 Depth 55,0 c E( ) index ( a ) 1,13 Drying performance Energy consumption in kWh [per cycle], based on the eco programme using cold water fill.
*$5$17,( 6(59,&(%(3$/,1*(1 GARANTIEBEPALINGEN 1. 2. 3. 4. 5. 6. 7. 8. 9. Deze garantiebepalingen gelden uitsluitend voor de oorspronkelijke koper en voor huishoudelijk gebruik van het apparaat in Nederland. Bij doorverkoop van gebruiker aan gebruiker vervalt de garantie. De garantie geldt slechts indien, bij eventueel beroep op de garantiebepalingen, dit garantiebewijs wordt getoond, samen met de originele aankoopnota door de 1e koper.
PART Ⅱ Please read this manual carefully before using the dishwasher and Keep this manual for future reference.
CONTENTS 4 USING YOUR DISHWASHER 4 12 Control Panel Water Softener Preparing And Loading Dishes Function Of The Rinse Aid And Detergent Filling The Rinse Aid Reservoir Filling The Detergent Dispenser 13 PROGRAMMING THE DISHWASHER 13 15 Wash Cycle Table Starting A Cycle Wash Changing The Program Mid-cycle Forget To Add A Dish? 16 ERROR CODES 17 TECHNICAL INFORMATION 6 7 10 11 14 14 NOTE: If you cannot solve the problems by yourself, please ask for help from a professional technician.
QUICK USER GUIDE Please read the corresponding content on the instruction manual for detailed operating method. 1 Install the dishwasher (Please check the section 5 INSTALLATION INSTRUCTION of PART Ⅰ:Generic Version.
USING YOUR DISHWASHER Control Panel 5 6 7 4 3 2 1 Operation (Button) 1 Power Press this button to turn on your dishwasher,the screen lights up. When you have about or less than half of full place setting dishware to wash, you can choose this function to save energy and water. (It can be used programs except rapid) 2 Half-load 3 To dry dishes more completely. (It can only be used with Extra Drying Intensive, Universal, ECO, Glass and 90 min.
Intensive Heavily soiled items include pots and pans. With dried on food. Universal For normally soiled loads, such as pots, plates, glasses and lightly soiled pans. 5 Program indicator ECO This is the standard program suitable for normally soiled loads, such as pots, plates, glasses and lightly soiled pans. Glass For lightly soiled crockery and glass. 90min For normally soiled loads that need quick wash. Rapid A shorter wash for lightly soiled loads that do not need drying.
Water Softener The water softener must be set manually, using the water hardness dial. The water softener is designed to remove minerals and salts from the water, which would have a detrimental or adverse effect on the operation of the appliance. The more minerals there are, the harder your water is. The softener should be adjusted according to the hardness of the water in your area. Your local Water Authority can advise you on the hardness of the water in your area.
Please check the section 3 Loading The Salt Into The Softener of PART Ⅰ:Generic Version, If your dishwasher lacks salt. NOTE: If your model does not have any water softener, you may skip this section. Water Softener The hardness of the water varies from place to place. If hard water is used in the dishwasher, deposits will form on the dishes and utensils. The appliance is equipped with a special softener that uses a salt container specifically designed to eliminate lime and minerals from the water.
Recommendations for loading the dishwasher Scrape off any large amounts of leftover food. Soften remnants of burnt food in pans. It is not necessary to rinse the dishes under running water. For best performance of the dishwasher, follow these loading guidelines. (Features and appearance of baskets and cutlery baskets may vary from your model.) Place objects in the dishwasher in following way: Items such as cups, glasses, pots/pans, etc. are faced downwards.
Loading the upper basket The upper basket is designed to hold more delicate and lighter dishware such as glasses, coffee and tea cups and saucers, as well as plates, small bowls and shallow pans (as long as they are not too dirty).Position the dishes and cookware so that they will not get moved by the spray of water.
Function Of The Rinse Aid And Detergent The rinse aid is released during the final rinse to prevent water from forming droplets on your dishes, which can leave spots and streaks. It also improves drying by allowing water to roll off the dishes. Your dishwasher is designed to use liquid rinse aids. WARNING Only use branded rinse aid for dishwasher. Never fill the rinse aid dispenser with any other substances (e.g. Dishwasher cleaning agent, liquid detergent). This would damage the appliance.
Filling The Rinse Aid Reservoir 1 Remove the rinse reservoir cap by lifting up the handle . 2 Pour the rinse aid into the dispenser, being careful not to overfill. 3 Close the cap after all. Adjusting the rinse aid reservoir To achieve a better drying performance with limited rinse aid, the dishwasher is designed to adjust the consumption by user. Follow the below steps. 1. Power on the dishwasher by plugging in; 2.
Filling The Detergent Dispenser 1 A Sliding it to the left 2 B Press down 2 Add detergent into the larger cavity (A) for the main wash cycle . For better cleaning result, especially if you have very dirt items, pour a small amount of detergent onto the door. The additional detergent will activate during the pre-wash phase. 1 Please choose an open way according to the actual situation. 1. Open the cap by sliding the release catch. 2. Open the cap by pressing down the release catch.
PROGRAMMING THE DISHWASHER Wash Cycle Table The table below shows which programs are best for the levels of food residue on them and how much detergent is needed. It also show various information about the programs. ( )Means: need to fill rinse into the Rinse-Aid Dispenser.
Wash Cycle Table The table below shows which programs are best for the levels of food residue on them and how much detergent is needed. It also show various information about the programs. ( )Means: need to fill rinse into the Rinse-Aid Dispenser.
Starting A Cycle Wash 1. Draw out the lower and upper basket, load the dishes and push them back. It is commended to load the lower basket first, then the upper one. 2. Pour in the detergent. 3. Insert the plug into the socket. The power supply refer to last pageProduct fiche. Make sure that the water supply is turned on to full pressure. 4. Open the door, Press the power button. 5. Choose a program, the response light will turn on. Then close the door, the dishwasher will start its cycle.
Forget To Add A Dish? A forgotten dish can be added any time before the detergent dispenser opens. If this is the case, follow the instructions below: 1. Open the door a little to stop the washing. 2. After the spray arms stop working, you can open the door completely. 3. Add the forgotten dishes. 4. Close the door. 5. The dishwasher will start running again. WARNING It is dangerous to open the door mid-cycle, as hot steam may scald you.
ERROR CODES If there is a malfunction, the dishwasher will display error codes to identify these: Meanings Possible Causes E1 Longer inlet time. Faucets is not opened, or water intake is restricted, or water pressure is too low. E3 Not reaching required temperature. Malfunction of heating element. E4 Overflow. Some element of dishwasher leaks. Codes Ed Failure of communication between main PCB with display pcb. Open circuit or break wiring for the communication.
TECHNICAL INFORMATION W D1 H D2 Height (H) 815mm Width (W) 598mm Depth (D1) 550mm (with the door closed) Depth (D2) 1150mm (with the door opened 90°) 18
Product fiche (EN50242) Sheet of household dishwasher according to EU Directive 1016/2010 & 1059/2010: Manufacturer ([TXLVLW (*63 ( Type / Description ([TXLVLW (*63 ( Standard place settings 12 Energy efficiency class 1 A++ Annual energy consumption 2 258 kWh Energy consumption of the standard cleaning cycle 0,908 kWh Power consumption of off-mode 0,45 W Power consumption of left-on mode 0,49W Annual water consumption 3 3080 liter Drying efficiency class 4 A Standard cle
Product information sheet (EN60436) Supplier's name or trade mark: ([TXLVLW (*63 ( Supplier's address VHH SDJH Model identifier: General product parameters: Parameter Value a Rated capacity ( ) (ps) 12 a 55,9 EEI ( ) a Parameter Value Dimensions in cm Energy efficiency class ( a ) Height 81,5 Width 59,8 Depth 55,0 c E( ) a 1,13 Drying performance index ( ) 1,07 Energy consumption in kWh [per cycle], based on the eco programme using cold water fill.
WARRANTY TERMS & CONDITIONS 1. 2. 3. 4. 5. 6. 7. 8. 9. These warranty conditions apply exclusively to the original buyer and for domestic use of the appliance in the Netherlands. If the appliance is resold from user to user, the warranty becomes null and void. The warranty only applies if, in the event of a warranty claim, this warranty certificate with the original purchase invoice is shown by the original buyer.