
User's Guide

For products available in the USA/Canada market, for the 2.4 GHz band, only channels 1-11
can be operated. Selection of other channels is not possible.
Changes or modifications made to this device that are not expressly approved by the
party responsible for compliance could void the user's authority to operate the equip-
ment.
Use only attachments and accessories specified by Extreme Networks.
These devices are not intended for use by persons (including children) with reduced phys-
ical, sensory, or mental capabilities, or with lack of experience of knowledge unless they
are given supervision or instruction concerning use of the devices by a person who is
responsible for their safety. Children should be supervised to ensure that they do not play
with the devices.
Electrostatic discharge (ESD) can damage equipment and impair electrical circuitry. ESD
damage occurs when electronic components are improperly handled and can result in
complete or intermittent failures. Be sure to follow ESD-prevention procedures when hand-
ling electronic components and equipment.
During operation, the surfaces of the AP305C and AP305CX can become hot. Use caution
when handling.
To meet federal radiation exposure requirements, these devices should be installed at a
minimum distance of 8" (20 cm) from people or animals.
Install the AP
You can mount the AP305C and AP305CX on a flat surface or wall, or on the rails of a standard dropped ceiling
grid. There is also an accessory mounting bracket that allows you to install the device in Armstrong-style dropped
ceilings (ordered separately).
The following sections describe how to install your AP305C and AP305CX devices and connect them to the net-
work.
Shipping Carton Contents
The AP305C and AP305CX shipping carton contains the following items:
AP305C or AP305CX chassis
Mounting bracket
Read Me card
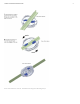
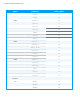
Install the AP on a Ceiling Track
The AP305C and AP305CX ship with a mounting bracket that lets you easily install them on the rail of a standard
dropped ceiling grid. The following illustration shows how to attach the bracket to the ceiling rail, and then install
the AP on the bracket. This illustration shows an AP305C but the procedures are the same for both models.
AP305C and AP305CX Hardware Guide
2