
User`s manual


SCP 150 • Installation and Operation
SCP 150 • Installation and Operation
Installation and Operation
Installation Overview
To install and set up an SCP 150, SCP 150 AAP, or SCP 150L,
follow these steps:
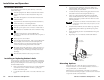
1
Turn the equipment off. Make sure that the SCP and the
System 5 IP switcher are disconnected from the power
source.
2
Run cables through the wall or furniture where the SCP
will be installed.
3
Prepare the site and install and ground the electrical box,
surface mount box, or mounting brackets.
4
Set the panel address DIP switch on the back of the SCP.
5
Wire the 5-pole captive screw connectors on both ends of
the cable that was installed in the wall or furniture in step
2
.
6
Plug the wired connectors into the CM/IR/SCP
connectors on the back of the SCP and on the rear panel of
the switcher.
7
Restore power to the switcher.
8
Press an input selection button. If the corresponding LED
does not light or the switch to the selected input is not
made, disconnect power from the switcher and verify
correct connector wiring at both ends of the cable.
9
Mount the SCP in the electrical box, surface mount box, or
mounting brackets. Make sure the faceplate is tied to an
earth ground to prevent damage caused by electrostatic
discharge.
10
Reconnect the switcher to the A/C power source.
2-2 2-3
Installing or Replacing Button Labels
You may wish to customize the SCP’s button labels. The labels
can be changed at any time, but it is convenient to change them
before you mount the panel. Follow these steps to change the
translucent button labels:
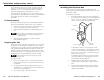
1. Remove the button from the panel: use a small, flat bladed
screwdriver such as an Extron Tweeker to gently pry a
button out from the panel.
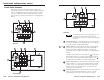
2. Locate the notch in the corner of one side of the clear outer
layer.
TEXT
Separate two
piece button here.
Clear Button
Cap
White Backing
Plate
Align tabs and
lock in place.
Use notch to
remove button.
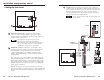
3. Separate the white backing from the clear button cap:
insert the blade of the small screwdriver into the corner
notch and gently twist the blade.
4. Save the translucent, white backing plate, but remove the
text/label insert from the transparent button cap.
5. Select one of the premade button labels from the label
sheets included with the SCP. Remove the label from its
backing and peel the protective film from the front of the
label, if applicable.
You may also use a Brother P-Touch label maker to create
custom labels. Cut the labels so they are square, 1/2 inch
on each side.
6. Insert the button label into the clear button cap, align the
white backing plate with the cap and firmly snap it into
place.
7. Gently but firmly press the reassembled button into place
in the panel.
8. Repeat steps 1 to 7 as needed to relabel other buttons.
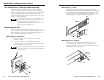
Mounting Options
Mount the SCP 150 or SCP 150 AAP in an electrical box or
surface mount box or use a mounting bracket to secure it to a
wall, podium, table, or other furniture.
Electrical boxes can be attached to wall studs or to furniture.
Use an electrical box deep enough to contain the SCP’s electrical
components and the connected cables.