
User`s manual


SCP 150 • Installation and Operation
SCP 150 • Installation and Operation
Installation and Operation, cont’d
2-52-4
To mount the SCP 150 in areas of walls or furniture without
studs, use an optional Extron 2-gang mounting bracket, part
#70-086-01, -11, or -21. For the SCP 150 AAP, use an Extron
4-gang mounting bracket, part #70-086-03, -13, or -23.
To mount the SCP 150 externally on a wall or desktop, use an
optional Extron 2-gang SMB surface mount box, part #60-640-02.
For the SCP 150 AAP, use an Extron 4-gang SMB, part
#60-642-02.
UL Requirements
The Underwriters Laboratories (UL) requirements listed below
pertain to the installation of the SCP into a wall or furniture.
1. This unit is not to be connected to a centralized DC power
source or used beyond its rated voltage range.
2. This unit must be installed in a UL listed electrical wall
box.
The UL approved electrical box is not included with the
SCP; the installer is responsible for obtaining and
installing the box.
3. This unit must be installed in accordance with the
National Electrical Code.
Preparing the Site
To mount the panel using either an electrical box or a mounting
bracket, use one of the rough-in templates provided on pages
A-7 through A-9 as a guide to measure and mark the hole in the
wall or furniture through which the SCP will be mounted. The
templates provide measurements for installing the panel with
either an electrical box or a mounting bracket. You do not need
the template if you are mounting the panel using an SMB.
The templates are not to scale and are provided for
reference only.
To prepare the site:
1. Choose a mounting location. If using an electrical box to
wall-mount the panel, locate a stud to which the box will
be attached.
2. Use the appropriate template and panel dimensions in
Appendix A to as a guide to measure and mark the area to
cut out of the wall or furniture.
3. Cut out the opening in the wall or furniture.
Installing the Electrical Box
If you are using a mounting bracket or SMB instead of an
electrical box, follow the mounting instructions that came with
the bracket or SMB.
To install the electrical box:
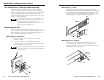
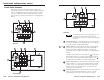
1. Insert the electrical box into the opening, and attach
the wall box to the wall stud (2" x 4") or furniture with
nails or screws, leaving the front edge flush with the
surface, as shown in the following illustration.
Flush with
Wall Surface
Screws or Nails
Wall Stud
Wall Box
To attach the wall box to wood, use four #8 to #10
wood or sheet metal screws. A minimum of 1/2 inch
(1.25 cm) of screw threads must penetrate the wood.
If the wood is a 2 x 4, such as a wall stud, 10-penny or
larger nails can be used.
To attach the electrical wall box to metal, use four #8
or #10 sheet metal screws (self-tapping) or #8 or #10
machine bolts with matching nuts.
2. Feed the cables into the wall box. Cable clamps
should be used to hold the cables in place for strain
relief.
3. Exposed cable shields (braids or foil) are potential
sources of short circuits. Trim back and/or insulate
shields with heat shrink.