
User`s manual


SCP 150 • Installation and Operation
SCP 150 • Installation and Operation
Installation and Operation, cont’d
2-9
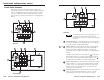
Mounting in a rack
The SCP 150 L is rack-mountable using the full rack width
UCM-RAAP mounting plate. Mount the UCM-RAAP using the
rack mounting screws included with the monting plate. Next,
mount the SCP 150 L to the UCM-RAAP using the SCP’s four
mounting screws, as show in the following diagram.
E
x
t
r
o
n
I
R
V
O
LU
M
E
S
C
P
1
5
0
L
P
R
O
J
E
C
T
O
R
P
R
O
J
E
C
T
O
R
O
N
P
R
O
J
E
C
T
O
R
O
F
F
F
U
N
C
T
I
O
N
B
U
T
T
O
N
L
IG
H
T
S
O
N
L
IG
H
T
S
O
FF
P
C
IN
PU
T
1
IN
PU
T
2
IN
P
U
T
3
IN
P
U
T
4
IN
P
U
T
5
Extron
SCP 150 L
Extron
UCM-RAAP
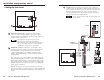
Mounting on a lectern
The SCP 150 L is designed to be mounted on a lectern. To
mount the SCP 150 L, cut a hole of the required size (see
“Preparing the Site” in this chapter) and attach the SCP 150 L
using the provided wood screws.
Extron
SCP 150 L
Lectern
SCP 150
V
O
L
U
M
E
P
R
O
J
E
C
T
O
R
INP
U
T
5
PC
LIG
HT
S
O
FF
LIGH
T
S
O
N
F
U
N
C
T
I
O
N
B
U
T
T
O
N
P
R
O
J
E
C
T
O
R
O
F
F
P
R
O
J
E
C
T
O
R
O
N
IN
PUT
4
INPU
T
3
IN
PU
T
2
INP
U
T
1
2-8
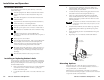
Pre-installation Testing/Troubleshooting
Before mounting the SCP to the wall or furniture, test the
system to make sure that the connections are correct and the
panel is working correctly. Test the system by powering on the
switcher, then pressing the input selection buttons on the
SCP and watching the LEDs on the switcher to see if the system
switches to the desired inputs.
The connections between the SCP and a System 5 IP
equipped with front panel controls can be tested even if
input/output devices are not available. For a
System 5 IP without front panels controls, input 5 will
be the only input available to view.
Mounting the SCP
Once the system has been cabled and tested, the SCP can be
mounted to the wall or furniture. See Mounting Options, earlier
in this chapter, for a description of the available brackets and
boxes in which the SCP may be mounted.
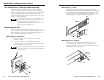
Mounting in a wall box
1. With power removed, insert the SCP into the wall,
furniture, or SMB.
2. Secure it to the box or mounting bracket with the
provided machine screws. The following illustration shows
an SCP mounted in an electrical box.
If you are not installing the SCP into a grounded metal
electrical box, make sure that the faceplate is grounded to
an earth ground.
S
CP
150
VOLUME
PROJECT
OR
I
N
P
U
T
5
P
C
L
IG
H
T
S
O
F
F
L
IG
H
T
S
O
N
F
U
N
C
T
IO
N
B
U
T
T
O
N
P
R
O
J
E
C
T
O
R
O
F
F
P
R
O
J
E
C
T
O
R
O
N
I
N
P
U
T
4
I
N
P
U
T
3
IN
P
U
T
2
IN
P
U
T
1