
Setup guide


3
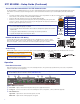
d Audio LED indicators —
HBR LED — Lights when the embedded audio signal is high bit rate audio.
Bitstream LED — Lights when the embedded audio input signal is Dolby Digital, DTS audio format, and 2-ch Dolby.
LPCM LED — Lights when the embedded audio input signal is 2-channel LPCM.
HDMI LED — Lights when HDMI embedded audio output (HBR, bitstream, or LPCM) is enabled.
S/PDIF LED — Lights when S/PDIF audio output (multi-channel or LPCM) is enabled.
Analog LED — Lights when analog audio output is enabled.
e Menu button — Press this button to access and navigate the On-screen Display (OSD) menu system.
f Enter button — Press this button to select submenus and submenu items.
g Adjustment knobs — Rotate the horizontal and vertical knobs to navigate the On-screen Display menu and to adjust settings.
Setting Front Panel Lockout Mode (Executive Mode)
The front panel security lock (executive mode) limits operation of the device from the front panel. While in executive mode, the XTP SR HDMI can
still be congured with SIS commands and the XTP System Conguration Software. To enable or disable executive mode through the front panel,
press and hold the Menu and Enter buttons simultaneously for 2 seconds or until the power LED blinks (see the XTP SR HDMI User Guide to
enable or disable executive mode with Simple Instruction Set (SIS) commands or the XTP System Conguration Software).
Setting HDMI Audio
The embedded audio on the HDMI output connector can be enabled or disabled by setting the HDMI audio switch next to the connector
(see e on page 1). Move and hold the HDMI audio switch up (for about 1 second) to enable embedded audio on the display connected to
the HDMI output connector or move and hold the HDMI audio switch down (for about 1 second) to disable it. The switch returns to the middle
position after it has been released. The associated LED lights when the audio is enabled and remains unlit when audio is disabled.
Conguring the XTP SR HDMI
The XTP SR HDMI can be congured through front panel controls and the On-screen Display (OSD) menu, Simple Instruction Set (SIS)
commands, or the XTP System Conguration Software. To utilize SIS commands or access the XTP System Conguration Software, connect a
host device to the XTP SR HDMI through the front panel Cong port (see b on page 2) or the rear panel Remote RS-232 connector
(see i on page 1). The Cong port supports SIS commands and the XTP System Conguration Software while the Remote RS-232 connector
supports only SIS commands.
On-screen Display (OSD) Menu System
The OSD menu consists of six submenus that can be accessed using the front panel Menu button. View the menu on a display connected to the
HDMI output connector (see e on page 1). The submenus are:
• Auto-Image — Use this submenu to perform a one-time Auto-Image on the image. The image is centered and sized to ll the output screen.
• Picture Control — Use this submenu to adjust the horizontal and vertical position, horizontal and vertical size, brightness, contrast, and
detail of the image.
• User Presets — Use this submenu to save or recall a user preset.
• Input Configuration — Use this submenu to view the total pixels and horizontal and vertical active pixels of the input signal.
• Output Configuration — Use this submenu to select an output rate from a list of common resolutions and refresh rates or view color space,
color bit depth, and HDMI data settings (all three are set to Auto).
• Advanced Configuration — Use this submenu to apply a test pattern, enable or disable a blank screen, freeze the output, set the aspect
ratio, or reset the receiver to factory default settings.
To adjust settings:
1. Press the Menu button to access the main menu.
2. Rotate either adjustment knob to navigate to a desired submenu.
3. Press the Enter button to access submenu items of a selected submenu.
4. Rotate either adjustment knob to navigate to a desired submenu item.
5. Press the Enter button to select a submenu item for adjustment.
6. As required, rotate the adjustment knobs or press the Enter button to adjust submenu items.
7. Press the Menu button to return to the list of submenus or exit the OSD menu.
XTP Conguration Software
The XTP SR HDMI can be congured by the XTP System Conguration Software when it is installed on a connected host device, such as a PC,
through the front panel USB port (see the XTP SR HDMI User Guide for more details).
Upgrading Firmware
The onboard rmware of the XTP SR HDMI can be upgraded via the XTP System Conguration Software or the Extron Firmware Loader Program
(available on the Extron website, www.extron.com).