
Instructions / Assembly


FORTRESS
®
OSHA Stair System Installation Manual Page 5 of 9
1. INSTALLATION
1.1.
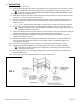
Set the platform on its side.
1.2.
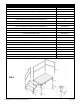
Loosen platform leg adjustment bolts in each platform corner pocket, but do not remove them. Adjust
legs to the desired height and securely retighten platform leg adjustment bolts and washers (FIG. 2).
If using oversized feet, see ‘OVERSIZED FEET INSTALLATION (OPTIONAL EQUIPMENT)’ section.
1.3.
Set the platform in an upright position.
1.4.
Readjust the height of each platform leg as necessary to level the platform. A slight tilt away from the
structure of no more than 1:50 will aid in drainage.
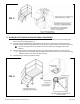
1.5.
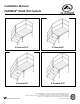
Remove the OSHA Riser Safety Pins and attach the riser (FIG. 1-E) to the platform by placing the “T” in
the riser’s upper corner pockets into the corresponding riser hanger (channels with roll pin) on the
platform (FIG. 3).
1.5.1.
The “T” placement determines height; use either upper or lower riser hangers as required.
1.6.
Secure the riser to the platform by reinserting OSHA Riser Safety Pins into the riser hanger (FIG. 3).
OSHA Riser Safety Pins (FIG. 1-D) must always be installed in the riser hangers on the platform
corner pockets before use (FIG. 3).
1.7.
Loosen riser leg adjustment bolts in the lower riser corner pockets, but do not remove them. Adjust the
legs to the desired height and tighten the riser leg adjustment bolts securely (FIG. 2).
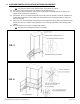
1.8.
Insert the 60” (longer) side of the platform handrail into the platform corner pocket, on the side
opposite the building or structure.
1.9.
Unfold the 40” (shorter) side of the platform handrail (FIG. 1-H) and orient on the side opposite the
riser, then lower the handrail into platform corner pockets until the snap button engages in the
corresponding hole (FIG. 2).
1.10.
Install the riser handrail (FIG. 1-J) into the riser on the side opposite the building or structure.
1.11.
Lag bolt (not included) the platform to the building using holes in platform angle braces (FIG. 2).
If lag bolts cannot be installed, secure the platform to the building or structure in another
structurally sound manner.
1.12.
Ensure the system is set up in the desired configuration, is correctly positioned, and complies with
applicable OSHA codes.
1.13.
Ensure all fasteners and locking mechanisms are in place and secured.
FIG. 2