
Instructions / Assembly


-2-
ASSEMBLY MANUAL
EZ-ACCESS
®
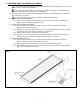
GATEWAY™ 3G Solid Surface Portable Ramp
ATTENTION INSTALLER AND END USER
• Please leave this Assembly Manual with the end user.
• Read all instructions prior to ramp installation.
• For residential use ONLY; do not use in commercial applications.
• RATED LOAD: 1,000 pounds. NEVER EXCEED RATED LOAD.
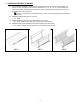
VIEW PACKING LIST
• Each system is shipped with a packing list. Be sure to check that all items are present before starting
assembly/installation.
TOOLS / MATERIALS TYPICALLY REQUIRED:
• 1/2″ socket or 1/2″ wrench
• Power drill
• 1/4″ drill bit
• 1/4″ masonry drill bit (if installing to concrete porch, step, etc.)
• 2 ea. concrete pin drive anchors (not included) if installing in concrete
• 2 ea. stainless steel wood screws (not included) if installing in wood
• Rubber mallet
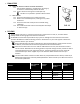
TABLE OF CONTENTS
SECTION 1: BASIC SAFETY AND WARNINGS .................................................................................................................... 3
SYMBOL MEANINGS..................................................................................................................................... 3
WARNINGS ................................................................................................................................................... 3
SECTION 2
: AVAILABLE GATEWAY 3G RAMPS ................................................................................................................. 4
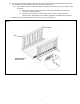
SECTION 3: FASTENING RAMP TO LANDING (ALL RAMPS) ............................................................................................. 5
SECTION 4: INSTALLING (OPTIONAL) HANDRAILS ....................................................................................................... 6-7
SECTION 5: INSTALL RAMP HANDRAIL END LOOPS ..................................................................................................... 8-9
SECTION 6: INSTALL RAMP CORNER PROTECTOR CAPS .................................................................................................. 9
SECTION 7: FINAL STEPS .................................................................................................................................................. 9
SECTION 8: DE-ICING ..................................................................................................................................................... 10
SECTION 9: INCLINE CHART ........................................................................................................................................... 11