
Installation Guide


4
Section 2 – Installation
2.5 Opening the Door
Depress the padlock-able catch at the bottom of the door and pull the door towards you to open. It will
detach as you slide the door toward the ground.
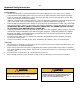
2.6 Removing Inner Cover
This should only be attempted by a certified electrical
contractor.
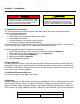
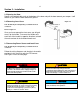
Refer to Figure 2.1
Once you have opened the front cover you will gain
access to the handle. To remove the handle twist
each half of the handle in opposite directions to back
the male end out of the threaded female end.
2.7 Connecting Power Source and Load Lines
This should only be attempted by a certified electrical
contractor.
Follow the wiring diagrams and electrical schematics
provided in this manual to wire the EZ-Connect.
See Figure 2.2 on the next page.
Hex Handle A
(male)
Hex Handle B
(female)
Rod
DANGER!
Verify both UTILITY and ALTERNATE power supplies
are OFF before trying to connect power source and
load lines to the transfer switch. Supply voltages are
extremely high and dangerous. Move handle on EZ-
Connect into OFF position.
Figure 2.1
WARNING!
Power conductors and sending wires may have
voltage present that can cause severe personal injury
or death. De-energize all power or control circuit
conductors before beginning to perform any wiring
activity to or within the transfer switch.
NOTICE!
The installation must fully comply with all applicable
codes, standards, and regulations.
CAUTION!
Extreme care should be taken to protect the EZ-
Connect from drill chips, filings, and other
contaminants when marking the cable entry holes (if
applicable) and mounting the enclosure to prevent
component damage or a future malfunction.