
Installation Guide


6. Insert Back Tube (closest to back wall) into installed Tube Receiver (use hammer or mallet if necessary).
7. If using an End Bracket, follow steps 15-22 for End Bracket Installation.
8. Attach Back Tube to other Tube Receiver and Extend to opposite sidewall.
9. Place Level on Back Tube & then also on Tube Receiver – Must be level - Mark Holes on wall with pencil.
10. Repeat Steps 4 and 5 above (from page 1)
11. Insert 4 other Top Tubes into both Tube Receivers.Don’t insert Hanging Rod tube (Bottom of “L”) until after step 13.
12. Twist both ends of tubes until fully secured. You may need to use a hammer to tap in tubes.
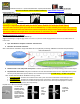
13. Place Center Support so the tubes rest in the slots (preferably thicker part of tubes) & Mark Holes on back wall. Push
center support up so that they come into full contact with tubes.
14. Attach Center Support using anchors and screws (see steps 4-5 on page 1).
Installing with only 1 Side Wall – Mount 1 Tube Receiver on Side Wall using steps 1 - 6
One Optional End Bracket is needed when:
Ending Unit WITHOUT a side wall. Joining 2 units together. Forming a corner with another unit.
If you have NO Side Walls, a 2
nd
End Bracket must be purchased.
15. Snap Tube Receiver into appropriate side of End Bracket. Hold End Bracket up to wall to ensure that the correct Tube
Receiver is snapped in and the shelf will extend in the correct direction
16. Place Bolts into End Bracket holes on the outside of the End Bracket. 17. Thread nuts on the bolts and turn them a
few times with your fingers.
18. Tighten nuts & bolts with a manual or electric screwdriver until snug.
19. Attach Back Tube to other Tube Receiver (which is attached to End Bracket).
20. Place Level on Back Tube & also on Tube Receiver/End Bracket–Must be level - Mark Holes on wall with pencil.
21. Repeat Steps 4 and 5 (page 1). 22. Repeat steps 10-13
23. Insert Tube for Hanging Rod into both Tube Receivers.
Note: DO NOT
rest Center
Support on
tube extension
sleeves.