
Instructions / Assembly


8
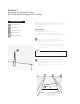
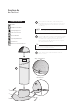
The vertical seam of the reflective tube should point to the
East or West to avoid irregular light patterns in your room.
TIP
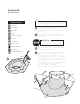
Use a flat pry bar to carefully break the seals on
the shingles upslope above the cuthole. Use a claw
hammer to remove nails on the shingles above the
cut hole.
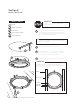
Secure flashing to roof with 2” Flashing Screws and
Washers. For aluminum flashing (Both Spun Severe
Weather & Formable. See images on pg. 4), use 9
screws & washers in an evenly spaced, circular pattern
around the 10” or 14” hole. The circular pattern should be
a 21” diameter for the 10” unit and a 24” diameter pattern
on the 14” unit.
For injection molded flashing, use 8 screws and washers
in the preformed holes for the 10” and 14” unit.
Seal screw heads with roof sealant.
Spun aluminum flashing does not have pre-drilled holes.
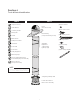
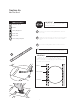
Caulk Gun
Claw Hammer
Flat Pry Bar
Ladder
Phillips Screwdriver
2” Screws
3/4” Washers
Roofing Sealant
Safety Equipment
Roof Flashing
Top Adjustable Tube
TOOLS & PARTS
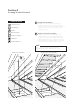
Generously apply roof sealant around bottom of
flashing. Slide top and sides of roof flashing under
top shingles.
Slide Top Adjustable Tube (pink label) into the flashing
to check for proper alignment.
For short shaft cathedral style installation
see Section 10. Do not install dome yet.
IMPORTANT
Sealant
Section-4b
On The Roof
1
1
1
2
2
3
4
2
2
3
4
4