SILENCE FEELING WHISPER SPECTRA NOVA CADRA NOVA MISTY room-sealed built-in gas-fireplace installation guide and user manual “Log Burner Technology” 40 010 527 02 37 Saturnus 8 NL-8448 CC Heerenveen Postbus 219 NL-8440 AE Heerenveen T. +31(0)513 656500 F.
UK/IRL CONTENTS 1. INTRODUCTION 2 2. SAFETY INSTRUCTIONS 3 3. INSTALLATION REQUIREMENTS 3.1 Builders opening and surround 3.2 Requirements outlet and exhaust 5 5 8 4. INSTALLATION-INSTRUCTIONS 4.1 Gas connection 4.2 Preparation of the appliance 4.3 Fitting the firebox 4.4 Placing of the wood set 17 17 17 24 26 5. INSTALLATION OF THE FLUE 5.1 Connection of the flue 5.2 Placing through existing chimney 5.3 Remote control 27 27 28 30 6. COMMISIONING 6.1 6.2 6.3 6.
UK/IRL UK/IRL 1. INTRODUCTION 2. SAFETY AND GENERAL INFORMATION Note: these instructions should be read carefully and retained for future reference. Please leave these instructions with the user.
UK/IRL UK/IRL 3. INSTALLATION REQUIREMENTS Building Regulations and Standards issued as relevant by the Department of the Environment or the Scottish Development Department. In the Republic of Ireland installation should be carried out in accordance with IS813, ICP3, IS327, Building Regulations, Codes of Practice, the manufacturers instructions and any other rules in force. Failure to comply with the above could leave the installer liable to prosecution and invalidate the appliance warranty.
UK/IRL UK/IRL 3.1 Builders opening and surround (continuing) F If the builders' opening is constructed out of non-combustible composition board (Fibrelux) and you install the appliance without a mantel then: G K E I D - Ventilate the space above the appliance (min. 1000 mm2 ). L M - Always fit the DC convection set. C B J H A - The plaster of the outside has to be resistant to a high temperature. Use therefore the plaster materials especially made for this, to prevent discoloring (min.
UK/IRL UK/IRL 3.2 Flue requirements Flue restrictor The appliance is of the type C11/C31. The appliance will need to be supplied with the approved flue pipes and terminal, it is not possible to supply your own. If applicable, in the table is also stated the size of a flue restrictor. This restrictor needs to be fitted in the combustion chamber when placing the appliance ( see chapter 4.2). Normally the smallest flue restrictor is fitted. The minimum effective height of the flue system must be 0.
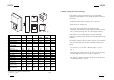
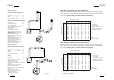
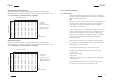
UK/IRL UK/IRL Table Silence and Feeling with interior Widescreen Example calculation 1 Determine according to the table 2 the right total horizontal- and vertical length. When meeting an X, and when the values are outside the table, the combination is not allowed. Normally the 30 mm flue restrictor is preinstalled. Flue lenght C + E = 1m + 1m Elbows D = 2m 2m 2m Total horizontal extension 4m Hvert. Calculati0n horizontal extension fig.
UK/IRL UK/IRL Table Cadra Nova with interior MV150 3.2 Flue requirements (continuing) Determine according to the table 4 the right total horizontal- and vertical length. When meeting an X, and when the values are outside the table, the combination is not allowed. Normally the 30 mm flue restrictor is preinstalled.
UK/IRL UK/IRL Flue terminal positions Table 6 Dimension Terminal position A B C D E F G H I J K L fig. 3 14 M N P Q (kW input 7.5 kW expressed in net) Direct below an opening, airbrick, opening windows, etc. Above an opening, airbrick, opening window ect. Horizontally to an opening, airbrick, opening window etc.
UK/IRL UK/IRL 4. INSTRUCTIONS FOR INSTALLATION Example of how terminal position is measured 4.1 Gas connection 1. Installation pipes should be in accordance with BS 6891. Pipe work from the meter to the appliance must be of adequate size. 2. The complete installation including the meter must be tested for soundness and purged as described in the above code. 3. A means of isolation must be provide in the supply to facilitate servicing. 4.
UK/IRL UK/IRL 4.2 Preparing the appliances Widescreen and Whisper (continuing) 4.2 Preparing the appliances Widescreen and Whisper (continuing) C C C 2. C C C C C A C C fig. 8 A A fig. 6 4. Take the box with the log set out of the combustion chamber. Remove the back panel by loosening the screws B (see fig. 6). 5. Place the right flue restrictor in the combustion chamber. To determine the right flue restrictor, see chapter 3. B B B B B fig. 7 3.
UK/IRL UK/IRL 4.3 Preparing the appliance Misty 4.3 Preparing the appliance Misty (continuing) 4. Take the box with the log set out of the combustion chamber. 5. Place the right flue restrictor in the combustion chamber. To determine the right flue restrictor, see chapter 3. fig. 10 1. Remove the door frame. Lift and pull forward (see fig. 10). 2. Open the ashtray door by pulling down (bottom handle). C fig. 12 C fig. 11 3. To open the door, remove the screws C (see fig. 11).
UK/IRL UK/IRL 4.4 Preparing the appliances Spectra Nova/Cadra Nova 4.4 Preparing the appliances Spectra Nova/Cadra Nova (continuing) 4. Take the box with the log set out of the combustion chamber. 5. Place the right flue restrictor in the combustion chamber. To determine the right flue restrictor, see chapter 3. fig. 13 1. To open the door, remove the screws A (see fig. 13). Open and remove the door; lift and pull forward. Be sure that there are no fingerprints on the glass.
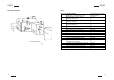
UK/IRL UK/IRL 4.5 Fitting the firebox 4.5 Fitting the firebox (continuing) Points of attention for placement: - If possible, first locate the appliance before assembling the flue. - If this is not possible then always use an extendible pipe before connection onto the appliance. ceramic blanket ceramic blanket ceramic blanket 1. Position the firebox in the fireplace opening. You can adjust the height with the 4 adjustable feet.
UK/IRL UK/IRL 5. INSTALLATION OF THE FLUE 4.6 Placing the log set Never place extra elements of any kind into the combustion chamber. To guarantee good combustion, the log set may only be installed in the way specified by Faber International. Any other arrangement can lead to soot on logs or window. Do not use the fire with broken or missing logs. 4.6.1 Placing the log set Widescreen, Whisper, Spectra Nova, Misty and Cadra Nova 5.
UK/IRL UK/IRL 5.2 Connection onto an existing chimney You can connect the appliance onto an existing chimney. The existing chimney then functions as air supply, where a flexible stainless steel liner (to BS715) of 100 mm performs the flue function. Any existing chimney used as an air supply must only service this appliance.
UK/IRL UK/IRL 5.3 Remote control (if applicable) The remote control is only meant to regulate the flames, it functions only when the pilot burner is ignited. It is therefore not possible to ignited the appliance with the remote control or to shut-off the pilotflame. The radio-frequency remote control is intended for fireplaces installed in a domestic setting in all EU countries except Austria, Denmark, Finland and Greece. Features: - Manual control will always remain possible.
UK/IRL UK/IRL 6. COMMISSIONING (functional checks) 6.1. Check pilot ignition 1. Push in and turn the control knob (A) from { anticlockwise to the setting (small flame). You will hear a tick meaning there is ignition. Hold the knob in and wait for a few seconds while the air is purged. 2. Bring the knob back in the start position and turn the knob several times to the position. Check that the pilot has lit. 3.
UK/IRL UK/IRL 7. HANDING OVER 8. SERVICING (final check and customer briefing) 7.1 Instruct the customer on the full operation of the appliance. 7.2.1 Advise the customer how to clean the appliance including the glass. It is recommended, that the fire is inspected/serviced by a competent person at least once a year. 7.2.2 Instruct the customer on the operation of the remote control, including replacement of batteries and how to set the right transmissions code.
UK/IRL UK/IRL 8.1.1 Cleaning the glass Depending on the intensity of use, you can get a deposit on the glass. This can be removed with a special ceramic glass cleaner (ceramic cook-top cleaner) as follows: 8.1.4 Burner tray assembly 1. Remove the front, glass, log set, grid and burner tray cover. 2. Break the gas supply at the control valve. 3. Unscrew the burner assembly and take them out of the combustion chamber. 1. Remove the front and the back. 2. Clean the glass.
UK/IRL UK/IRL 8.1.7 Combustion test A BS7967 combustion analysis check should be carried out using an analyser to BS7927 positioned in the flue outlet. 8.1.6 Gas control block A Ratio of CO/CO2 should be less than 0.01 within 30 minutes. (100ppm CO per 1% CO2). A reading of CO in the room centre should give a rise of less than 9ppm over ambient, peak reading. A A B B DD CC A B C D 38 Governor Adjusting screw pilot flame Inlet pressure test point Burner pressure test point fig.
UK/IRL UK/IRL 8.2 LIST OF SPARE PARTS 8.
UK/IRL UK/IRL 8.3 TECHNICAL DATA 8.3 TECHNICAL DATA MV100 Whisper and Spectra Nova Country Category Model type Heat input Hi Efficiency class NOX class Type of gas Inlet pressure kW mbar MV150 Cadra Nova UK/IRL II2H3+ UK/IRL II2H3+ Country Category C11 0f C31 7,5 2 4 G20 20 C11 0f C31 7,5 2 4 G30 30/37 Model type Heat input Hi Efficiency class NOX class Type of gas Inlet pressure kW mbar UK/IRL II2H3+ UK/IRL II2H3+ C11 0f C31 7.5 2 4 G20 20 C11 0f C31 7.
UK/IRL UK/IRL 8.
UK/IRL UK/IRL 9. SAFETY INSTRUCTIONS FOR THE USER IMPORTANT A suitable Fireguard conforming to BS6539 and BS6778 should be used with this appliance to protect children, the elderly or infirm. Care should also be taken with pets. 9.1 General safety instructions If a gas leak is found or suspected, turn off the gas supply at the meter and contact your installer or gas emergency service. These instructions should be read carefully and retained for future reference.
UK/IRL UK/IRL 10. CONTROLLING THE APPLIANCE Knob A The { is the OFF position preventing any gas from passing through the control valve to either the pilot burner or to the main burner. By pressing the knob in it is possible to turn it anticlockwise.
UK/IRL UK/IRL 10.3 To extinguish 10.4.1 To light 1. Push in and turn the control knob (A) from { anticlockwise to the setting (small flame). You will hear a ignition click. Check that the pilot is lit (if not repeat). 1. For the main burner turn the control knob B clockwise to position {. 2. To disable knob B turn knob A to the position. 2. Continue to hold in the control knob for a further ten seconds to ensure that the pilot flame is stable. 3.
UK/IRL UK/IRL 10.4.3 Setting the right transmission code he receiver has to learn the code from the transmitter, which is already done at the factory. However the code disappears if the receiver is disconnected from the mains for a longer period, 10.4.4 Changing the batteries There is no risk of electric shock as the low voltage supply is similar to that used in torches. Always turn off the appliance before changing batteries. 1. Set the on/off switch on the receiver to "on". Remote control 2.
UK/IRL UK/IRL 12. DISPOSAL OF THE PACKAGING 11. CLEANING AND SERVICE AND THE APPLIANCE INSTRUCTIONS Important: Turn off the fire and allow it to cool down before commencing cleaning. It is recommended that the fire is inspected/serviced, by a competent person at least once a year. To maintain the finish on the trim wipe with soft damp cloth only. Do not use abrasive cleaners, polish or solvents as these can damage the surface finish. The appliance packaging is recyclable.