
Instructions / Assembly
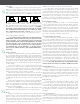

Correct
Under-Driven
Over-Driven
Fastening
FABRAL can supply either screws or nails for fastening into
dimension lumber. Always use screws with solid sheathing.
Screws for use with steel panels are galvanized and then coated
with an organic polymer for optimum corrosion resistance. For
best results with aluminum panels, use #300 series stainless steel
screws.
Wood screws with combination metal and neoprene washers
should be installed in the at area of the panel adjacent to the
ribs, and tightened such that the washer is compressed as illus-
trated above. This will ensure a lasting, leak-proof seal. REMOVE
ANY METAL FILINGS CREATED BY THE DRILLING ACTION OF
THE SCREWS OR PRE-DRILLING OF THE HOLES TO AVOID
RUST STAINING ON THE PANEL SURFACE. Refer to the fasten-
ing schedules in this booklet for the correct fastener locations.
Panels adhered with CondenStop
FULL LENGTH PANELS FROM EAVE TO RIDGE ARE REC-
OMMENDED, EAVE OVERHANGS, VALLEYS AND ANY OTHER
EDGES EXPOSED TO THE WEATHER SHOULD BE PAINTED
TO SEAL MICROFIBERS FROM ABSORBING MOISTURE FROM
THE OUTSIDE. WET STACK STORAGE STILL APPLIES TO PAN-
ELS WITH CONDENSTOP APPLIED. PLEASE STORE PROPERLY
BY COVERING AND TILTING ONE END. IT’S ALWAYS BEST IF
THEY CAN BE STORED INSIDE IF NOT BEING IMMEDIATELY
INSTALLED.
Flashing and Trim
Always begin ashing installation from the bottom and work
up, so that upper ashings are lapped on top of lower ashings.
This will prevent moisture from leaking under the ashings and
into the structure. Endlap ashings a minimum of 6ފ and seal the
lap joints with sealant. Extend ashings 4-6ފ beyond the building,
cut along the bend lines, apply sealant, and fold the side aps in
and the top aps down to cap off the ends. Secure with pop-rivets
or stitch screws.
Some roof conditions, such as valleys, may require a longer
endlap and/or a larger ashing to properly drain moisture from
the roof. Factors that inuence ashing size, shape, and endlap
requirements include roof pitch, roof geometry, slope length, and
climatic factors (such as heavy snowfall or rainfall).
Whenever possible, begin trim installation at the downwind
end of the roof, farthest away from the source of prevailing winds,
to allow ashing laps to face away from wind-driven rain. Refer to
the details in this book for the proper location of fasteners and
sealants.
The ashings and trims shown in this book are standard parts.
Custom trims are available to meet your specic design needs. If
you need a special trim, please furnish a drawing of the desired
shape, including dimensions and angles, to your Fabral dealer to
obtain pricing and availability.
Refer to the SMACNA Architectural Sheet Metal Manual for
additional information about detailing and installing ashings.
Safety
Always work safely when installing metal products and use
extreme caution on the roof at all times. Wear gloves and safety
glasses to reduce the risk of injury, and use hearing protection
when operating power tools. Always be sure that ladders are
safely positioned and properly secured. Safety harnesses or other
special equipment may be required; be sure to Consult OSHA
guidelines for compliance with all safety requirements.
Do Not walk on panels until all the fasteners are installed.
Metal roong panels are slippery when wet, dusty, frosty, or oily
-- Do Not attempt to walk on a metal roof under these conditions.
Wear soft-soled shoes to improve traction and to minimize dam-
age to the paint nish. Always be aware of your position on the
roof relative to any roof openings, roof edges, co-workers, and
penetrations. Installing metal panels or ashings on a windy day
can be dangerous and should be avoided if possible.
Cutting Aluminum Panels
To make a cut parallel to the ribs, score the panel deep-
ly with a sharp utility knife and bend back-and-forth along the
score, breaking the metal off cleanly. For cuts across the ribs, use
straight-cut snips, electric or pneumatic shears, a portable prole
shear, or an electric nibbler. Some installers prefer using a circular
saw with a metal cutting blade (a ne-tooth hardwood blade, or a
standard combination blade reversed in the saw works also). Light
oil or soap on the blade will make cutting easier.
Cutting and Drilling Steel Panels
Steel panels may be cut with metal snips, electric or pneu-
matic shears, a portable prole shear, or an electric nibbler. Some
installers prefer using a circular saw to cut metal panels. Do Not
use self-consuming abrasive blades because of the following: 1.
Abrasive blades burn the paint and galvanizing at the cut edge,
leaving edges that are jagged and unsightly and rust more quickly
2. Abrasive blades produce hot metal lings that embed in the
paint and cause rust marks on the face of the panel. If saw cutting
cannot be avoided, select a carbide-tipped blade specially de-
signed for cutting light-gage ferrous metal panels. These blades
are now available at many home centers and lumber yards. 1. All
saw cut panels must be turned face down and cut in a location
down-wind and well away from the building and other panels to
avoid embedment of metal lings on other panels 2. All saw cut
panels must be thoroughly wiped to ensure the removal of all
metal lings. Pre-drilling wall panels gives uniform alignment of
screw rows. BE SURE TO REMOVE ANY FILINGS ONCE PANELS
ARE INSTALLED TO AVOID RUST MARKS FROM THE FILINGS.
Building Maintenance
A metal roof should be inspected annually and cleaned as
necessary to maintain its beauty and performance. Any debris
or residue, including leaves, twigs, and dust should be cleaned
off promptly to prevent moisture entrapment against the metal,
which may lead to nish deterioration or premature corrosion.
Flashings may need to be re-sealed periodically in order to main-
tain optimum weathertightness.
Proper Storage
Store metal panels indoors when possible; if outdoors, cover
and elevate. Elevate one side higher for water drainage. Never
cover in plastic; us a tarp that can breath. Allow for air circula-
tion. If a bundle gets wet, break bands and separate sheets; allow
sheets to dry completely and only restack if completely dry. Prod-
uct should be stored for a maximum of 2-4 weeks before being
installed.
Spray Foam Insulation
When insulating metal with spray foam insulation, the rst
application layer should be getting the insulation behind all fram-
ing members. When completing the insulation, ensure the spray
foam is installed in 2ފ thick layers (maximum) until desired thick-
ness is achieved.