Manual de instalación y uso del aparato Manual de instalação e utilização do aparelho Installation manual and instructions for use Installations- und Bedienungsanleitung
ÍNDICE / ÍNDICE / TABLE OF CONTENT / INHALT ESPAÑOL INSTALACIÓN Y MONTAJE USO DEL APARATO Y CONSEJOS PRÁCTICOS MANTENIMIENTO Y LIMPIEZA DEL APARATO LOCALIZACIÓN y SOLUCIÓN DE PROBLEMAS ESQUEMAS Y MEDIDAS DE INSTALACIÓN 3 8 23 25 107 PORTUGUÊS INSTALAÇÃO E MONTAGEM 29 UTILIZAÇÃO DO APARELHO E CONSELHOS PRÁTICOS 34 MANUTENÇÃO E LIMPEZA DO APARELHO 49 LOCALIZAÇÃO E SOLUÇÃO DE PROBLEMAS 51 ESQUEMAS E DIMENSÕES DE INSTALAÇÃO 107 ENGLISH INSTALLATION AND FITTING 55 USING THE APPLIANCE - A FEW PRACTI
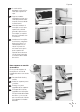
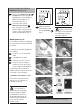
LAVAVAJILLAS INSTALACIÓN Y MONTAJE 1 CONEXIÓN A LA RED DE AGUA En la parte posterior del lavavajillas encontrará la manguera de agua: a Conecte el tubo a la toma de agua, apriete la tuerca de conexión y asegúrese de que la manguera esté bien enroscada al aparato. a b La manguera ha de pasar entre la pared y el zócalo inferior trasero del lavavajillas (b1), con objeto de que no se estrangule o quede excesivamente tirante (b2).
2 CONEXIÓN ELÉCTRICA Consulte la etiqueta de características situada en el canto superior de la puerta, antes de realizar las conexiones eléctricas. Asegúrese de que la tensión que llega a la base del enchufe es la que aparece en la etiqueta. Es muy importante que el lavavajillas se conecte a un enchufe con toma de tierra.
Español c A continuación desplegar hacia atrás los tacos que soportan la tapa. d Algunos modelos integrables incluyen una varilla que permite nivelar las patas traseras desde la parte frontal. e Antes de introducir el lavavajillas en el hueco aproxímelo y elévelo girando la pata trasera hasta dejar un espacio de unos 3 milímetros con la encimera. f Introduzca el lavavajillas en el hueco y asegúrese de que los tubos y el cable quedan trás el zócalo.
4 PANELACIÓN Y ENCASTRE PA N E L A C I Ó N De forma sencilla, puede colocar en la puerta del lavavajillas paneles o revestimientos decorativos, a juego con los muebles de su cocina. Estos paneles de revestimiento no pueden tener un espesor superior a 4 mm. a Retire el marco de la puerta soltando los tornillos. b Prepare el panel a estas dimensiones: 596 x 586 mm. c Coloque el panel o revestimiento decorativo. Para fijar el nuevo panel decorativo vuelva a atornillar el marco de la puerta.
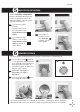
Español 5 SELECCIÓN DE IDIOMA Algunos lavavajillas con pantalla ofrecen la posibilidad de personalizar los menús del display a partir del idioma que prefiera. Para ello siga las siguientes indicaciones: a b Para activar el modo IDIOMA: Pulse durante más de tres segundos la tecla Carga arriba y Carga Abajo. a c Para cambiar o elegir idiomas: Pulse la tecla Carga arriba y Carga Abajo aparecerá un nuevo idioma. b Para validar el IDIOMA. Pulse la tecla Arranque El idioma ya está seleccionado.
LAVAVAJILLAS USO DEL APARATO Y CONSEJOS PRÁCTICOS 1 DUREZA DEL AGUA, SAL, ABRILLANTADOR Y DETERGENTE Ajuste de la dureza del agua. El agua contiene cal. Cuánto más cal contenga el agua, mayor será su dureza. Para que la cal no dañe el lavavajillas, éste incorpora un descalcificador que reduce la presencia de cal en el agua y la deja limpia para el lavado. Este descalcificador funciona con sal. Antes de poner en funcionamiento el lavavajillas tenemos que conocer el grado de dureza del agua.
Español Regulación de la cantidad de sal Los lavavajillas incorporan un regulador de sal que, . según el modelo, puede ser manual o electrónico. Este sencillo ajuste del lavavajillas es vital para su buen funcionamiento. No lo pase por alto. REGULACIÓN MANUAL Si su lavavajillas lleva en el lateral interior derecho un regulador de sal como los mostrados en las fotografías adjuntas (Mod. A-B) Vd. Deberá posicionar el regulador de sal en el número que corresponda a su dureza de agua (ver tabla).
REGULACIÓN ELECTRÓNICA MODELO D (ver pág. 17) a Pulse la tecla Reducción de Tiempo durante tres segundos. Seguidamente se encenderá el piloto correspondiente a la dureza del agua (fig. 1). b Pulse de nuevo la tecla Reducción de Tiempo para seleccionar el valor de dureza. Según vaya pulsando la tecla, se irá encendiendo el piloto correspondiente (fig. 1). L1 L2 L3 L4 1 c L1 L2 L3 L4 2 Valide la selección necesaria pulsando la tecla Arranque (fig. 2).
Español El abrillantador facilita el secado y evita que la vajilla tenga gotas de agua después del lavado. El depósito del abrillantador está en el interior de la puerta, junto al de detergente. El depósito dispone de un dosificador de 4 posiciones para poder ajustar la cantidad del abrillantador según la calidad del agua. Si observa gotas de agua en la vajilla, aumente la numeración del regulador del abrillantador.
Detergente El detergente se vierte en un depósito ubicado en la parte interna de la puerta, junto al del abrillantador. a Una vez vertido el detergente, cierre la tapa del depósito. b Algunos programas requieren además colocar una parte de la dosis en el alojamiento situado en la tapa del depósito. DEPÓSITO DETERGENTE Existen detergentes en pastillas, en polvo y líquidos. La cantidad de detergente puede consultarse en la tabla de programas.
Español 2 VAJILLA. TIPOS Y COLOCACIÓN Tipo de vajilla No toda la vajilla es apta para los lavavajillas. No es recomendable introducir piezas de madera o barro, ni las de plástico no resistentes al calor. La cubertería inoxidable puede limpiarse sin ningún problema; sin embargo, hay que procurar que los cubiertos de plata no estén en contacto entre ellos, ya que pueden aparecerles algunas manchas. Las piezas de aluminio pueden decolorarse con el tiempo.
c Los cubiertos, a excepción de los cuchillos, han de ponerse en el cesto para los cubiertos cuidando que los mangos queden hacia abajo. d En el cestillo superior se colocan las piezas más delicadas, como tazas, vasos, porcelana o cristal y platos de tamaño estándar. Hay una zona destinada particularmente a los cubiertos largos. Asimismo, hay unos soportes que, puestos en posición vertical, sirven para colocar copas.
Español Regulación de los cestillos Los cestillos pueden regularse en función de la carga. 19 cm. El cestillo superior puede colocarse a dos alturas distintas de forma que se puedan lavar platos de diferentes tamaños. En la posición alta podrá lavar en el cestillo superior platos normativos de hasta 19 cm. y en el inferior de 31 cm. Colocando el cestillo superior en la posición baja podrá lavar platos de hasta 24 cm. arriba y de 26 abajo. a 31 cm. 26 cm.
3 A SELECCIÓN DEL PROGRAMA DE LAVADO pilotos sal • abrillantador detergente 4 en 1 piloto funcionamiento tecla mando selector tecla on/off de programas arranque B piloto Eco + tecla Eco + piloto pilotos reducción sal • abrillantador detergente 4 en 1 display tiempo piloto funcionamiento tecla mando tecla tecla tecla on/off selector de arranque retardo reducción programas horario tiempo C pantalla tecla on/ off tecla tecla retardo reducción horario tiempo tecla selector de programas tecla carga
Español pilotos: • lavado • fin D pilotos: • reducción tiempo • retardo horario tecla retardo horario piloto funcionamiento botón on/off mando selector de programas pilotos abrillantador • sal E tecla tecla arranque/ reducción pausa tiempo pilotos: • lavado • secado • fin display pilotos: • carga arriba • abajo • reducción tiempo • 4 en 1 tecla reducción tiempo piloto funcionamiento botón on/off pilotos abrillantador • sal mando selector de programas tecla retardo horario tecla 4 en 1 tec
Para seleccionar el programa de lavado, debe seguir los siguientes pasos: a Para los modelos A, B y C, pulsar la tecla On/Off durante dos segundos (hasta oir un pitido de confirmación). En el panel frontal del lavavajillas, se encenderá el piloto, el display o la pantalla según modelo. a Para los modelos D, E, F y G pulsar el botón On/Off y se encendarán los pilotos o el display, según modelo.
Español Dispone de varios tipos de programas en función del modelo del lavavajillas: Es muy importante escoger bien el programa de lavado en función de la suciedad, la cantidad, y tipo de vajilla.
4 SELECCIÓN DE LAS FUNCIONES ADICIONALES Las funciones de lavado se deben seleccionar siempre después de elegir el programa de lavado. Cualquier cambio de programa durante la selección anula las funciones previamente seleccionadas. Estas funciones permiten ajustar al máximo la carga, los tiempos y los consumos del lavado. Las funciones adicionales son según modelos: Tecla: Retardo horario Permite retrasar el comienzo de lavado, pulsando la tecla Retardo horario. Modelos E y G (ver pág.
Español 5 PUESTA EN MARCHA Una vez seleccionado el programa de lavado y las funciones adicionales: a Pulse la tecla de arranque. El lavavajillas está en funcionamiento. 6 DESARROLLO DEL PROGRAMA DE LAVADO Las fases activas en cada momento del programa irán apareciendo sucesivamente a medida que avanza el lavado. Modelos sin display: Se iluminará un piloto de arranque /stop.
7 FIN DE PROGRAMA Una vez finalizado el programa, el aparato emitirá un pitido durante 3 seg. y/o se encenderá el piloto FIN (STOP). En los modelos A y B, el piloto de funcionamiento se quedará intermitente. 8 CORTES EN EL SUMINISTRO ELÉCTRICO Si se produce un corte en el suministro eléctrico, al restablecerse el mismo el lavavajillas continúa su funcionamiento normal en el punto donde se había parado. 9 CONSEJOS BÁSICOS Hay una serie de cuestiones que siempre ha de tener en cuenta.
LAVAVAJILLAS MANTENIMIENTO Y LIMPIEZA DEL APARATO Es recomendable que realice habitualmente las operaciones de limpieza con el fin de alargar la vida de su lavavajillas. Cada tres meses ha de realizar las siguientes operaciones: • Limpieza del filtro. • Limpieza de los distribuidores. • Limpieza interior. • Limpieza exterior. De esta forma alargará la vida de su lavavajillas.
2 LIMPIEZA DE LOS ASPERSORES El tercer aspersor (según modelo), el aspersor superior y el aspersor inferior han de limpiarse cada tres meses. Desmontaje de los aspersores: a El tercer aspersor se desmonta presionando hacia arriba y desenroscándolo. b El aspersor superior va montado en el cestillo superior. Para desmontarlo hay que desenroscarlo del todo. c a b El aspersor inferior se desmonta aflojando hacia la izquierda la tuerca inferior y extrayéndolo hacia arriba.
LAVAVAJILLAS LOCALIZACIÓN y SOLUCIÓN DE PROBLEMAS En el caso de detectar algún problema en el uso de su lavavajillas, probablemente usted pueda resolverlo tras la consulta de las indicaciones que siguen. De no ser así, póngase en contacto con el SERVICIO DE ASISTENCIA TÉCNICA ofreciéndole la mayor información posible.
• ¿Por qué el lavavajillas no se pone en marcha? Puede ser debido a: – No hay tensión en la red eléctrica. – No se ha introducido bien el enchufe. – Los fusibles de la instalación eléctrica están “saltados”. – El lavavajillas no está conectado a la red eléctrica. – No ha pulsado la tecla de On / Off (el indicador luminoso de esta tecla debe estar iluminado de forma fija). – La puerta del lavavajillas está mal cerrada. – No ha pulsado la tecla de arranque.
Español 2 PROBLEMAS CON LA EFICACIA DE LAVADO • Restos de suciedad o de alimentos en la vajilla Puede ser debido a: – El filtro de lavado está colocado incorrectamente, sucio u obstruido. – Los orificios de los aspersores están sucios o los distribuidores están bloqueados con alguna pieza de la vajilla. – El detergente no es el adecuado o es insuficiente. – La vajilla no está colocada correctamente. Hay piezas en contacto con otras. – Hay un exceso de carga en los cestillos.
LAVAVAJILLAS ADVERTENCIAS SU LAVAVAJILLAS ES NET Comp@tible Los lavavajillas identificados con el logotipo NET comp@tible están preparados para conectarse al Hogar Digital Fagor o a cualquier otra red domótica compatible y así ofrecer un conjunto de prestaciones avanzadas como el control remoto mediante llamada telefónica, telediagnosis, etc. Los lavavajillas NET comp@tible disponen de un puerto serie que facilita su conectividad con una red domótica mediante comunicaciones por corrientes portadoras.
MÁQUINA DE LAVAR LOUÇA INSTALAÇÃO E MONTAGEM 1 LIGAÇÃO À REDE DE ÁGUA Na parte traseira da máquina de lavar louça encontrará a mangueira de água: a Ligue o tubo à entrada de água, aperte a rosca de ligação e certifiquese de que a mangueira está bem enroscada ao aparelho. a b A mangueira tem de passar entre a parede e o rodapé inferior traseiro da máquina de lavar louça (b1), de forma a não ficar estrangulada ou demasiado esticada (b2).
2 LIGAÇÃO ELÉCTRICA Consulte a etiqueta de características situada no canto superior da porta, antes de realizar as ligações eléctricas. Certifique-se de que a tensão que chega à base da ficha é a que aparece na etiqueta. Modelo Número de série É muito importante que a máquina de lavar louça seja ligada a uma ficha com ligação à terra.
Português c Em seguida estender para trás os tacos que suportam a tampa. d Alguns modelos integráveis contam com uma vareta que permite nivelar os pés traseiros desde a parte frontal e Antes de introduzir o lava-louças no espaço livre, aproxime-o e eleve-o virando o pé traseiro respeitando um espaço de uns 3 milímetros respeito à bancada. f Introduza o lava-louças no espaço livre. Ajusteo à bancada, até a parte superior do aparelho entrar em contacto com a superfície inferior da bancada.
4 PAINÉIS E ENCASTRAMENTO PA I N E L A G E M De forma simples, pode colocar na porta da máquina de lavar louça painéis ou revestimentos decorativos, a condizer com os móveis da sua cozinha. Estes painéis de revestimento não podem ter uma espessura superior a 4 mm. a Retire o marco da porta desapertando os parafusos. b Prepare o painel para estas dimensiones: 596 x 586 mm. c Coloque o painel ou revestimento decorativo. Para fixar o novo painel decorativo volte a aparafusar o marco da porta.
Português 5 SELECÇÃO DA LÍNGUA Alguns lava-louças com ecrã oferecem a possibilidade de personalizar os menus do display a partir da língua desejada. Para isto siga os seguintes passos: a b Para activar o modo LÍNGUA: Prima durante mais de três segundos o botão Carga Acima e Carga Abaixo. a c Para mudar o escolher uma língua, prima o botão Carga Acima e Carga Abaixo, e surgirá uma nova língua. 6 b Para validar a LÍNGUA. Prima o botão Arranque A língua já fica seleccionada.
MÁQUINA DE LAVAR LOUÇA UTILIZAÇÃO DO APARELHO E CONSELHOS PRÁTICOS 1 DUREZA DA ÁGUA, SAL, ABRILHANTADOR E DETERGENTE Ajustar a dureza da água. A água contém cal. Quanto maior a quantidade de cal, maior a dureza da água. Para a cal não danificar o lava-louças, o mesmo conta com um descalcificador que reduz a presença de cal na água e a limpa para a lavagem. O descalcificador funciona com sal.
Português Regulação da quantidade de sal As máquinas de lavar louça . integram um regulador de sal, que, de acordo com o modelo, pode ser manual ou electrónico. Este simples ajuste do lava-louças é fundamental para um bom funcionamento. Não o negligenciar. REGULAÇÃO MANUAL Se a sua máquina de lavar louça leva na parte lateral interna direita um regulador de sal como os mostrados nas fotografias em anexo (Mod.
REGULAÇÃO ELECTRÓNICA MODELO D (ver pág. 43) a Prima a tecla Redução de tempo durante 3 segundos, seguidamente acender-se-á o piloto correspondente à dureza da água (segundo figura 1). b Prima de novo a tecla Redução de tempo para seleccionar a posição do regulador de sal que necessita, conforme for premindo a tecla ir-se-á acendendo o piloto correspondente (segundo figura 1). L1 L2 L3 L4 1 c L1 L2 L3 L4 2 Valide a selecção necessária premindo o botão Arranque (fig. 2).
Português O abrilhantador facilita a secagem e evita que a louça tenha gotas de água depois da lavagem. O depósito do abrilhantador está no interior da porta, junto ao de detergente. O depósito possui um dosificador de 4 posições para poder ajustar a quantidade do abrilhantador de acordo com a qualidade da água. Se observar gotas de água na louça, aumente a numeração do regulador do abrilhantador. Caso contrário, diminua a numeração se a louça apresentar riscos esbranquiçados ou pegajosos.
Detergente Adiciona-se o detergente no depósito localizado na parte interna da porta, junto do depósito de abrilhantador. a Una vez adicionado o detergente, feche a tampa do depósito. b Alguns programas precisam ainda de se colocar parte da dose no compartimento localizado na tampa do depósito. DEPÓSITO DE DETERGENTE Existem detergentes em pastilhas, em pó, e líquidos. Pode consultar a quantidade de detergente na tabela de programas.
Português 2 LOUÇA: TIPOS E COLOCAÇÃO Nem toda a louça é apta para as máquinas de lavar louça. Não é recomendável meter peças de madeira ou barro, nem as de plástico não resistentes ao calor. Os talheres em aço inoxidável podem ser lavados sem nenhum problema; no entanto, tenha cuidado com os talheres de prata para que não estejam em contacto entre os mesmos, visto que poderiam aparecer com algumas manchas. As peças de alumínio podem ficar descoloradas com o tempo.
c Os talheres, à excepção das facas, devem ser colocados no cesto para os talheres com o cabo para baixo. d No cesto superior colocam-se as peças mais delicadas, como taças, copos, porcelana ou cristal e pratos de tamanho standard. Existe uma zona destinada particularmente aos talheres compridos. Do mesmo modo, existem suportes que, postos na vertical, servem para colocar copos. Ao escolher o programa Express ou a funcionalidade Carga Acima, coloque a louça no cesto superior.
Português Regulação dos cestos Os cestos podem ser regulados em função da carga. 19 cm. O cesto superior pode ser colocado a duas alturas diferentes de forma a que se possam lavar pratos de diferentes tamanhos. Na posição alta poderá lavar no cesto superior pratos normativos de até 19 cm. e, no inferior, de 31 cm. Colocando o cesto superior na posição baixa poderá lavar pratos de até 24 cm. acima e de 26 abaixo. a 31 cm. 26 cm.
3 A SELECÇÃO DO PROGRAMA DE LAVAGEM leds sal • abrilhantador detergente 4 em 1 led funcionamento botão comando on/off selector de programas B leds sal • abrilhantador detergente 4 em 1 botão arranque led funcionamento led Eco + botão Eco + led redução display tempo botão comando botão botão botão on/off selector arranque retardo redução de programas horário tempo C ecrã botão on/off botão retardo horário botão redução tempo botão botão arranque selector de programas botão carga acima • aba
Português leds: • lavagem • fim D leds: • redução tempo • retardo horário botão retardo horário led funcionamento botão on/off botão selector de programas leds abrilhantador • sal E leds: • lavagem • secagem • fim display botão arranque/ pausa botão redução tempo leds: • carga acima • abaixo • redução tempo • 4 em 1 botão redução tempo led funcionamento botão on/off leds abrilhantador • sal botão retardo horário botão selector de programas botão 4 em 1 botão carga acima • abaixo led sal
Para seleccionar o programa de lavagem, siga os seguintes passos: a Para os modelos A, B e C, prima o botão On/Off durante dois segundos (até ouvir sinal de confirmação) localizado no painel frontal do lava-louças; segundo o modelo, acenderá o led, ou surgirá visualização no ecrã ou no display. a Para os modelos D, E, F e G premir o botão On/Off então acender-se-ão os pilotos e os display s/modelo.
Português Possui vários tipos de programas em função do modelo da máquina de lavar louça: É muito importante seleccionar bem o programa de lavagem em função da sujidade, da quantidade, e do tipo de louça.
4 SELECÇÃO DAS FUNÇÕES ADICIONAIS As funções de lavagem devem ser sempre seleccionadas depois de escolher o programa de lavagem. Qualquer mudança de programa durante a selecção anula as funções previamente seleccionadas. Estas funções permitem ajustar ao máximo a carga, os tempos e os consumos da lavagem. As funções adicionais dependem dos modelos: Botão: Retardo horário Permite retardar o início da lavagem, premindo o botão Retardo Horário. Modelos E y G (ver pág. 43): retardo de até 9 horas.
Português 5 ACCIONAMENTO Uma vez seleccionado o programa de lavagem e as funcionalidades adicionais: a Prima o botão de arranque e o lava-louças estará em funcionamento. 6 PROGRESSO DO PROGRAMA DE LAVAGEM As fases activas em cada momento do programa de lavagem irão surgir sucessivamente conforme avança a lavagem. Modelos sem display: Acenderá um led de arranque /stop. Modelos com display: Acenderá o led de arranque /stop e no display surgirá o tempo restante para a finalização do programa.
7 FIM DE PROGRAMA Uma vez finalição o programa, o aparelho emitirá um sinal sonoro durante 3 segundos e/ou o led FIM (STOP) acenderá. Nos modelos A e B, o piloto de funcionamento ficará intermitente. 8 CORTE NO FORNECIMENTO DE ELECTRICIDADE Na ocorrência de um corte no fornecimento eléctrico, ao ser restabelecido, o lava-louças continuará o seu funcionamento normal desde o ponto em que foi interrompido. 9 CONSELHOS BÁSICOS Há uma série de perguntas que se deve ter sempre em conta.
Português MÁQUINA DE LAVAR LOUÇA MANUTENÇÃO E LIMPEZA DO APARELHO É recomendável realizar habitualmente as operações de limpeza para alargar a vida da sua máquina de lavar louça. De três em três meses deve realizar as seguintes operações: • Limpeza do filtro. • Limpeza dos distribuidores. • Limpeza interior. • Limpeza exterior. Desta forma alargará a vida da sua máquina de lavar louça.
2 LIMPEZA DOS ASPERSORES Limpar cada três meses o terceiro aspersor (segundo modelo), o aspersor superior e o aspersor inferior. Desmontagem dos aspersores: a Para desmontar o terceiro aspersor, pressione para cima e desenrosque-o. b O aspersor superior encontra-se montado no cesto superior. Para o desmontar é preciso desenroscar completamente. c a b Para desmontar o aspersor inferior, afrouxar para a esquerda a porca inferior, em seguida puxe dele para cima.
MÁQUINA DE LAVAR LOUÇA LOCALIZAÇÃO e SOLUÇÃO DE PROBLEMAS Se detectar algum problema na utilização da máquina de lavar louça, provavelmente possa resolvêlo depois de consultar as indicações que se seguem. Se assim não for, entre em contacto com o SERVIÇO DE ASSISTÊNCIA TÉCNICA oferecendo-lhe a maior informação possível. 1 PROBLEMAS TÉCNICOS OU FUNCIONAIS Modelos com display e ecrã. Nestes modelos, a ocorrência de um problema será visualizada através de “F” seguido de um número (de 0 a 9).
• Porque é que a máquina de lavar louça não se liga? Pode ser devido a: – Não haver tensão na rede eléctrica. – Não se ter metido bem a ficha. – Os fusíveis da instalação eléctrica estarem “saltados”. – A máquina de lavar louça não estar ligada à rede eléctrica. – Não se ter premido a tecla de On / Off (o indicador luminoso desta tecla deve estar ligado de forma fixa). – A porta da máquina de lavar louça estar mal fechada. – Não se ter premido a tecla de arranque.
Português 2 PROBLEMAS COM A EFICÁCIA DE LAVAGEM • Restos de sujidade ou de alimentos na louça Pode ser devido a: – O filtro de lavagem estar colocado incorrectamente, sujo u obstruído. – Os orifícios dos aspersores estarem sujos ou os distribuidores estarem bloqueados com alguma peça da louça. – O detergente não ser o adequado ou ser insuficiente. – A louça não estar colocada correctamente. Há peças em contacto com outras. – Existir um excesso de carga nos cestos.
MÁQUINA DE LAVAR LOUÇA ADVERTÊNCIAS INFORMAÇÃO PARA A GESTÃO CORRECTA DOS RESÍDUOS DE APARELHOS ELÉCTRICOS E ELECTRÓNICOS Ao final da vida útil do aparelho, este não deve ser eliminado junto com os resíduos domésticos gerais. Pode entregar, sem qualquer tipo de custo, em centros específicos de recolha, diferenciados pelas administrações locais, ou distribuidores que facilitem este serviço.
DISHWASHWER INSTALLATION AND FITTING 1 CONNECTION TO THE PLUMBING The water connection pipe is located on the back of the dishwasher: a Connect the pipe to the water inlet, tighten the connection nut and make sure it is securely connected to the appliance. a b The hose must run between the wall and the bottom space at the back of the dishwasher (b1) so that it is not squashed or overstretched. b2 b1 There should be a fixed water outlet drain at a distance of between 25 and 100 cm from the floor.
2 ELECTRICAL CONNECTION Please refer to the specification label on the top edge of the door before making the electrical connections. Make sure that the power voltage connected to the plug socket is as shown on the label. It is very important for the dishwasher to be connected to an earthed plug socket. The electrical installation, plug, socket, fuses or circuit breaker and meter must be capable of the maximum power shown on the specifications label.
English c Then pull the support blocks for the cover outwards and backwards. d Some integrated models have a rod for levelling the rear feet from the front of the dishwasher. e Before fitting the dishwasher into the recess, move it up to the space and raise it by turning the rear foot to leave a space of some 3 millimetres from the worktop. f Fit the dishwasher into the space. Adjust it to the worktop until the top part of the dishwasher is touching the lower part of the cabinet worktop.
4 PANEL-MOUNTING AND RECESS-MOUNTING PANELLING Simply fit the same decor panels or doors as the kitchen cupboards to the dishwasher door. Said panels must be more than 4 mm thick. a Remove the frame around the door by unfastening the screws. b Cut the panel to size: 596 x 586 mm. c Fit the decor panel or door To fasten the new decorative panel in place, screw the frame back onto the door.
English 5 CHOOSING A LANGUAGE Some display model dishwashers allow you to customise the menus on the display in your preferred language. To do this, proceed as follows: a b To activate the LANGUAGE mode: Press and hold down the Top Load/Bottom Load button for at least three seconds. a c To change or select a language: Press the Top Load/Bottom Load button. A new language will appear. b To validate the LANGUAGE: Press the Start button. The language has now been selected.
DISHWASHWER USING THE APPLIANCE - A FEW PRACTICAL TIPS 1 WATER HARDNESS, SALT, RINSE-AID AND DETERGENT Water hardness adjustment. Water contains scale. The more scale, the harder the water. To prevent the scale in the water from damaging the dishwasher, it is equipped with a descaler to reduce the scale and leave it perfectly clean for washing. The descaler uses salt to function. Before starting up the dishwasher, you will need to know the water hardness in your area.
English Controlling the salt level Depending on the model, . dishwashers will have a manual or electronic salt level control. This simple adjustment of your dishwasher is vital for its correct functioning. Do not ignore it. MANUAL REGULATION If there is a salt regulator like the one shown in the photographs (Mod. AB) inside your dishwasher on the righthand side, turn it to the number that corresponds to the hardness of the water in your area (see table).
ELECTRONIC ADJUSTAMENT D MODEL (see pag. 69) a Press the Short Wash button and hold it down for three seconds. The hard water pilot light will come on (fig. 1). b Then press the Short Wash button again to select the water hardness. Each time you press the button, the corresponding pilot light will come on (fig. 1). L1 L2 L3 L4 1 c L1 L2 L3 L4 2 Press the Start button to validate the selection (fig. 2).
English The rinse-aid helps drying and prevents drops of water from clinging to utensils after washing. The rinse-aid container is located on the inside of the door, next to the detergent container. It has a 4-position dispenser for adjusting the amount of rinse-aid to the water quality. If you notice drops of water on utensils, increase the position of the rinse-aid dispenser. If the utensils have white or sticky lines, lower the position.
Detergent The detergent is poured into a tank on the inside of the door, beside the rinse aid tank. a Pour in the detergent, then close the tank cap. b Some programmes also require part of the dose of detergent to be poured into the tank cap compartment. Detergent comes in tablet, powder and liquid form. DETERGENT CONTAINER You can consult the amount of detergent needed on the programme chart.
English 2 TABLEWARE AND UTENSILS. TYPES AND POSITIONING Types of dishes Not all utensils can be washed in a dishwasher. Do not attempt to wash items made of wood or earthenware or plastic that is not heat resistant. Stainless steel cutlery can be washed easily; however, ensure that silver cutlery does not come into contact as they may stain. Items made of aluminium may fade in time. Patterns on decorated porcelain may wear off if the quality is not good. Check with the manufacturer of China.
c Les couverts, Except for knives, cutlery should be placed in the cutlery rack, with the handles at the bottom. d Place the more delicate items, such as cups, glasses, porcelain or crystal, and standardsize plates in the top rack. Long cutlery has a special place. There are also racks which, when vertical, are for holding wine glasses. If you have selected the Express programme or the Top Load function, the dishes are to be loaded into the top basket only.
English Adjusting the racks The racks can be adjusted in accord with the load. 19 cm. The top rack can be placed at two different heights for washing different-sized plates. In the upper position, the top rack holds standardsize plates of up to 19 cm and the bottom rack holds plates of up to 31 cm. In the lower position, the top rack holds plates of up to 24 cm and the bottom rack holds plates of up to 26 cm. a 31 cm. 26 cm.
3 A SELECTING THE WASH PROGRAMME sal • rinse aid 4-in-1 detergent pilot lights on/off button B programme selector dial sal • rinse aid 4-in-1 detergent pilot lights Eco + button start button Power on pilot light on/off programme start button selector dial button C eco + pilot light power on pilot light short wash display pilot light time delay button short wash button screen on/ off button time short wash delay button button selector dial button top • bottom load button start button
English • wash • end pilot lights D • top • bottom load • short wash pilot lights time delay button power on pilot light on/off button selector dial button rinse aid • salt pilot lights E • wash • dry • end pilot lights display start/ pause button short wash button • top • bottom load • short wash • 4-in-1 pilot lights short wash button power on pilot light on/off button rinse aid • salt pilot lights time delay button selector dial button 4-in-1 button top • bottom load button salt pilo
To select a wash programme, proceed as follows: a For models A, B and C, press and hold down the On/Off button for two seconds (until you hear the confirmation beep). The pilot light, display or screen will light up on the front panel of the dishwasher, depending on the model. a For models D, E, F and G, press the On/Off button. The pilot lights or the display will light up, depending on the model.
English There are various programme types depending on the dishwasher model: It is very important to choose the wash programme in accordance with the type and amount of utensils and level of soiling.
4 SELECTING ADDITIONAL FUNCTIONS Wash functions must always be selected after the wash programme has been selected. If the programme is changed during the selection, the previously selected functions are cancelled. These functions make it possible to adjust the wash load, times and consumption to a maximum. The additional functions available depend on the model: Button: Time delay Press the time delay button to delay the start of the wash programme. E and G models (see pag.
English 5 STARTING UP THE DISHWASHER When you have selected the wash programme and the additional functions: a Press the start button. The dishwasher will start up 6 WASH PROGRAMME PHASES The phases the wash programme is at will successively appear as the programme advance Non-display models: A start/stop pilot light will come on. Display models: A start/stop pilot light will come on and the time remaining for the programme to end will appear on the display.
7 END OF PROGRAMME When the wash programme is complete, the dishwasher will emit a beeping sound for 3 seconds and/or the END (STOP) pilot light will come on. On models A and B, the On pilot light will flash. 8 POWER CUTS If a power cut should occur, when the electricity comes back on the dishwasher will continue to run from where it left off. 9 BASIC TIPS There a few things you should always bear in mind. If you do, your dishwasher will last longer and be more efficient.
DISHWASHWER APPLIANCE MAINTENANCE AND CLEANING You should perform the cleaning operations regularly so that your dishwasher will last longer. You should do the following every three months: • Clean the filter. • Clean the spray arms. • Clean the inside. • Clean the outside. This will make your dishwasher last longer. 1 I M P O R TA N T If you are planning to be away for a long period, leave the dishwasher door open so that the air can circulate freely inside the machine.
2 CLEANING THE SPRINKLERS The third sprinkler (depending on the model), the top sprinkler and the bottom sprinkler should be cleaned every three months. To remove the sprinklers for cleaning: a The third sprinkler is removed by pressing upwards on it and then unscrewing it. b The top sprinkler is fitted to the top basket. It should be totally unscrewed to remove it. c The bottom sprinkler is removed by turning the lower screw to the left to loosen it and then pulling upwards on the sprinkler.
DISHWASHWER TROUBLESHOOTING If you find a problem when using your dishwasher, you will probably be able to solve it by consulting the following section. If this is not so, please contact the TECHNICAL ASSISTANCE SERVICE and be ready to provide as much information as possible. 1 TECHNICAL OR FUNCTIONAL PROBLEMS Non-display models. If a malfunction occurs, the dishwasher will emit a series of beeps. These will stop for a few seconds and then sound again.
• Why won’t the dishwasher start? This may be because: – There is no power. – It isn’t plugged in correctly. – The power fuses have blown. – The dishwasher is not connected to the mains. – You haven’t pressed the On/Off button (the pilot light for this button must be on continuously). – The dishwasher door is not closed correctly. – You have not pressed the Start button. • The dishwasher starts up but no water comes into the appliance This may be because: – There is no water supply. – The stop tap is off.
English 2 PROBLEMS WITH THE QUALITY OF THE WASH • Remains of dirt or food on the utensils This may be because: – The wash filter is dirty, blocked or not correctly in place. – The sprinklers nozzles are dirty or the arms are blocked by a utensil. – The detergent is inappropriate or there is an insufficient amount. – The utensils are not positioned correctly. Some utensils are in contact with others. – There are too many utensils in the racks. – The wash programme is inappropriate. – The drain is blocked.
DISHWASHWER FURTHER INFORMATION INFORMATION FOR THE CORRECT DISPOSAL OF ELECTRICAL AND ELECTRONIC APPLIANCES When the appliance reaches the end of its service life, you should not dispose of it with the general domestic waste. It can be taken free of charge to the local administrations’ specific selective collection centres, or to distributors who provide this service.
GESCHIRRSPÜLER INSTALLATION UND MONTAGE 1 WASSERANSCHLUSS Auf der Rückseite des Geschirrspülers befindet sich der Wasserschlauch: a Schließen Sie den Schlauch an den Wasseranschluss und ziehen Sie die Anschlussmutter fest. Vergewissern Sie sich, dass der Schlauch fest am Gerät sitzt. a Der Schlauch muss zwischen der Wand und dem unteren, rückseitigen Sockel des Ge chirrspülers (b1) entlang geführt werden, so dass er nicht geknickt, ein-geklemmt oder zu straff g zogen wird (b2).
2 ELEKTROANSCHLUSS Vor der Ausführung des Elektroanschlusses beachten Sie bitte die Angaben auf dem Typenschild am oberen Rand der Tür. Achten Sie darauf, dass die Netzspannung mit den Angaben auf dem Typenschild übereinstimmt. Es ist sehr wichtig,dass der Geschirrspüler an eine geerdete Steckdose angeschlossen wird.Die Elektroinstallation, Stecker, Steckdose, Sicherungen oder Sicherungsautomaten, sowie der Zähler müssen für die auf dem Typens childangegebene Höchstleistung ausgelegt sein.
Deustch c Schieben Sie dann die Klötze, die den Deckel stützen, nach hinten. d Einige Einbau-Modelle verfügen über eine Stange, mit deren Hilfe die hinteren Füße von der Vorderseite aus nivelliert werden können. c d e Bevor Sie den Geschirrspüler auf den Platz schieben, der für seinen Einbau vorgesehen ist, drehen Sie bitte solange an dem hinteren Fuß, bis ein Abstand von 3 mm zur Abdeckplatte erreicht ist. e e f Schieben Sie den Geschirrspüler auf seinen Platz.
4 VERKLEIDUNG UND EINBAU VERKLEIDUNG Die Tür eines Dekorfä higen Spülers kann pro-blemlos mit Paneelen oder Dekorverkleidungen verse-hen werden, die zu Ihren Küchenmöbeln passen. Die-se Paneele dürfen nicht di-cker als 4 mm sein. a Entfernen Sie den Türrahmen, indem Sie die Schrauben lösen. b Schneiden Sie das Paneel auf folgende Größe zu: 596 x 586 mm. c Setzen Sie das Paneel oder die Dekorverkleidung ein. Schrauben Sie nun den Türrahmen wieder an, um so das Dekopaneel zu befestigen.
Deustch 5 ANWAHL DER SPRACHE Einige Geschirrspüler mit Bildschirm bieten die Möglichkeit, das Menü der Displays durch Anwahl der gewünschten Sprache zu personalisieren. Dazu gehen Sie bitte folgendermaßen vor: a b Aktivieren des Modus SPRACHE: Betätigen Sie mindestens 3 Sekunden die Taste 3 Oben laden – Unten laden Um die Sprache zu ändern bzw. anzuwählen, betätigen Sie bitte die Taste Obern laden – Unten laden. Es wird eine neue Sprache angezeigt. 6 a c b Bestätigen der ausgewählten SPRACHE.
GESCHIRRSPÜLER BENUTZUNG DES GERÄTS UND PRAKTISCHE RATSCHLÄGE 1 WASSERHÄRTE, SALZ, KLARSPÜLER UND SPÜLMITTEL Stellen Sie die Härte des Wassers ein. Das Wasser enthält Kalk. Je mehr Kalk das Wasser enthält, desto härter ist es. Damit der Kalk den Geschirrspüler nicht beschädigt, ist dieser mit einem Entkalker ausgestattet, der den im Wasser vorhandenen Kalk reduziert und es für den Spülvorgang reinigt. Dieser Entkalker arbeitet mit Salz.
Einstellen der Salzmenge Diese Regulierung des Geschirrspülers ist einfach und von grundlegender Bedeutung für seinen einwandfreien Betrieb. Vergessen Sie das nicht! Die Geschirrspüler verfügen . über einen Salzregler, der je nach Modell manuell oder elektronisch arbeitet. MANUELLES EISTELLEN Wenn Ihr Geschirrspüler an der rechten Innenseite über einen Salzregler verfügt, wie er auf nebenstehenden Fotos (Mod.
ELEKTRONISCHES EINSTELLEN MODELL D (siehe S. 95) a b Drücken Sie die Taste Zeit verringern: Innerhalb von 3 Sekunden schaltet sich die der Wasserhärte entsprechende Kontrollleuchte ein (gemäß Abbildung 1). Drücken Sie die Taste Zeit verringern erneut. Zur Auswahl der Position des erforderlichen Salzreglers, schaltet sich je nach Drücken der Taste die entsprechende Kontrollleuchte (gemäß Abbildung 1). L1 L2 L3 L4 L1 L2 L3 L4 2 1 c Bestätigen Sie diese Einstellung durch Betätigen der StartTaste (Abb.
Deustch Der Klarspüler erleichtert das Trocknen und sorgt dafür, dass nach dem Spülen keine Wassertropfen dem Geschirr anhaften. Der Behälter für den Klarspüler befindet sich auf der Innenseite der Tür, neben dem Behälter für das Spülmittel. Der Behälter verfügt über eine Dosiereinrichtung mit 4 Positionen, um die Menge des Klarspülers der Wasserqualität entsprechend einstellen zu können. Wenn Sie an dem Geschirr Wassertropfen feststellen, drehen Sie den Regler auf eine höhere Ziffer.
Spülmittel Das Spülmittel wird in einen Behälter auf der Innenseite der Tür gegeben, der sich neben dem Behälter für den Klarspüler befindet. a Wenn Sie das Spülmittel eingefüllt haben, schließen Sie den Deckel des Behälters. b Bei einigen Programmen muss zudem ein Teil der Spülmittelmenge in die Aufnahme im Deckel des Spülmittelbehälters gegeben werden. SPÜLMITTELBEHÄLTER Es gibt Spülmittel in TabForm, in Pulverform sowie flüssige Spülmittel.
Deustch 2 GESCHIRR: ARTEN UND BELADEN Nicht jedes Geschirr ist spülmaschinenfest. Teile aus Holz oder Ton sowie nicht hitzebeständige Kunststoffteile sollten nicht im Geschirrspüler gespült werden. Rostfreies Besteck kann bedenkenlos gespült werden; es ist jedoch darauf zu achten, dass Silberbestecke nicht miteinander in Berührung kommen, da sich sonst Flecken bilden können. Aluminiumteile können im Laufe der Zeit ihre Farbe verlieren.
c Die Bestecke müssen mit Ausnahme der Messer mit dem Griff nach unten in den BesZteckkorb gestellt werden. d In den oberen Korb werden empfindlichere Teile wie Tassen, Gläser Porzellan oder Kristall sowie Teller in Standardgröße geladen. Hier gibt es einen speziellen Bereich für lange Bestecke. Darüber hinaus gibt es Halterungen, die in vertikaler Position für Stieloder Kelchgläser vorgesehen ist.
Deustch Verstellen der Geschirrkörbe Die Körbe können je nach Beladung verstellt werden. Der obere Geschirrkorb verfügt über zwei Höheneinstellungen, so dass Teller unterschiedlicher Größe gespült werden können. 19 cm. Auf der oberen Höhenposition können im Oberkorb genormte Teller bis zu einer Größe von 19 cm, im Unterkorb Teller bis zu 31 cm gespült werden. Wird der Oberkorb auf seine untere Position gestellt, so können oben Teller bis zu 24 cm, unten bis zu 26 cm gespült werden.
3 A ANWAHL DES SPÜLPROGRAMMS Leuchtanzeigen Salz • Klarspüler Spülmittel 4 in 1 Leuchtanzeige Betrieb Taste Programmon/off wahlschalter B StartTaste Leuchtanzeige Eco + Taste Eco + Leuchtanzeigen Leuchtanzeigen Salz • Klarspüler Spülmittel 4 in 1 Leuchtanzeige display Zeitverkürzung Betrieb Taste Programm- Starton/off wahlschalter Taste Taste Zeitverkürzung Taste Zeitverzögerung C Bildschirm Taste on/off Taste Taste ZeitverkürWahlschalter Taste zung Zeitverzögerung Taste oben • unteno Taste S
Deustch Leuchtanzeigen: Leuchtanzeigen: • Spülen • Zeitverkürzung • Ende • Zeitverzögerung D Taste Zeitverzögerung Leuchtanzeige Betrieb Taste on/off Taste Wahlschalter Leuchtanzeigen Klarspüler • Salz E Taste Taste Start/ Zeitverkürzung Pause Leuchtanzeigen: • Spülen • Trocknen • Ende Display Leuchtanzeigen: • Oben o unten lagen • Zeitverkürzung • Spülmittel 4 in 1 Taste Zeitverkürzung Leuchtanzeige Betrieb Taste on/off Leuchtanzeigen Klarspüler • Salz Taste Wahlschalter Taste Zeitverzöger
Um das Spülprogramm anzuwählen, gehen Sie bitte folgendermaßen vor: a Für die Modelle A, B und C, die On/Off-Taste auf der Vorderseite des Geschirrspülers zwei Sekunden betätigen (bis ein Pfeifton ertönt). Die Betriebsleuchte, das Display oder der Bildschirm (je nach Modell) schaltet ein. a Für die Modelle D, E, F und G drücken Sie den On/OffSchalter. Es schalten sich die Kontrollleuchten und Displays je nach Modell ein.
Deustch Je nach Gerätemodell stehen verschiedene Programme zur Auswahl: Die Wahl des richtigen Programms in Funktion des Verschmutzungsgrades, der Menge und Art des Geschirrs ist von großer Bedeutung.
4 ANWAHL DER ZUSATZFUNKTIONEN Die Spülfunktionen müssen immer nach der Programmwahl eingestellt werden. Wird das Programm beim Einstellen der Funktionen geändert, erfolgt fü r alle zuvor gewählten Funktionen ein Reset. Mit diesen Funktionen können Beladung, Zeiten und Verbrauchswerte des Spülvorgangs optimal eingestellt werden. Zusatzfunktionen (je nach Modell): Taste: Zeitschaltung Durch Betätigung der Zeitschalttaste wird der Beginn des Spülvorgangs verzögert. Modelle E und G (siehe S.
Deustch 5 START Nach dem das Programm und die Zusatzfunktionen eingestellt sind: a Die Start-Taste betätigen. Der Geschirrspüler beginnt das Programm auszuführen. 6 ABLAUF DES SPÜLPROGRAMMS Die jeweils laufenden Programmphasen werden nacheinander angezeigt. Modelle ohne Display: Die Leuchtanzeige Start / Stop leuchtet. Modelle mit Display: Die Leuchtanzeige Start / Stop leuchtet und die verbleibende Zeit bis zum Programmende erscheint auf dem Display.
7 PROGRAMMENDE Nach Ablauf des Programms ertönt ein 3-sekündiges akustisches Signal und/oder die Leuchtanzeige FIN (STOP) leuchtet auf. Bei den Modellen A und B blinkt das An-/Aus-Lämpchen. 8 STROMAUSFALL Sollte es zu einem Ausfall der Stromversorgung kommen, setzt der Geschirrspüler nach Wiederherstellung der Versorgung seinen normalen Ablauf an der Stelle fort, an der die Unterbrechung aufgetreten ist.
GESCHIRRSPÜLER INSTANDHALTUNG UND REINIGUNG DES GERÄTS Eine Reinigung sollte regelmäßig vorgenommen werden, um die Lebensdauer Ihres Geschirrspülers zu verlängern. Alle drei Monate: • Filter reinigen. • Sprüharme reinigen. • Geschirrspüler innen reinigen. • Geschirrspüler außen reinigen. Auf diese Weise werden Sie die Lebensdauer Ihres Geschirrspülers optimieren.
2 REINIGEN DER SPRÜHARME Der dritte Sprüharm (je nach Modell), der obere und der untere Sprüharm müssen alle drei Monate gereinigt werden. Ausbau der Sprüharme: a Um den dritten Sprüharm auszubauen, drückt man diesen nach oben und dreht ihn heraus. b Der obere Sprüharm ist im oberen Korb montiert. Er wird durch vollständiges Herausdrehen ausgebaut. c Um den unteren Sprüharm auszubauen, muss die untere Mutter nach links losgedreht und der Arm nach oben herausgenommen werden.
GESCHIRRSPÜLER FEHLERSUCHE UND PROBLEMLÖSUNG Sollte während des Betriebs Ihres Geschirrspülers ein Problem auftreten, werden Sie dieses anhand der nachfolgenden Hinweise wahrscheinlich selbst lösen können. Anderenfalls wenden Sie sich bitte an den TECHNISCHEN KUNDENDIENST. Versuchen Sie dabei, dem Kundendienst möglichst detaillierte Information zu geben. 1 TECHNISCHE PROBLEME ODER BETRIEBSSTÖRUNGEN Modelle mit Display oder Bildschirm.
• Warum startet der Geschirrspüler nicht? Mögliche Gründe sind: – Keine Netzspannung. – Der Stecker ist nicht richtig eingesteckt. – Die Sicherungen der Elektroinstallation haben “ausgelöst”. – Der Geschirrspüler ist nicht ans Netz geschlossen. – Die Taste On / Off wurde nicht betätigt (die Leuchtdiode dieser Taste muss kontinuierlich leuchten). – Die Tür des Geschirrspülers ist nicht richtig geschlossen. – Die Start-Taste wurde nicht betätigt.
Deustch 2 PROBLEME BEZÜGLICH DER SPÜLWIRKUNG • Schmutz oder Speisereste am Geschirr Mögliche Gründe sind: – Der Spülfilter ist falsch eingesetzt, verschmutzt oder verstopft. – Die Öffnungen der Sprüharme sind verschmutzt oder die Sprüharme werden durch Geschirrteile blockiert. – Ungeeignetes oder zu wenig Spülmittel. – Das Geschirr ist nicht korrekt eingesetzt. Die Teile berühren sich gegenseitig. – Die Geschirrkörbe sind überladen. – Falsches Spülprogramm. – Der Abfluss ist blockiert.
GESCHIRRSPÜLER HINWEISE INFORMATION ZUR UMWELTVERTRÄGLICHEN ENTSORGUNG VON NICHT MEHR FUNKTIONSFÄHIGEN ELEKTRISCHEN UND ELEKTRONISCHEN GERÄTEN Ein nicht mehr gebrauchsfähiges elektronisches oder elektrisches Gerät, darf nicht gemeinsam mit dem üblichen Hausmüll entsorgt werden. Ohne dass dafür weitere Kosten entstehen, kann das Gerät bei von der örtlichen Verwaltung speziell dafür eingerichteten Stellen, oder bei Herstellern, die einen Rücknahmeservice anbieten, abgegeben werden.
Esquemas y medidas de instalación Esquemas e dimensões de instalação Installation measurements and diagrams Pläne und Maßnahmen zur Installation 600 600 570 110 820–890 490–600 0–15 90 170 170 60 100–170 50 .5 áx m 595 115 20 600 600 820–850 596 586 170 170 60 70 .
Fagor Electrodomésticos, S. Coop. Tel. 943 03 71 00 Fax 943 03 71 17 Barrio S. Andrés, 18 20500 MONDRAGÓN (Gipuzkoa) www.fagor.com info@fagor.