
Use and Care Manual

ADJUSTABLE PEDESTAL COLUMN
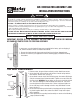
1. Remove 2 sections of adjustable pedestal column
from carton(See fig. 2). Remove oval grommet
from parts package and install in oval slot near top
of pedestal column, Remove large round grommet
from parts package. Turn grommet “inside out” so
that groove is on the inside and the smooth side is
on the outside. Install grommet over bottom lip of
pedestal column. Feed power cord down through
top of black section (end with screw holes). Slide
adjustment collar into black section, align screw
holes and secure. Secure adjustment collar to low-
e
st height for assembly (See fig. 3).
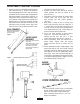
2. Remove base from carton and insert medium
rubber grommet into hole on surface of fan
base.(See fig. 3)
3. Feed power cord from bottom of column down
through center hole of fan base and then
back through hole with rubber grommet.
(See fig. 3).
4. Align holes in flange at base of column with
holes in top of fan base. Secure by using 5/16” x
1” carriage bolts, external tooth star washers, and
hex nuts. (See fig. 3). One of the carriage bolts is
to be attached with the 5/16” internal tooth star
washer mounted under the bolt head.
5. Secure fan head assembly to upper column
using 1/2” x 1” hex bolt, star washers, lock
washers and hex nuts; and 1/4” x 1” bolt,
washer, lock washers, and hex nut. (See fig. 4).
6. Loosen adjustment collar and extend fan to
proper height. Tighten collar and connect
power cord from column to power cord on
motor.
7. Refer to nameplate for proper supply voltage. Plug
power cord from fan into any 120 VAC 3-prong
grounded outlet for all 120 volt rated units. Units
rated 220V or 277V are not supplied with attach-
ment plugs. These units may be hard wired to a
junction box or provided with the required 15 amp,
3 prong grounded plug rated at 250V or 277V as
per nameplate rating of the fan unit.
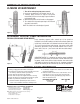
1. If fixed pedestal column comes un-assembled,
put two sections together, align holes at union,
and secure with screws. Power cord for this
model is external. Follow items 2, 4, 5 & 7 for
balance of installation.
FIXED PEDESTAL COLUMN
OVAL GROMMET
RUBBER
GROMMET
Figure 3
Figure 5
Figure 4
Remove 2 phillips head screws.
Remove oval grommet from parts
p
ackage and install in oval slot
n
ear top of pedestal
LARGE ROUND
GROMMET
R
emove large round grommet from
parts package.
Turn grommet “inside out” so that
groove is on the inside and the
smooth side is on the outside.
Install grommet over bottom lip of
pedestal column.
Align and secure with
2 phillips head screws.
2
Figure 2