
Use and Care Manual
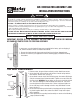

WALL MOUNT
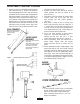
CEILING MOUNT
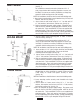
I-BEAM MOUNT
1. Securely attach wall mount to either a wood or concrete wall.
(See fig. 7)
For installation on wood construction (minimum of 2” x 4”
stud), secure bracket with heavy duty lag bolts or screws (not
included). For concrete or masonry installation use heavy duty
expansion shields and lag screws (not included).
NOTE: All installations should be done to meet local building code.
2. Attach swivel mounting plate to end of bracket using 1/2” bolt, lock
washers, and hex nut. (See fig. 7)
3. Secure motor to wall mount using 1/2” x 1” hex bolt and 1/4”
x 1” bolt, washers, lock washers, and hex nuts. (See fig. 8)
4. Refer to nameplate for proper supply voltage. Plug power cord
from fan into any 120 VAC 3-prong grounded outlet for all 120
volt rated units. Units rated 220V or 277V are not supplied with
attachment plugs. These units may be hard wired to a junction
box or provided with the required 15 amp, 3 prong grounded plug
rated at 250V or 277V as per nameplate rating of the fan unit.
1. Securely attach ceiling mounting plate to either a wood or
concrete ceiling. (See fig. 9)
For installation on wood construction (minimum of 2” x 4”
stud), secure bracket with heavy duty lag bolts or screws (not
included). For concrete or masonry installation use heavy duty
expansion shields and lag screws (not included).
NOTE: All installations should be done to meet local building code.
2. Screw section of 1 1/2” pipe (Installer furnished, and threaded
on both ends) into mounting plate. Then screw fan head
mounting section onto pipe. (See fig. 10)
3. Secure motor to ceiling mount using 1/2” x 1“ hex bolt and
1/4” x 1” bolt, washers, lock washers & hex nuts. (See fig. 11)
4. Refer to nameplate for proper supply voltage. Plug power cord
from fan into any 120 VAC 3-prong grounded outlet for all 120
volt rated units. Units rated 220V or 277V are not supplied with
attachment plugs. These units may be hard wired to a junction
box or provided with the required 15 amp, 3 prong grounded
plug rated at 250V or 277V as per nameplate rating of the fan unit.
1. Place two U-bolt I-beam clamps on threaded pipe - Position
threaded pipe on either horizontal or vertical I-beam and slide
U-bolt firmly on I-beam and tighten securely to beam.
(See fig. 12)
NOTE:All installations should be done to meet local building codes.
2. Screw mounting section securely onto threaded end of pipe
(See fig. 12)
3. Secure motor to I-beam mount using 1/2” x 1” hex bolt,
washers, lock washers, and hex nuts; and 1/4” x 1” bolt, washer,
lock washers and hex nut. (See fig. 13)
4. Refer to nameplate for proper supply voltage. Plug power cord
from fan into any 120 VAC 3-prong grounded outlet for all 120
volt rated units. Units rated 220V or 277V are not supplied with
attachment plugs. These units may be hard wired to a junction
box or provided with the required 15 amp, 3 prong grounded plug
rated at 250V or 277V as per nameplate rating of the fan unit.
Figure 7
Figure 8
Figure 9
Figure 11
Figure 10
Figure 13
(Not Included)
3
Figure 12