
User Manual


19
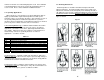
Work Positioning/ Tower Work:
FallTech Full Body Harnesses which are equipped with side or hip D-
rings may be used for work positioning when used with one of the
connecting devices shown in Table 3.1.
1. Select the appropriate FallTech FBH based on the work
conditions, specific hazards and the weight of the user.
2. Read, understand and comply with manufacturer’s instructions
for each component of your Work Positioning/Personal Fall
Arrest System (Full Body Harness, Positioning Assembly,
SAL/SRL, Anchorage Connectors, etc.). Be sure to choose
components that are compatible with this FBH. If you have
questions about product or component compatibility, be sure to
contact FallTech for additional instructions.
3. Calculate possible swing fall hazards, total fall distance, and
required clearance distance. If you have a swing-fall hazard or
do not have the required clearance distance, STOP and
reevaluate your application and system. Your work location
should never exceed an angle of 15 degrees in any direction in
relation to your anchorage location.
4. Inspect this Full Body Harness, and all components of your Work
Positioning/PFAS in accordance with Section 8 of this manual.
Be sure to consult, and adhere to the instructional
materials, labels and warnings accompanying the other
components of your PFAS as well.
5. Don and adjust your Full Body Harness in accordance with
section 3.6 of this manual.
6. Attach the one of the small double-locking snap hooks on the
legs of your Positioning Assembly to the side or hip D-rings on
your FBH. Each of the two small snap hooks must be attached
to its own side or hip D-ring (in the case of a spreader hook
assembly, each side of the hook should be attached to its own
side or hip D-ring).
7. Proceed or ascend to your work location, using your back-up
Shock-Absorbing Lanyard to tie-off to the structure as you
ascend, if at all practicable. A “Y-leg” or 100% tie-off lanyard is
ideally suited to this activity, allowing you to remain protected at
all times. Once in place, attach the large double-locking snap
hook (rebar hook) in the center of your positioning assembly to
your anchor point.
8. Be sure to also tie-off with a Shock-Absorbing Lanyard or Self-
Retracting Lifeline attached to the back D-ring of your FBH.
When positioning, you must always use a back-up fall
arrest connecting device (SAL or SRL) to prevent a fall in
the event of an accidental disengagement of your
20
Positioning Assembly. Failure to do so may result in
serious bodily injury or death.
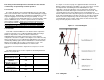
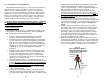
9. Ensure that your Positioning Assembly is tied-off, limiting your
free-fall to 2 feet or less. Always ensure that your side or hip d-
rings are below the level of your anchorage while positioning
(see figure 3.3 below).
10. Ensure that your back-up fall arrest connecting device is rigged
to allow no more than 6 feet of free-fall. It should be anchored at
or above the level of your back D-ring while you are positioning
(see figure 3.3 below).
11. Once your positioning assembly and back-up fall arrest
connecting device are attached to the anchorages, carefully lean
back into a comfortable work position and proceed with your
assigned tasks. Always maintain three points of contact (both
feet, and your positioning device) while working hands-free.
12. If you need to move to another work position, carefully
disconnect your Positioning Assembly from your anchorage and
proceed to your next work position. Ensure that you use your
back-up fall arrest connecting device to remain tied-off at all
times.
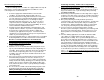
13. In Tower climbing applications, the FallTech 7084 and 7085
series FBH’s are equipped with side or hip D-rings on the
belt/waist pad assembly. These specific Full Body Harnesses
also feature a pair of D-rings mounted to the seat sling. These
D-rings on the seat sling maybe be used as an alternative to the
side or hip D-rings for prolonged periods of Work Positioning,
allowing you greater comfort and support. Should you choose to
use the seat sling for Work Positioning, attach your Positioning
Assembly or Spreader Hook Assembly to the seat sling D-rings
as described in step six above, and then proceed as instructed in
steps 7 – 12. Always use a back-up fall arrest connecting device
when positioning in any application! (See Figure 3.4 below).