
Installation Guide


Fanaway Meridian Installation Instructions
4 | P a g e M E R I D I A N
V e r s i o n 1 . 0 0 1 / 2 0 2 0
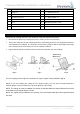
1
Mounting bracket x 1
9
• Wood screw x 2
2
Canopy x 1
• Machine screw x 2
3
Down rod with ball joint x 1
• Flat washer x 2
4
Bolt and pin cover x 1
• Spring washer x 2
5
Bolt x 1
10
Wire nut x 6
6
Pin x 1
11
Receiver & Remote x 1 Set
7
Fan assembly x 1
12
LED bulb x 3
8
Lamp base and shade x 1
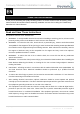
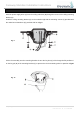
INSTALLING THE MOUNTING BRACKET
If there isn’t an existing outlet box, then install one using the following instructions:
• Disconnect the power by removing the fuses or turning off the circuit breakers.
• Secure the outlet box (A) (not included) directly to the building structure. Use appropriate fasteners
and materials (not included). The outlet box and its bracing must be able to fully support the weight
of the moving fan (at least 70 lbs). Do not use a plastic outlet box.
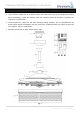
• Figures below show three different ways to mount the outlet box (A) (not included).
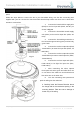
This fan hanging system supports a maximum 15 degree angled ceiling installation. Fig. 4
NOTE: If you are installing the ceiling fan on a sloped ceiling, you may need a longer downrod to
maintain proper clearance between the tip of the blade and the ceiling.
NOTE: The ceiling fan must be installed in a location so that the blades are spaced 300mm from the tip
of the blade to the nearest objects or walls.
NOTE: For angled ceiling installation, the opening of the mounting bracket (B) must be pointed toward
the peak.
Fig. 2
Fig. 3
Fig. 4
Angled ceiling
Maximum 15°