
Installation Guide


Fanaway Meridian Installation Instructions
8 | P a g e M E R I D I A N
V e r s i o n 1 . 0 0 1 / 2 0 2 0
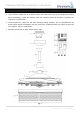
ELECTRICAL WIRING DIAGRAM
WARNING: To avoid possible electrical shock, be sure you have turned off the power at the main circuit
panel.
Follow the steps below to connect the fan to your household wiring. Use the wire connecting nuts
supplied with your fan. Secure the connectors with electrical tape. Make sure there are no loose wire
strands or connections.
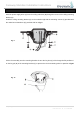
1. Connect the household live supply wire
(black) to receiver input wire (black, AC IN L) as
shown in Fig. 11.
2. Connect the household neutral supply
wire (white) to the receiver input wire (white, AC
IN N).
3. Connect the household ground wire to
the fan bracket ground wire (green) and fan body
ground wire.
4. Connect the reveiver output wire (black,
TO MOTOR L) to motor live input wire (black, TO
MOTOR L).
5. Connect the receiver output wire (white,
TO MOTOR N) to motor neutral input wire (white,
TO MOTOR N)
6. Connect the receiver output wire (blue,
FOR LIGHT) to fan light live input wire (blue,
FOR LIGHT)
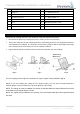
7. After connecting the wires, spread
them apart so that the green and white wires are
on one side of the outlet box and the black and
blue wires are on the other side.
8. Turn the connecting nuts upward and
push the wiring into the outlet box.
Fig. 11
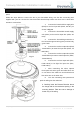
9. Carefully insert the Remote Receiver above
the hanger ball in the remainder spacing in the
mounting bracket. Take care not to damage or
loosen any of the wiring.