
Installation Guide

How to Assemble Your Ceiling Fan (Continued)
8
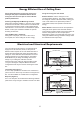
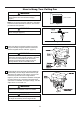
7. Cut off excess lead wire approximately 6 to 9 inches
above top of the downrod. Strip insulation off 1/2 inch
from the end of each lead wire. (Figure 7)
NOTE: All set screws must be checked, and
retightened where necessary before installation.
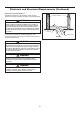
8. Remove one of the two shoulder screws in the
hanger bracket and retain the screw for later. Loosen
the second shoulder screw without fully removing it.
(Figure 8)
Figure 8
Hanger Bracket
Figure 1
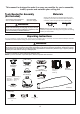
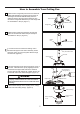
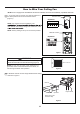
How to Assemble Your Ceiling Fan Blades
x 9
x 3Blade Plate
3/16”-24
Serrated Head
Screws
HARDWARE USED:
3/16”-24 Serrated Head
Screw (3 per blade)
INSTALLATION NOTE
Do not connect fan blades until the fan is completely
installed. Installing the fan with blades assembled may
result in damage to the fan blades.
WARNING
To reduce the risk of personal injury, do not bend the
blades when installing, balancing or cleaning the fan.
Do not insert foreign objects in between the rotating
blades.
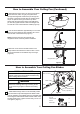
1. Slide blades through slots in motor assembly. Make
sure the blade is fully seated against the blade holder
of motor assembly. Place blade plate over the blade with
holes alingned and assmble blade to blade holder using
serrated head screws. Tighten screws firmly, but do not
over-tighten. (Figure 1)
Motor Assembly
Blade Holder
Blade
Blade Plate
6. Reinstall the hanger ball on the downrod as follows.
Route the
brown, blue, red, gray and yellow wires
through the hanger ball. Position the pin through the
two holes in the downrod and align the hanger ball so
the pin is captured in the groove in the top of the
hanger ball. Pull the hanger ball up tight against the
pin. Securely tighten the set screw in the hanger ball.
A loose set screw could create fan wobble. (Figure 6)
Figure 6
Figure 7