
Android Guide


12
9. Using the fanSync application, make sure you are in the fan control screen and tap the
learn button.
If your Fanimation ceiling fan successfully paired with your fanSync DC control, the fan should
start spinning. Your fan will now spin for a minute in each direction before making itself available
to be controlled with the fanSync application.
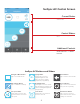
TIP: To determine what type of remote your fan uses, flip it over and remove the battery cover and compare what you see
with Figure XXX. The remote on the left is 4-bit. The remote on the right is 16-bit.
10. Make your selection by tapping on either 4-bit or 16-bit.
If your ceiling fan successfully paired with your fanSync DC control, the fan should start spinning.
Your fan will now spin for a minute or two in each direction before making itself available to be
controlled with the fanSync application.
Edit Your Fan’s Settings
After you have setup your device, you may find that you want to edit the name or change some general settings. You can do
this easily with the edit settings feature. Follow the steps below:
1. With the fanSync app open on your Android device, navigate to the fans list screen.
2. Locate your fan in the list and tap on it.
The fan control screen will load.
3. In the top right corner of the fan control screen there is an edit button, tap this button.
The settings screen will load. Make all desired changes and press the save button.
TIP: Alternatively, you can get to the settings screen directly from the fans list by following these steps:
1. From the fans list screen, locate your fan and swipe it to the left.
The locate button and edit settings button will appear.
2. Tap the edit settings button.
The settings screen will load. Make all desired changes and press the save button.