
Android Guide

9
Set Up fanSync AC For The First Time
1. Locate the fanSync icon on your Android device and tap it.
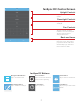
fanSync application will launch and load the fans list. For a fan to appear in this list, your fanSync
receiver must be properly installed in your ceiling fan and it must be receiving power. Your
Android device needs to also have Bluetooth turned on.
TIP: If your fan is connected to a light switch, make sure the light switch is on.
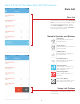
2. If this is the first time setting up your fan, it will appear in the list with the label tap to setup.
Tap the button to set-up the fan.
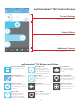
fanSync will load the edit fan screen.
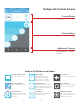
3. In the fan name field, enter the name you wish to give to your fan. Ie. bedroom, kitchen,
kids room, etc.
When you are finished typing, you can hide the keyboard. Tapping another selection will also
cause the keyboard to hide automatically. Next, you will need to answer a series of yes or no
questions. No is the default answer.
4. If your fan has a light, tap yes.
The yes option will become highlighted with blue to indicate your selection; the next question
will become enabled as well. If you tapped no you can skip to step number 6.
5. If your ceiling fan’s light is currently using a dimmable bulb, tap yes.
WARNING: If your bulb is not dimmable and you enable this feature, dimming your bulb could cause it to malfunction.
6. If you can change the direction of your fan from a remote or a wall switch, tap yes.
The yes option will become highlighted blue to indicate your selection.
7. Tap Save
Your settings will be saved and fanSync will navigate you back to the fans list screen.