
Installation Guide

FastenMaster
®
VersaClip
™
Installation Instructions
IMPORTANT! Read all instructions carefully to ensure proper installation.
WARNING! Parts have sharp points & edges. Use extreme caution when handling
& installing. Wear safety glasses at all times.
Tools & Materials Needed
Power screw gun with
ratcheting torque setting
Safety Glasses Router
(Optional)
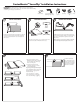
INSTALL FIRST BOARD POSITION FASTENERS
COMPLETING INSTALLATION OF BOARDS INSTALLING LAST BOARD
HOUSE
LEDGER BOARD
START/STOP CLIP
ScrewStart/Stop
Clip
VersaClip
INSTALL FIRST FASTENER
CORRECT
DECKING BOARD
INCORRECT
DECKING BOARD
1 2 3
4
5
Install screw straight down through Start/Stop clip and
into ledger board. Screw should be in line with center
of joist. It is important that this board is straight and
well secured.
To nish, install Start/
Stop clip and install screw
at a 45° angle through clip
tab and into joist. Install a
vertical fascia board ush
with deck board surface.
While standing on deck board, install provided screw
at 45° angle through clip and into joist, while applying
pressure on clip. Install one clip and screw at each
support joist.
Make sure clip body is vertical to deck board and the
screw holding fastener down tight to deck board.
Fully insert VersaClip into grooved edge of deck board.
Screw hole should be in line with center of joist.
1. Place next board into position.
Holding the deck board 2" back from
clip, push deck board with enough
force to lock into place.
2. Check gap between boards for
consistency. Apply force to ensure
board is fully installed.
Repeat steps 2 through 4 until complete.
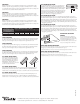
VersaClip hidden fasteners will provide
the following proper gapping when
installed correctly:
Lowe's ChoiceDeck®:
3
⁄16" gapping
Lowe's Style Selections:
3
⁄16" gapping
Trex® Grooved Decking:
1
⁄4" gapping
FASCIA BOARD
LEDGER BOARD
3
⁄16"