
Installation Guide

Universal Hidden Deck Fastener
SKU: VCINSTR
TOOLS REQUIRED
No special tools are required when using pre-grooved deck boards, just a drill with screwdriver
tip. When using decking without the grooved edger, a router with proper bit will be needed to
create a groove in board edge at each joist or along the entire edge of the deck board.
TOOLS REQUIRED
No special tools are required when using pre-grooved deck boards, just a drill with screwdriver
tip. When using decking without the grooved edger, a router with proper bit will be needed to
create a groove in board edge at each joist or along the entire edge of the deck board.
TOOLS REQUIRED
No special tools are required when using pre-grooved deck boards, just a drill with screwdriver
tip. When using decking without the grooved edger, a router with proper bit will be needed to
create a groove in board edge at each joist or along the entire edge of the deck board.
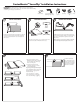
45° ANGLE INSTALLATION
Where deck is in the walled corner of the
house: Always start with small triangular
piece of decking in that corner and work
your way out. When installing VersaClip
hidden fasteners, oset the center
1
⁄2"
towards the long point of joist so screw will
not exit side of joist when driven.
45° ANGLE INSTALLATION
Where deck is in the walled corner of the house: Always start with small triangular piece of
decking in that corner and work your way out. When installing VersaClip hidden fasteners,
oset the center
1
⁄2" towards the long point of joist so screw will not exit side of joist when driven.
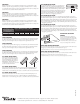
COVERAGE
Multiply the number of joists by the number of decking boards to equal the number of clips
needed. 90 clips will cover approximately 50 sq (using 5.5" decking boards on 16" centers).
To calculate the number of Start/Stop clips needed, multiply the width of deck x .75. If clips will
be used for last board, double the amount calculated above.
BUTT SEAM INSTALLATION
First, install a small framing board (10–12") alongside the joist
in which the seam is going to land. Install additional clip into
previous board above small framing block. Line up rst board in
the center of the joist and the small framing board. Install clips
and screws at each joist of the rst board including the joist at the
seam. en install second board in the same fashion and place a
second clip at the seam attaching it to the small framing block.
Make sure to follow end-to-end gapping specications.
BUTT SEAM INSTALLATION
First, install a small framing board (10–12") alongside the joist in which the seam is going to
land. Install additional clip into previous board above small framing block. Line up rst board
in the center of the joist and the small framing board. Install clips and screws at each joist of the
rst board including the joist at the seam. en install second board in the same fashion and
place a second clip at the seam attaching it to the small framing block. Make sure to follow end-
to-end gapping specications.
USING WITH UNSLOTTED
BOARDS
Use a router with proper routing bit* to
create a groove at every intersection of the
deck board and support joists. A VersaClip
can now be inserted into this groove.
* Contact FastenMaster for the correct router
bit for your decking board. 800·518·3569.
USING WITH UNSLOTTED BOARDS
Use a router with proper routing bit* to create a groove at every intersection of the deck board
and support joists. A VersaClip can now be inserted into this groove.
* Contact FastenMaster for the correct router bit for your decking board. 800·518·3569.
USING WITH UNSLOTTED BOARDS
Use a router with proper routing bit* to create a groove at every intersection of the deck board
and support joists. A VersaClip can now be inserted into this groove.
* Contact FastenMaster for the correct router bit for your decking board. 800·518·3569.
Joist Spacing (on center)
Espaciado entre las Vigas (en el centro)
Espacement entre les solives
(centre à centre)
Fastener Quantity (Packages) Needed
Cantidad de Sujetadores (Paquetes) Necesarios / Nombre de fixations (emballages) nécessaires
100 sq ft 200 sq ft 300 sq ft 400 sq ft 500 sq ft
12"
210 (3) 441 (5) 672 (8) 882 (10) 1113 (13)
16"
175 (2) 336 (4) 512 (6) 672 (8) 848 (10)
DECKING BOARD
DECKING BOARD
SHIFT 1/2"
DECKING BOARD
FastenMaster® and VersaClip™ are trademarks of OMG Inc. Copyright © 2013 OMG, Inc. All rights reserved.
153 Bowles Road, Agawam, MA 01001 800·518·3569 www.FastenMaster.com Made in USA