
Owner manual

OPERATING INSTRUCTIONS
Roseville, MN
Ph: 1-800-444-2373
Fax: 651-645-7390
www.fastestinc.com
WP100 Rev D 11/16/2012
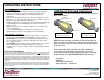
Sleeve Retracted
Test Piece
Collets Expanded
Insert Test Piece
Test Piece Inserted
Sleeve Forward
Test Media Port/
Termination Port
Test Media Port
Sleeve Retracted
Collets Expanded
Push Knob forward
Rear Knob fully
pushed forward and
Sleeve retracted
Rear Knob
Installation:
Connect hose securely to the termination port of the connector.
1/8” NPT tighten to a maximum torque of 12 ft-lbs.
1/4” NPT tighten to a maximum torque of 25 ft-lbs
Op
eration:
Connecting Action:
1. With sleeve manually retracted and collets expanded, test piece can be
inserted. Collets will open to allow insertion of test piece.
2. Insert test piece and slide sleeve forward collapsing collets around test
piece.
• CAUTION: The maximum rated pressure is stamped on the connector body. Be-
fore using, verify that this pressure rating is within your working pressures.
• WARNING: Tug on the connector to assure proper engage
ment and gripping be-
fore introduction of pressurized media.
• DO NOT force connector onto test part when connecting. The split collet design
should easily mate with test piece. Forcing the connector will result in poor sealing
and possible leakage.
• DO NOT turn or rotate connector after the collets have gripped the test piece.
Damage to test piece and the connector’s internal parts may result.
3. Activate test media through connector test port. Pressure will enhance the
seal.
Pressurized:
During pressurization, the test media port will extend out from the connector.
This motion will lock the connector to prevent accidental removal. DO NOT
obstruct this movement.
Disconnecting Action:
1. Deactivate test pressure.
2. Push on back side of rear knob and retract sleeve simultaneously.
P
ush knob forward as far as it will go when disconnecting from test
piece, this helps to reset the inner piston.
3. Remove connector from test piece.