
Operation Manual


5 Manual magnetic drilling machines
3. Operating instructions
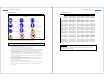
4.1 Hole cutter selection
Before starting to drill make sure the cutter of your choice is the right one for the job you want to
do. Following cutters are available in the Fe Powertools program:
6 Manual magnetic drilling machines
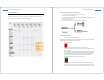
4.2 How to mount tools or adapters in a Weldon arbor?
1) Make sure the machine is disconnected from the power supply.
2) Put the center pilot in the cutter hole.
3) Put the cutter or adapter in the arbor, making sure the flat sides are exactly in front of the
arbor retaining screws (picture 1).
4) Tighten the retaining screws.
5) Check if the center pilot can move inside the cutter (up and down).
4.3 Drilling with hole cutters
1 Place the machine at the desired position
TIP: For 100% magnet clamping force you need at least 10 mm of steel. Coatings, paintings and dirt
between magnet and workpiece will affect clamping force.
2 Switch on the magnet
3 Ensure that the magnetic drilling unit is secure on the working piece.
4 Fill the arbor with lubrification/cutting oil in the special meant holes. Always use cutting
oil from your dealer.
5 Set the right RPM by adjusting the gear switch and/or variable speed control. (models FE
32 R/L, FE 50 R/L and FE 100 R/L). The gear switch can be found on the side of the gear
box. Variable speed for FE 32 R/L is placed on the control panel. The variable speed
adjust of FE 50 R/L and FE 100 R/L can be found on the side of the drilling unit.
6 Start the motor by pressing the green motor start button (I).
7 Start bringing the cutter to the workpiece but handle with care and do not apply too
much pressure. The cutter has to find its way in to the material by itself. After 2 mm, the
groove of the cut will help the cutter maintain its place and you can increase the power.