
Installation Sheet

(E) 12/04
ASSEMB LY I NST R UCT I ONS FOR F1938/8+4
MUR R AY FEI SS
©M UR R AY FEI SS I M PO RT LL C.
IMPORTANT
TURN OFF THE POWER AT THE MAIN FUSE
OR CIRCUIT BREAKER BOX
BEFORE STARTING INSTALLATION
Carefully unpack and identify all parts
before assembly. Bulbs are not included.
1. Middle Tier Assembly:
A. Spread open middle tier arms so they are
evenly spaced to each other.
B. Screw threaded pipe into coupler located
at bottom section of center body. Then slip
notched cap in order to lock arms into position.
Fasten with small finial.
2. Upper Tier Assembly:
A. Thread fixture wires, located above center
body, through center column and fixture loop.
Screw center column onto top of center body.
Then screw fixture loop onto top of
center column.
B. Install bottom section of upper tier arm
onto threaded stud located at middle tier arm
by fastening with ball cap nut. Then install
upper section of upper tier arm onto threaded
stud located at center column by fastening
with ball cap nut. Repeat other arms.
3. Lower Tier Assembly:
A. Spread open lower tier arms so they are
evenly spaced to each other. Then install the
arms onto middle tier arms by fastening with
ball cap nuts.
B. Install large finial onto bottom section of
lower tier arm.
4. Follow enclosed “Chain Suspended Fixture
Installation Instructions” for electrical and
fixture installation onto ceiling outlet box.
5. Hang all crystal glass parts as shown on
drawing. NOTE: To replace broken crystals
extras are included in hardware bag. Replace
by gently bending open pins, remove broken
crystal, hook new one, then close back pins.
Avoid bending pins into sharp angle.
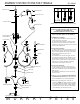
Fixture Loop
Fixture Wire and
Ground Wire
Bulb
(not included)
Candle Tube
Socket
Notched Cap
Small Finial
Large Finial
Ball Cap Nut
Threaded Pipe
Ball Cap Nut
Small Steel Plate
Ball Cap Nut
Upper Tier Arm
Middle Tier Arm
Bottom Tier Arm
Center Column
Center Body
1
1
1
1
1
1
1
3
2
1 PC.1 PC.
31 2
52 PCS.
NOTE: Spare crystals enclosed in hardware bag.