
Installation Guide

4 WWW.FEIT.COM
Retain this manual for future use.
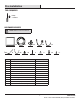
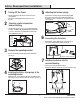
Junction Box Installation
Fig. 2
EE
BB
JJ
GG
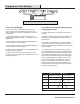
4
Installing the mounting bracket
to the junction box
5
Installing the xture to the
mounting bracket
□ Install the mounting bracket (BB) to the J-box by
inserting the two mounting screws (II) through the slots
in the mounting bracket.
□ Make sure the mounting bracket (BB) is installed with
the label facing downwards (See Fig. 3).
Fig. 3
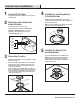
□ Secure the xture (AA) to the mounting bracket
(BB) by pressing the xture into the mounting
bracket until the clips on the xture engage
together. Make sure the xture is rmly locked
into place (See Fig. 4).
II
Fig. 4
BB
AA
□ Use the slide switch to choose a color
temperature before installing. Soft White (SW),
Bright White (BW), Daylight (DL) or choose to
adjust the color temperature from the wall
switch (SWITCH) (See Fig. 1).
Soft White
3000K
Bright White
4000K
Daylight
5000K
Switch*
Fig. 1
1
Turning Off the Power
3
Connecting the wires
2
Choosing a color temperature
before installing
□ Turn the power OFF at the switch and fuse box or the
circuit breaker.
□ Identify the wiring: (Black - line voltage, White - neutral
and Green - ground)
□ Connect the stripped wires with male connector (EE)
to the two wires coming from the J-box: Black - line
voltage to Black, White - neutral to White, using wire
connectors provided (JJ).
□ Ensure the xture is properly grounded according to
local code requirements. Connect the ground wire (GG)
to the mounting bracket (BB) as shown in Fig. 2 and
connect to the ground wire in the J-box with the wire
connectors provided (JJ)
BB