
Installation Guide

5 WWW.FEIT.COM
Please contact 1-866-326-BULB (2852) for further assistance.
5/6 In. Recessed Can Installation
1
Turning Off the Power
2
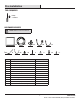
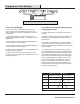
Choosing a color temperature
before installing
□ Use the slide switch to choose a color temperature before
installing. Soft White (SW), Bright White (BW), Daylight (DL)
or choose to adjust the color temperature from the wall
switch (SWITCH) (See Fig. 1).
□ Install the E26 adapter (DD) into the socket (See Fig. 5).
□ Connect the two terminals together (See Fig. 6)
6
Connecting the terminals
Soft White
3000K
Bright White
4000K
Daylight
5000K
Switch*
Fig. 1
Connect the orange connectors
Fig. 5 Fig. 6
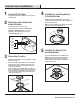
Fig. 2
BB
AA
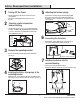
□ Turn the power OFF at the switch and fuse box or the
circuit breaker.
□ Remove the existing trim installed in the recessed
housing
3
Remove the mounting bracket
□ Remove the mounting bracket (BB) from the xture (AA)
(See Fig. 2).
4
Installing the 5/6 in. clip springs to the
mounting bracket
CC
LL
BB
Fig. 3
□ Insert the torsion springs (FF) into mounting bracket (BB).
□ The position of the torsion springs will vary depending on
the diameter of the recessed housing. See figure 4 for the
correct position.
5
Adjusting the torsion springs
Fig. 4
5 in. position
BB
FF
KK
6 in. position
□ Install the 5/6 in. torsion brackets (CC) to the mounting bracket
(BB) using four torsion bracket screws (LL) provided. (See Fig. 3)
7
Installing the xture into the
recessed housing
□ Install torsion spring into xture bracket.
□ Gently push the xture into the recessed housing (See Fig. 7).
Fig. 7