
Installation Guide


Cross Rail Installation
IMPORTANT: Through temperature changes of seasonal weather, Wood Composite Fencing will experience thermal expansion in the
pickets and cross rails. To anticipate this expansion movement, our instructions include installation steps which need to be followed to
prevent pressure from building in the fence during the hot summer months. Following these preventive steps will ensure a long lasting
fence through the years. Avoid installing below 40 degrees.
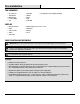
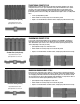
USE RAIL & BRACKET LOCATOR
Place Rail and Bracket Locator template square against the post. Slide Bracket into location. Attach with provided screws.
ADD CROSS RAILS IN BRACKETS
Mark the Bracket hole locations on the Post and Cross Rail ends. Pre-drill the holes to prevent splitting the ends of the wood insert or the
composite sleeve. Slide Cross Rails into Brackets. Attach with provided screws through bracket screw slots. Skip using screw where picket
covers bracket.
Screw/Bracket Slot Locations: Top Rail = Tighten screws into slot-top Middle Rail = Touch Tighten into slot bottom Bottom Rail = Touch Tighten into slot bottom
NOTE: Avoid applying screws to top 5 Inches of post tops.
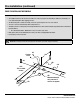
Cross Rails
Rail & Bracket
Locator Template
Side Mount Brackets All Purpose Posts
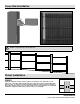
6 in.
12 in.
30 in.
Ground to
post top
72 in.
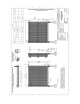
All Purpose Post Installation
1
Dig hole:
□ Dig hole 12 in. wide x 30 in. deep.
2
Add Gravel
□ Add 6 in. gravel (depth now = 24 in.)
3
Set Post
□ Add 160 lbs of concrete.
4
Next Post
□ Set post at a maximum of 72 in. post-center to post-center.