
Installation Guide
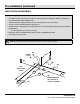

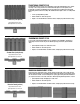


All Purpose Post Installation
1
Dig hole:
□ Dig hole 12 in. wide x 32 in. deep.
2
Add Gravel
□ Add 6 in. gravel (depth now = 26 in.)
3
Set Post
□ Add 160 lbs of concrete.
4
Next Post
□ Set post at a maximum of 68 in. post-center to post-center.
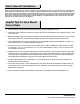
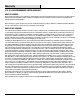
Cross Rail Installation
IMPORTANT: Through temperature changes of seasonal weather, Wood Composite Fencing will experience thermal expansion in the
pickets and cross rails. To anticipate this expansion movement, our instructions include installation steps which need to be followed to
prevent pressure from building in the fence during the hot summer months. Following these preventive steps will ensure a long lasting
fence through the years. Avoid installing below 40 degrees.
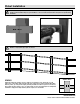
USE RAIL & BRACKET LOCATOR
Pre-drill rail ends first, centering hole 1 in. from rail ends with 1/2 in. drill bit. Slightly angling the hole toward post center. Do not pre-drill
posts. Place Rail & Bracket Locator template square against the post. Slide rails into the notched out areas of the template, flipping it after
one side of this face is done. Repeat process on the other side of the face. (Ends and corners excepted). Use 4 1/2 in. HeadLOK
™
Fasten-
Masters
®
, Heavy Duty Flathead Screws. Apply screws to bottom of the pre-drilled rail holes, leave screws loose, touch tighten. No nails or
deck screws. Space rail ends 1/4 in. apart. This is necessary for the thermal expansion of the rails and pickets, which you can read below.
Cross Rails
Rail & Bracket
Locator Template
HeadLOK™ Fasten-Masters
®
Heavy Duty Flathead Screws
All Purpose Posts
6 in.
12 in.
32 in.
Ground
View
Picket
Post