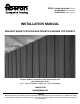
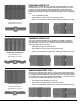
STYLE BOARD ON BOARD (Privacy) SHADOWBOX (Semi-Private) TRADITIONAL (Semi-Private) INSTALLATION MANUAL BRACKET MOUNT FOR DOG-EAR PICKETS & SQUARE TOP PICKETS Questions, problems, missing parts? Before returning to the store, call Fiberon Customer Service 8 a.m. - 7 p.m., EST, Monday - Friday, 9 a.m. - 6 p.m., EST, Saturday 1-800-215-2740 FIBERONFENCING.COM THANK YOU We appreciate the trust and confidence you have placed in Fiberon through the purchase of this fencing.
Pre-Installation TOOLS REQUIRED □□ Air compressor □□ Staple Gun □□ Tape Measure □□ Hammer □□ Wheel Barrow □□ Clamp □□ Post Hole Digger □□ Level □□ Saw □□ Power Drill □□ Rail & Bracket Locator Template (provided) SUPPLIES □□ Quick Set Concrete □□ Galvanized Staples Leg: 1 1/4 / 1 1/2 in.
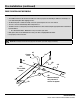
Pre-Installation (continued) PRIOR TO INSTALLING THE FENCING LAYOUT (See Diagram): □□ 2A. Establish total area to be fenced. Insert stakes 6 in. inside of proposed area extending an additional 3 ft. laterally so as not to disturb string lines when digging post holes. □□ 2B. Attach string line to staked area. Verify corners are square using the 3 ft. x 4 ft. x 5 ft. method. □□ 2C. Fence corners are determined by where strings intersect. □□ 2D.
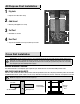
All Purpose Post Installation 1 Dig hole: □□ Dig hole 12 in. wide x 30 in. deep. 2 12 in. Add Gravel □□ Add 6 in. gravel (depth now = 24 in.) 3 30 in. Set Post □□ Add 160 lbs of concrete. 4 6 in. Next Post □□ Set post at a maximum of 72 in. post-center to post-center. Cross Rail Installation IMPORTANT: Through temperature changes of seasonal weather, Wood Composite Fencing will experience thermal expansion in the pickets and cross rails.
Cross Rail Installation NOTE: For sloping landscape, step brackets down. Picket Installation STAPLES Staple Pattern Holding the staple gun sideways, shoots 4 staples in a box pattern in each “picket and cross rail intersection” so the staples hide vertically in the grain of the picket. To prevent staple buckling when fired into pickets, go slow, push the staple gun firmly and make sure the fence panel is not bouncing back towards the gun. Shorter 1 1/4 in.
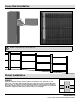
TRADITIONAL PICKET STYLE Traditional style consists of 14 Dog-ear and 10 Square Top pickets between posts, and it is important to leave a 1/8 in. space in between each picket. A minimum of 1/8 in. picket spacing is a necessary precaution to avoid the thermal expansion of the pickets, from pushing into each other and building pressure. A small space in between the pickets will prevent the pickets from ever touching. The Traditional Picket Style is more of a semi-private fence. □□ 1/8 in.
Gate Frame Kit Installation Follow the Gate Frame Kit instructions in the box to install each gate. All hardware is included. Use 1 gate frame kit for a single gate; use 2 gate frame kits for a double drive gate. Gates are designed to “swing in.” Gate pickets need a minimum of 4 in. above the ground grade to swing properly. Pickets should be installed in a single layer Tradition Picket Style row for gates only.
Warranty 15 & 10 YEAR PERFORMANCE LIMITED WARRANTY WHAT IS COVERED Fiberon Fencing is backed by a 15-year limited pro-rated warranty on fence pickets and backer rails. Fence posts are covered by a 10-year limited pro-rated warranty. When installed correctly, your composite fencing is guaranteed to remain free from rot, fungal degradation, checking, splintering and delamination. Fiberon Fencing is a system of pickets, rails, and posts and must be installed according to guidelines to validate the warranty.
PAGE 8
PAGE 9
PAGE 10
PAGE 8
PAGE 9
PAGE 10
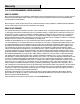
STYLE BOARD ON BOARD (Privacy) SHADOWBOX (Semi-Private) TRADITIONAL (Semi-Private) INSTALLATION MANUAL FACE MOUNT FOR DOG-EAR & SQUARE TOP PICKETS Questions, problems, missing parts? Before returning to the store, call Fiberon Customer Service 8 a.m. - 7 p.m., EST, Monday - Friday, 9 a.m. - 6 p.m., EST, Saturday 1-800-215-2740 FIBERONFENCING.COM THANK YOU We appreciate the trust and confidence you have placed in Fiberon through the purchase of this fencing.
Pre-Installation TOOLS REQUIRED □□ Air compressor □□ Staple Gun □□ Tape Measure □□ Hammer □□ Wheel Barrow □□ Clamp □□ Post Hole Digger □□ Level □□ Saw □□ Power Drill □□ Rail & Bracket Locator Template (provided) SUPPLIES □□ Quick Set Concrete □□ 4 in. Lag Screw (for Face Mount Install) □□ Gravel □□ Galvanized Staples Leg: 1 1/4 / 1 1/2 in.
Pre-Installation (continued) PRIOR TO INSTALLING THE FENCING LAYOUT (See Diagram): □□ 2A. Establish total area to be fenced. Insert stakes 6 in. inside of proposed area extending an additional 3 ft. laterally so as not to disturb string lines when digging post holes. □□ 2B. Attach string line to staked area. Verify corners are square using the 3 ft. x 4 ft. x 5 ft. method. □□ 2C. Fence corners are determined by where strings intersect. □□ 2D.
All Purpose Post Installation 1 Dig hole: □□ Dig hole 12 in. wide x 32 in. deep. 2 12 in. Add Gravel □□ Add 6 in. gravel (depth now = 26 in.) 3 32 in. Set Post □□ Add 160 lbs of concrete. 4 6 in. Next Post □□ Set post at a maximum of 68 in. post-center to post-center. Cross Rail Installation IMPORTANT: Through temperature changes of seasonal weather, Wood Composite Fencing will experience thermal expansion in the pickets and cross rails.
Picket Installation NOTE: Face Mounting the backer rails makes the installation of each picket style much easier. There is no fitting a fixed number of pickets between the posts, just remember to cover each of the rail seams with some portion of a picket during installation. NOTE: For sloping landscape, angle cut rail ends.
TRADITIONAL PICKET STYLE It is important to leave a 1/8 in. space in between each picket. A minimum of 1/8 in. picket spacing is a necessary precaution to avoid the thermal expansion of the pickets, from pushing into each other and building pressure. A small space in between the pickets will prevent the pickets from ever touching. The Traditional Picket Style is more of a semi-private fence. □□ 1/8 in. spacing between pickets. □□ Pickets install 1 in. above post top and 2 in.
Gate Frame Kit Installation Follow the Gate Frame Kit instructions in the box to install each gate. All hardware is included. Use 1 gate frame kit for a single gate; use 2 gate frame kits for a double drive gate. Gates are designed to “swing in.” Gate pickets need a minimum of 4 in. above the ground grade to swing properly. Pickets should be installed in a single layer Tradition Picket Style row for gates only.
Warranty 15 & 10 YEAR PERFORMANCE LIMITED WARRANTY WHAT IS COVERED Fiberon Fencing is backed by a 15-year limited pro-rated warranty on fence pickets and backer rails. Fence posts are covered by a 10-year limited pro-rated warranty. When installed correctly, your composite fencing is guaranteed to remain free from rot, fungal degradation, checking, splintering and delamination. Fiberon Fencing is a system of pickets, rails, and posts and must be installed according to guidelines to validate the warranty.
PAGE 8
PAGE 9
PAGE 10
PAGE 8
PAGE 9
PAGE 10
STYLE GOTHIC PANEL RANCH RAIL (2 Rail) RANCH RAIL (3 Rail) INSTALLATION MANUAL GOTHIC PICKETS AND RANCH RAIL Questions, problems, missing parts? Before returning to the store, call Fiberon Customer Service 8 a.m. - 7 p.m., EST, Monday - Friday, 9 a.m. - 6 p.m., EST, Saturday 1-800-215-2740 FIBERONFENCING.COM THANK YOU We appreciate the trust and confidence you have placed in Fiberon through the purchase of this fencing. We strive to continually create quality products designed to enhance your home.
Pre-Installation TOOLS REQUIRED □□ Air compressor □□ Staple Gun □□ Tape Measure □□ Hammer □□ Wheel Barrow □□ Clamp □□ Post Hole Digger □□ Level □□ Saw □□ Power Drill □□ Rail & Bracket Locator Template (provided) SUPPLIES □□ Quick Set Concrete □□ Galvanized Staples Leg: 1 1/4 / 1 1/2 in.
Pre-Installation (continued) PRIOR TO INSTALLING THE FENCING LAYOUT (See Diagram): □□ 2A. Establish total area to be fenced. Insert stakes 6 in. inside of proposed area extending an additional 3 ft. laterally so as not to disturb string lines when digging post holes. □□ 2B. Attach string line to staked area. Verify corners are square using the 3 ft. x 4 ft. x 5 ft. method. □□ 2C. Fence corners are determined by where strings intersect. □□ 2D.
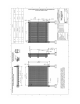
All Purpose Post Installation 1 Dig hole: □□ Dig hole 12 in. wide x 26 in. deep. 2 12 in. Add Gravel □□ Add 4 in. gravel (depth now = 22 in.) 3 Set Post □□ Add 80 lbs of concrete. 4 26 in. 4 in. Next Post □□ Set post at a maximum of 72 in. post-center to post-center. Cross Rail Installation IMPORTANT: Through temperature changes of seasonal weather, Wood Composite Fencing will experience thermal expansion in the pickets and cross rails.
Cross Rail Installation 2 Rail 3 Rail 48 in. 42 in. 40 in. 32 in. 24 in. 10 in. 10 in. Ground NOTE: For sloping landscape, step brackets down. Picket Installation STAPLES Staple Pattern Holding the staple gun sideways, shoots 3 staples into each “picket and cross rail intersection” so the staples hide vertically in the grain of the picket. To prevent staple buckling when fired into pickets, go slow, push the staple gun firmly and make sure the fence panel is not bouncing back towards the gun.
Gate Installation Construct a gate using 2 or 3 rails plus an additional 3 rails. Build a square design, then add a diagonal rail for support to strengthen the gate. Purchase separately heavy duty gate hardware. Ground FIBERONFENCING.COM Please contact 1-800-215-2740 for further assistance.
Warranty 15 & 10 YEAR PERFORMANCE LIMITED WARRANTY WHAT IS COVERED Fiberon Fencing is backed by a 15-year limited pro-rated warranty on fence pickets and backer rails. Fence posts are covered by a 10-year limited pro-rated warranty. When installed correctly, your composite fencing is guaranteed to remain free from rot, fungal degradation, checking, splintering and delamination. Fiberon Fencing is a system of pickets, rails, and posts and must be installed according to guidelines to validate the warranty.
PAGE 5